Ramp up on Kubernetes in minutes via a lightning quick, hands-on crash course where you learn by doing.
This is part 2 of the Docker, Kubernetes, Terraform, and AWS crash course series. In part 1, you got an introduction to Docker, including how to build and run Docker containers. This post will teach you the basics of Kubernetes, the world’s most popular container orchestration tool, by going through a lightning quick crash course where you learn by doing. This course is designed for newbies, starting at zero, and building your mental model step-by-step through simple examples you run on your computer to do something useful with Kubernetes — in minutes. If you want to go deeper, there are also links at the end of the post to more advanced resources.
- What is Kubernetes (the 60 second version)
- Deploy a Kubernetes cluster
- Run an app in your Kubernetes cluster
- Explore the app in your Kubernetes cluster
- Manage your app as code
- Further reading
- Conclusion
What is Kubernetes (the 60 second version)
Kubernetes is an orchestration tool, which means it’s a tool for running and managing applications across a fleet of servers. More specifically, it’s a container orchestration tool, which means it is designed to deploy and manage applications packaged as containers (if you’re new to technologies such as containers and Docker, make sure to check out part 1 of this series, A crash course on Docker). You give Kubernetes a fleet of servers to manage and in return, it gives you all the following functionality, out-of-the-box:
- Scheduling: pick the optimal servers to run your containers (bin packing).
- Deployment: roll out changes to your containers (without downtime).
- Auto healing: automatically redeploy containers that failed.
- Auto scaling: scale the number of containers up and down with load.
- Networking: routing, load balancing, & service discovery for containers.
- Configuration: configure data and secrets for containers.
- Data storage: manage and mount data volumes in containers.
Under the hood, Kubernetes consists of two main pieces:

- Control plane: The control plane is responsible for managing the Kubernetes cluster. It is the “brains” of the operation, responsible for storing the state of the cluster, monitoring containers, and coordinating actions across the cluster. It also runs the API server, which provides an API you can use from command line tools (e.g.,
kubectl, as you’ll see later in this post), web UIs (e.g., the Kubernetes Dashboard), and infrastructure as code tools (e.g., Terraform, as you’ll see in part 4 of this series) to control what’s happening in the cluster. -
- Worker nodes: The worker nodes are the servers used to actually run your containers. The worker nodes are entirely managed by the control plane, which tells each worker node what containers it should run.
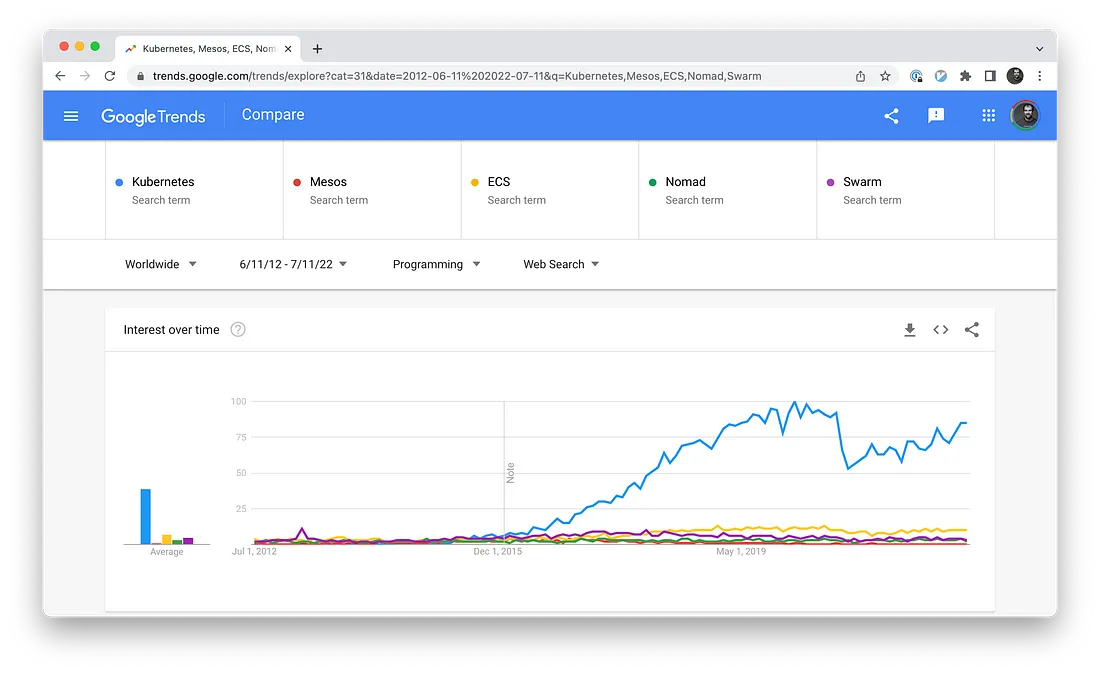
It is widely believed that Kubernetes has won the container wars, beating out the competition (Mesos, Docker Swarm, ECS, Nomad, etc.) to become the most popular container orchestration tool in the world, in use by over 5.6 million developers and at over 50% of companies that run containerized workloads, and still growing incredibly fast (67% growth from 2020–2021). So, it’s well worth your time to learn how to use it. Let’s get started!
Deploy a Kubernetes cluster
Kubernetes is open source, and one of its strengths is that you can run it anywhere: in any public cloud (e.g., AWS, Azure, Google Cloud), in your own data center, and even on your own developer workstation. In part 3 of this series, I’ll show you how you can run Kubernetes in the cloud (in AWS), but for this tutorial, let’s start small, and run it locally. This is easy to do if you installed a relatively recent version of Docker Desktop, as it has the ability to fire up a Kubernetes cluster locally with just a few clicks.
If you open Docker Desktop’s preferences on your computer, you should see Kubernetes in the nav:
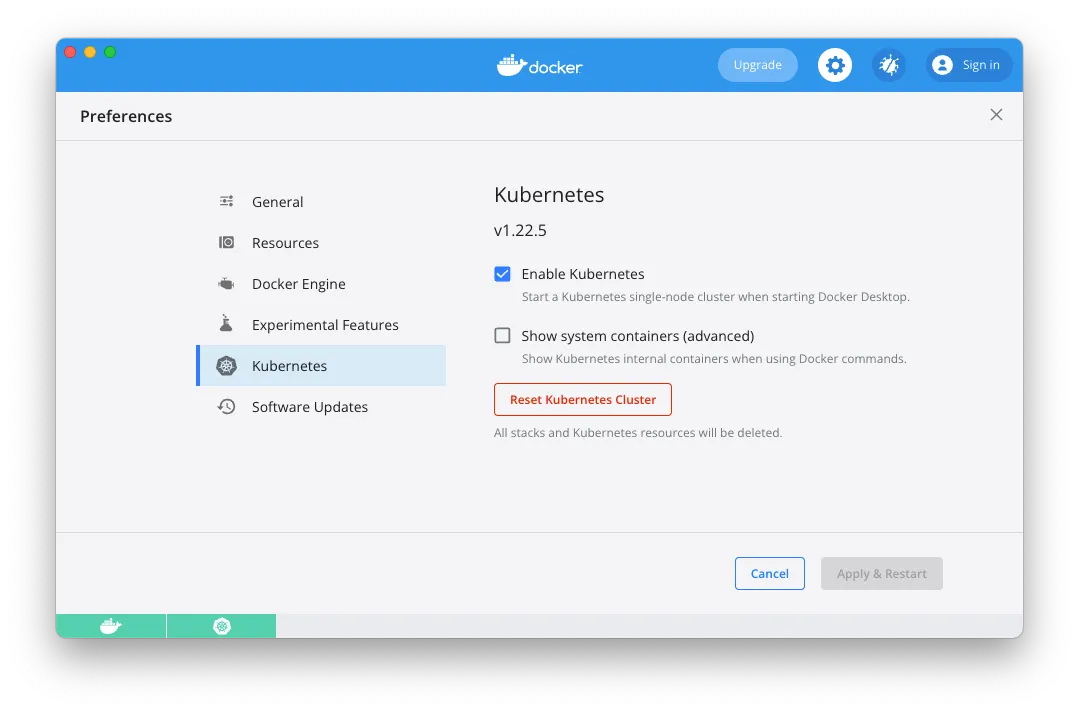
If it’s not enabled already, check the Enable Kubernetes checkbox, click Apply & Restart, and wait a few minutes for that to complete. In the meantime, follow the instructions on the Kubernetes website to install kubectl, which is the command-line tool for interacting with Kubernetes.
To use kubectl, you must first update its configuration file, which lives in $HOME/.kube/config (that is, the .kube folder of your home directory), to tell it what Kubernetes cluster to connect to. Conveniently, when you enable Kubernetes in Docker Desktop, it updates this config file for you, adding a docker-desktop entry to it, so all you need to do is tell kubectl to use this configuration as follows:
$ kubectl config use-context docker-desktop
Switched to context "docker-desktop".
Now you can check if your Kubernetes cluster is working with the get nodes command:
$ kubectl get nodes
NAME             STATUS   ROLES                  AGE   VERSION
docker-desktop   Ready    control-plane,master   95m   v1.22.5
The get nodes command shows you information about all the worker nodes in your cluster. Since you’re running Kubernetes locally, your computer is the only node, and it’s running both the control plane and acting as a worker node. You’re now ready to run some Docker containers!
Run an app in your Kubernetes cluster
To deploy something in Kubernetes, you create Kubernetes objects, which are persistent entities you write to the Kubernetes cluster (via the API server) that record your intent: e.g., your intent to have specific Docker images running. The cluster runs a reconciliation loop, which continuously checks the objects you stored in it and works to make the state of the cluster match your intent.
There are many different types of Kubernetes objects available. For this blog post, let’s use the following two objects:
- Kubernetes Deployment: A Kubernetes Deployment is a declarative way to manage an application in Kubernetes. You declare what Docker images to run, how many copies of them to run (called replicas), a variety of settings for those images (e.g., CPU, memory, port numbers, environment variables), and the strategy to roll out updates to those images, and the Kubernetes Deployment will then work to ensure that the requirements you declared are always met. For example, if you specified you wanted 3 replicas, but one of the worker nodes went down so only 2 replicas are left, the Deployment will automatically spin up a 3rd replica on one of the other worker nodes.
- Kubernetes Service: A Kubernetes Service is a way to expose a web app running in Kubernetes as a networked service. For example, you can use a Kubernetes Service to configure a load balancer that exposes a public endpoint and distributes traffic from that endpoint across the replicas in a Kubernetes Deployment.
You can create a Deployment using the following command:
$ kubectl create deployment simple-webapp \
  --image training/webapp \
  --replicas=2 \
  --port=5000

deployment.apps/simple-webapp created
This command configures the Deployment as follows:
- Name:
simple-webapp. - Docker image: run the training/webapp Docker image from Docker Hub, which contains a simple Python “Hello, World” web app that listens on port 5000 (see part 1 of this series for more info on this Docker image).
- Replicas: run two replicas of the
training/webappimage. - Ports: listen on port 5000.
Next, create a Service using the following command:
$ kubectl create service loadbalancer simple-webapp \
  --tcp=80:5000

service/simple-webapp created
This command configures the Service as follows:
- Name:
simple-webapp. - Type: Load Balancer. This tells Kubernetes to deploy a load balancer to route traffic across your replicas. The exact type of load balancer depends on what sort of Kubernetes cluster you run: e.g., in AWS, this might be an Elastic Load Balancer, whereas in GCP it might be a Cloud Load Balancer.
- Ports: map port 80 in the cluster (on your host OS) to port 5000 in the Docker container.
Give the app a few seconds to boot and then test it out:
$ curl http://localhost
Hello world!
Success!
Explore the app in your Kubernetes cluster
The “Hello world!” output looks nearly identical to the output of the docker run command from part 1 of the series, so what’s the point of the more complicated kubectl commands? Well, let’s look under the hood to see the differences. You can use kubectl**** to explore your cluster. First, run the get deployments**** command:
$ kubectl get deployments
NAME            READY   UP-TO-DATE   AVAILABLE   AGE
simple-webapp   2/2     2            2           3m21s
You can see your Kubernetes Deployment, named simple-webapp, reporting that 2/2 Pods are ready. In Kubernetes, instead of deploying one container at a time, you deploy Pods, which are groups of containers that are meant to be deployed together. The Deployment you created earlier only had a single container in the Pod, but you could’ve, for example, created a Pod with one container to run the web app and another container that gathers metrics on the web app and sends them to a central service (e.g., DataDog).
To get more info on your Pods, run the get pods command:
$ kubectl get pods
NAME                            READY   STATUS    RESTARTS   AGE
simple-webapp-d45b496fd-7d447   1/1     Running   0          2m36s
simple-webapp-d45b496fd-vl6j7   1/1     Running   0          2m36s
So that’s one difference from docker run already: there are multiple containers running here, not just one. Moreover, those containers are being actively monitored and managed. For example, if one crashed, a replacement will be deployed automatically. You can see this in action by running the docker ps command:
$ docker ps
CONTAINER ID   IMAGE             COMMAND           CREATED
b60f5147954a   training/webapp   "python app.py"   3 seconds ago
c350ec648185   training/webapp   "python app.py"   12 minutes ago
Grab the CONTAINER ID of one of those containers and use the docker kill command to shut it down:
$ docker kill b60f5147954a
If you run docker ps again very quickly, you’ll see just one container left running:
CONTAINER ID   IMAGE             COMMAND           CREATED
c350ec648185   training/webapp   "python app.py"   12 minutes ago
But just a few seconds later, the Kubernetes Deployment will have detected that there is only one replica instead of the requested two, and it’ll launch a replacement container automatically:
$ docker ps
CONTAINER ID   IMAGE             COMMAND           CREATED
56a216b8a829   training/webapp   "python app.py"   1 second ago
c350ec648185   training/webapp   "python app.py"   12 minutes ago
So Kubernetes is ensuring that you always have the expected number of replicas running. Moreover, it is also running a a load balancer to distribute traffic across those replicas, which you can see by running the kubectl get services command:
$ kubectl get services
NAME           TYPE          CLUSTER-IP    EXTERNAL-IP  PORT(S)
kubernetes     ClusterIP     10.96.0.1     <none>       443/TCP
simple-webapp  LoadBalancer  10.110.25.79  localhost    80:30234/TCP
The first service in the list is Kubernetes itself, which you can ignore. The second is the Service you created, also with name simple-webapp. This service runs a load balancer for your app: you can see the IP it’s accessible at (localhost) and the port it’s listening on (80). This is why you’re able to access your app at localhost:80.
Kubernetes Deployments also provide automatic rollout of updates. A fun trick with the training/webapp Docker image is that if you set the environment variable PROVIDER to some value, it’ll use that value instead of the word “world” in the text “Hello world!” You can set an environment variable using the kubectl set command:
$ kubectl set env deployment/simple-webapp PROVIDER=Gruntwork

deployment.apps/simple-webapp env updated
This will trigger a rolling update on your app. After a few seconds, test the endpoint again:
$ curl http://localhost
Hello Gruntwork!
And there you go, the Deployment has rolled out your change automatically.
Manage your app as code
Using kubectl commands like create and set is convenient for learning and testing, but it’s not a great way to manage applications in production. A better option is to manage all of your infrastructure as code (IaC). This has a number of benefits—automation, speed, safety, reproducibility, etc—that I’ll cover in more detail in part 4 of this series.
For now, you can improve the situation a little bit by storing the configuration of your Kubernetes objects in YAML files. First, clean up the Service and Deployment from before:
$ kubectl delete service simple-webapp
service "simple-webapp" deleted

$ kubectl delete deployment simple-webapp
deployment.apps "simple-webapp" deleted
Next, create a file called deployment.yml with the following contents:
apiVersion: apps/v1
kind: Deployment
metadata:
  name: simple-webapp
spec:
  replicas: 2
  template:
    metadata:
      labels:
        app: simple-webapp
    spec:
      containers:
      - name: simple-webapp
        image: training/webapp
        ports:
        - containerPort: 5000
  selector:
    matchLabels:
      app: simple-webapp
This configures the exact same Deployment you created earlier with the create deployment command. Next, create a service.yml file with the following contents:
apiVersion: v1
kind: Service
metadata:
  name: simple-webapp
spec:
  type: LoadBalancer
  ports:
    - protocol: TCP
      port: 80
      targetPort: 5000
  selector:
    app: simple-webapp
As you can probably guess, this configures the same Service as you created earlier with the create service command. Deploy these two YAML files using the kubectl apply command:
$ kubectl apply -f deployment.yml
deployment.apps/simple-webapp created

$ kubectl apply -f service.yml
service/simple-webapp created
Give the app a few seconds and test the endpoint:
$ curl http://localhost
Hello world!
Next, try updating deployments.yml to add the PROVIDER environment variable again:
apiVersion: apps/v1
kind: Deployment
metadata:
  name: simple-webapp
spec:
  replicas: 2
  template:
    metadata:
      labels:
        app: simple-webapp
    spec:
      containers:
      - name: simple-webapp
        image: training/webapp
        ports:
        - containerPort: 5000
        env:
          - name: PROVIDER
            value: Gruntwork
  selector:
    matchLabels:
      app: simple-webapp
Run the kubectl apply command one more time:
$ kubectl apply -f deployment.yml
deployment.apps/simple-webapp configured
This will trigger another rolling deployment. Give it a few seconds to complete and then test the endpoint once more:
$ curl localhost:80
Hello Gruntwork!
And there you go! Now, all the information about your Kubernetes objects is stored in files that you can check into version control. This allows you and your team members to carefully update those files, do code reviews, explore Git history to debug issues, and so on. Of course, static YAML files have lots of drawbacks—no support for variables, loops, conditionals, code reuse, etc—so in part 4 of the series, you’ll see how to use Terraform to manage your Kubernetes objects as code.
Further reading
This crash course only gives you a tiny taste of Kubernetes. There are many other things to learn: networking, application configuration, secrets management, service discovery, auto scaling, security policies, and so on. If you want to go deeper, here are some recommended resources:
- Kubernetes Documentation: The official documentation has lots of useful guides. I especially recommend the interactive tutorials and kubectl reference.
- Kubernetes In Action: The best book I’ve found on Kubernetes.
- Terraform: Up & Running. Much of the content from this blog post series comes from the 3rd edition of this book.
Conclusion
You’ve now seen how to use Kubernetes locally to deploy Docker containers, which is great for learning and testing. Let’s now move on to part 3 of this series, where you’ll learn how to run Kubernetes in AWS for production workloads.


- No-nonsense DevOps insights
- Expert guidance
- Latest trends on IaC, automation, and DevOps
- Real-world best practices