Open source, production-ready modules for InfluxDB Enterprise
InfluxDB is an open source, enterprise grade, distributed time series database, optimized for time-based streams of data, metrics and events.
We worked with the InfluxData team to create a set of reusable infrastructure modules that make it easy to deploy and manage InfluxDB Enterprise in AWS. These production-ready modules are built on top of Terraform, Packer and Bash, include thorough documentation, lots of example code and automated tests. Today, we’re happy to announce that we’ve open sourced terraform-aws-influx under the Apache 2.0 license and it’s available on GitHub and the Terraform Registry!
Update, August, 2019: we’ve also open sourced a set of modules for running the TICK stack on GCP!
Quick Start
At the root of the terraform-aws-influx repo is a simple example that makes it easy to try this code out. Create a file called main.tf with the following contents:
provider "aws" {
  region = "us-east-1"
}

module "influxdb" {
  source        = "gruntwork-io/influx/aws"
  version       = "0.0.2"
  license_key   = "0000-1111-2222-3333-4444"
  shared_secret = "xxxxxxxxxxx"
}

output "influxdb_url" {
  value = "${module.influxdb.lb_dns_name}"
}
You’ll need to provide the license key you received after purchasing InfluxDB Enterprise, plus a shared secret which can be any random JWT encoded string. Run terraform init followed by terraform apply, and after a few minutes, you should get an output that looks like this:
Apply complete! Resources: 21 added, 0 changed, 0 destroyed.

Outputs:

influxdb_url = influxdb-cluster-lb-1541268841.us-east-1.elb.amazonaws.com
Install the InfluxDB CLI and run the following command to connect to the cluster:
$ influx -host influxdb-cluster-lb-1541268841.us-east-1.elb.amazonaws.com
If everything went fine, you should be dropped into a REPL and be able to issue InfluxQL commands:
Connected to http://influxdb-cluster-lb-1541268841.us-east-1.elb.amazonaws.com:8086 version 1.6.2-c1.6.2
InfluxDB shell version: v1.6.3
> CREATE DATABASE mydb
> USE mydb
Using database mydb
> INSERT temperature,airport=SFO,measure=celsius value=13
> SELECT * FROM temperature
name: temperature
time                airport measure value
----                ------- ------- -----
1544624439553551126 SFO     celsius 13
Congrats! You have an InfluxDB Enterprise cluster running in AWS!
This example works by deploying an Auto Scaling Group (ASG) with the InfluxDB Enterprise meta and data services running on each node. It also deploys a load balancer in front of the ASG to route requests from the InfluxDB CLI to the data services running on the nodes.

Rolling Up Your Sleeves
The first example you just tried is a great way to experiment with these modules and learn how to use InfluxDB, but it’s not necessarily the way you’d deploy InfluxDB Enterprise in production.
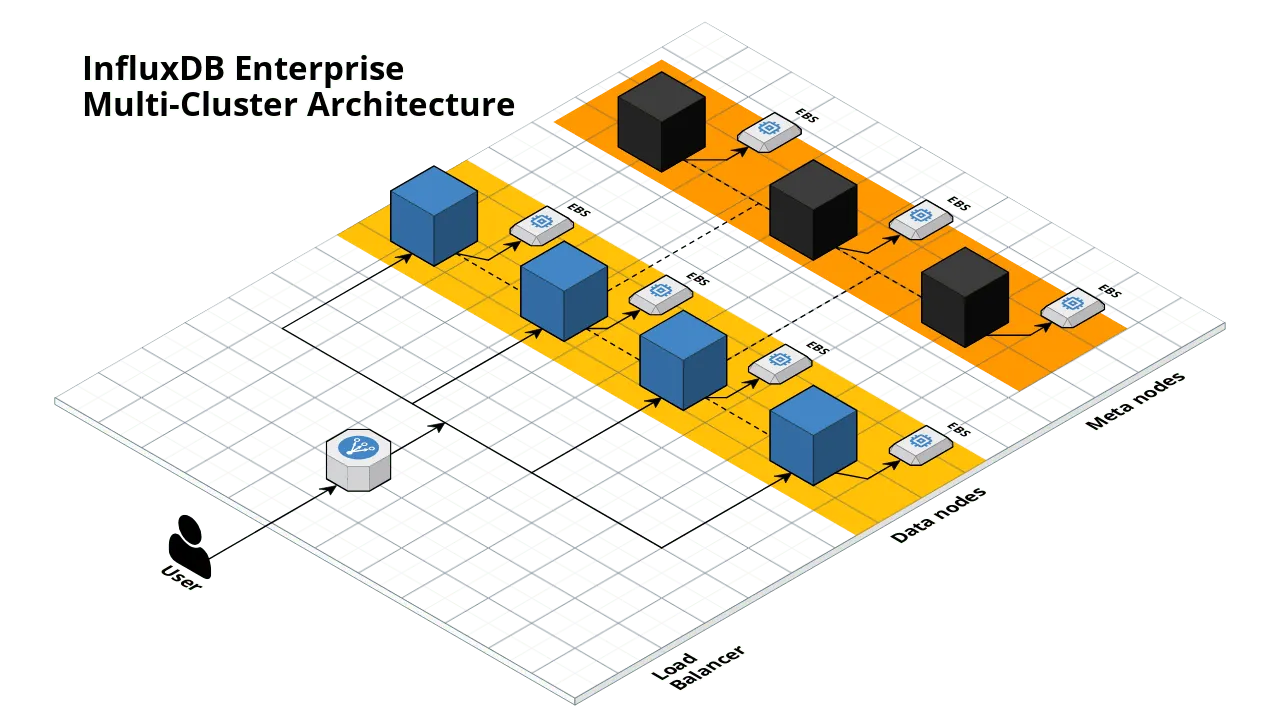
In a production environment, you’d want to run InfluxDB meta nodes and data nodes in separate Auto Scaling Groups so you can scale each separately. The initial number of nodes you set depends on your use case, but the official clustering guide recommends 3 meta nodes and data nodes in multiples of 2, depending on your replication factor.
To try out the multi cluster example, run terraform destroy to un-deploy the first example and then replace the main.tf file with the following contents:
provider "aws" {
  region = "us-east-1"
}

module "influxdb" {
  source        = "gruntwork-io/influx/aws//examples/influxdb-multi-cluster"
  version       = "0.0.2"
  license_key   = "0000-1111-2222-3333-4444"
  shared_secret = "xxxxxxxxxxx"
}

output "influxdb_url" {
  value = "${module.influxdb.lb_dns_name}"
}
As you can see, the only difference between this and the previous example is the value of the source argument. Run terraform init and terraform apply once more, wait a few minutes, and you’ll get the following output:
Apply complete! Resources: 32 added, 0 changed, 0 destroyed.

Outputs:

influxdb_url = influxdb-cluster-data-lb-1926978669.us-east-1.elb.amazonaws.com
You should be able to access the value of the influxdb_url output using the InfluxDB CLI as previously demonstrated.
Making it Yours
The examples you tried out in this blog post are a great start, but since there’s no one size fits all approach, there’s no doubt you might want to customize the code to some level before going to production. At a minimum, you’ll want to tweak the following:
- VPC: To keep things simple, all examples are deployed in the default VPC. For production usage, you’ll most likely want to deploy in a custom VPC instead.
- Authentication: Currently, the deployed InfluxDB cluster doesn’t have any authentication credentials and can be accessed without a username/password. You’ll need to enable HTTP authentication in the sample InfluxDB data node configuration file and rebuild the AMI.
- Secrets: Variables like
license_keyandshared_secretshould not be stored as plaintext in your code. You could instead store/retrieve them using a secrets manager and use environment variablesTF_VAR_license_keyandTF_VAR_shared_secretrespectively, to pass them to Terraform.
Next steps
Check out the terraform-aws-influx repo for more documentation and the source code of the examples used in this blog post. You should also browse through the full list of available submodules to get a sense of all the ways you can use this repo. Take the code for a spin and let us know how it works for you!
Get your DevOps superpowers at Gruntwork.io.


- No-nonsense DevOps insights
- Expert guidance
- Latest trends on IaC, automation, and DevOps
- Real-world best practices