As a developer, I need to manage many pieces of sensitive information securely. I never want a secret I’ve been entrusted with to leak accidentally, yet I also need fast access to my secrets during development and debugging.
How can one balance these two tensions between ease of use and security?
In this blog post, I’ll show you how I leverage BitWarden CLI and shell functions to create a simple workflow that allows you to unlock your secrets into environment variables whenever needed, without requiring you to hardcode secrets into your dotfiles.
Introducing the super secure shell secret series
This is the first in a series of posts where we’ll walk you through the why and how of:
- Securely storing your secrets in a password manager that has a command line interface
- Only loading your secret tokens into your shell when they are actually needed, via shell functions (we’ll provide you the working code, too!)
Posts:
- How to securely store secrets in BitWarden CLI and load them into your ZSH shell when needed (This post!)
- How to securely store secrets in OnePassword CLI and load them into your shell when needed (How we do it at Gruntwork) — COMING SOON
- How to securely store secrets in
passand only load them into your shell when needed — COMING SOON
Demo of the shell function in action
Here’s a quick demo to show you exactly what this looks like.

As you can see, initially the user’s shell has no GitHub token environment variables set. Immediately after running the load_github shell function and entering the BitWarden password, the GitHub token stored in BitWarden as a secure note is exported into environment variables and available for use.
Note, also, that we can choose to export our secret into several different environment variables, as needed.
For example, at Gruntwork we prefer to use GITHUB_OAUTH_TOKEN whenever our scripts or tools need access to GitHub’s API, but the GitHub command line tool, gh, expects GITHUB_TOKEN for the same purpose.
You can implement this same logic in your own shell function or customize it as you wish. A little further on in this post I’ll share the full source code you can use to start employing this secure workflow on your own machine.
Why I settled on this workflow
There’s a number of advantages to storing your secrets this way, and only loading them as needed into a particular shell:
No secrets stored in plaintext
It’s tempting to write commonly used secrets as static environment variables that are exported from your .bashrc , .zshrc , or a similar file. The problem with this approach is that your secrets are stored in plaintext.
If you ever decide you want to version control, publish and share your dotfiles, briefly lend your system to your colleague, etc, you’ll need to comb through all of them to find and remove secrets first.
By default, my tokens are not exposed
I never need to worry about my secrets being exposed to third party scripts or processes because I’m only ever loading my secrets when I want to, as needed, on a per-shell basis. This is more intentional and explicit than leaving your secrets exposed as environment variables 24/7.
It’s still fast
The only real overhead to this process is how many times, on average, you typo your master vault password when filling it in. Otherwise, it’s a single command to load my secret whenever needed.
It enables context switching between different secrets
You can extend this same pattern and have a different function per secret. For example, you may commonly need to authenticate to two different private GitHub organizations using two different tokens (as we often do at Gruntwork!) I’ve implemented load_github and load_git_xargs_github shell functions on my machine for exactly this purpose.
Now, instead of needing to look up and insecurely copy out my desired token each time I want to authenticate against a different GitHub organization, I can simply call two different functions as needed.
This approach makes it simple to do a side by side diff — you could imagine making API calls in two side-by-side buffers in your terminal, each with a different secret loaded, in order to sanity check differences in responses.
If you’re convinced this new workflow is for you, then it’s time to set it up on your machine!
Step 1. Install the BitWarden CLI
BitWarden has excellent docs for their CLI. You can find them, along with comprehensive installation instructions, here.
Step 2. Add a new secure note to your BitWarden Vault
By way of demonstration, let’s see how we can store a new GitHub Personal Access Token in our BitWarden Vault.
Create your GitHub PAT by visiting https://github.com/settings/tokens.
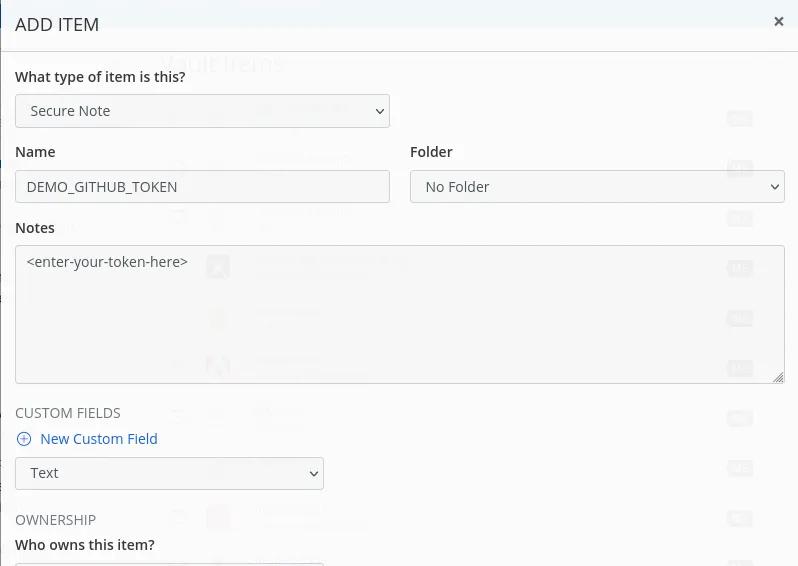
In your BitWarden Plugin or in the Web interface, create a new Secure Note and name it DEMO_GITHUB_TOKEN then add your token to the Notes textarea and click Save.
This will accomplish saving your new secure note to your central BitWarden account, but in order to make it available in your BitWarden CLI client, you must first re-sync your vault.
You can either run bw sync to accomplish this, or you can re-login to your local BitWarden CLI by running bw login and following the steps returned in the output (because logging into your vault again from the CLI will also perform a vault sync).
Step 3. Figure out the ID that BitWarden assigned your secret
Once your BitWarden CLI has been successfully synced, your new secure note should be available if you search for it like so:
bw list items — search DEMO_GITHUB_TOKEN
You will get back a JSON object that looks like the following:
[{“object”:”item”,”id”:”8d58fbbe-78fe-49ac-a53f-af3200995699",”organizationId”:null,”folderId”:null,”type”:2,”reprompt”:0,”name”:”DEMO_GITHUB_TOKEN”,”notes”:”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”,”favorite”:false,”secureNote”:{“type”:0},”collectionIds”:[],”revisionDate”:”2022–10–18T09:20:11.273Z”,”deletedDate”:null}]
The field you want is id. This is how the BitWarden API uniquely refers to this particular note. Store this value to the side as we’ll use it shortly when we write our load_github function.
Step 4. Write your shell function
Now that we have our BitWarden CLI vault configured and we know the ID of the secure note that contains our GitHub PAT, we can write the shell function that will unlock our CLI and fetch the token when called.
Open ~/.zsh_autoload_functions/load_github for editing and write the following to the file:
unlock_bw_if_locked() {
  if [[ -z $BW_SESSION ]] ; then
    >&2 echo 'bw locked - unlocking into a new session'
    export BW_SESSION="$(bw unlock --raw)"
  fi
}

load_github() {
  unlock_bw_if_locked
  # Note that this github_pat_id value will be different for you!
  local -r github_pat_id='e3e46z6b-a643-4j13-9820-ae4313fg75nd'
  local github_token
  github_token="$(bw get notes $github_pat_id)"
  export GITHUB_OAUTH_TOKEN="$github_token"
  export GITHUB_TOKEN="$github_token"
  export GIT_TOKEN="$github_token"
}

load_github "$@"
We’re defining two functions here. The first, unlock_bw_if_locked , ensures that our BitWarden CLI vault is unlocked so that our get command will work later on.
The second function, load_github , fetches the token out of the vault by its ID and then makes it available in several different environment variables.
I fetch this same value into multiple environment variables because I use different tools that expect different variable names.
There’s one more thing we need to do to make our new load_github function available in all future shells.
Step 5. Instruct ZSH to autoload your new function
Open your ~/.zshrc file and add the following lines to it:
# Autoload zsh shell functions defined in the function path
fpath=( ~/.zsh_autoload_functions "${fpath[@]}" )

autoload -Uz load_github
The first line tells ZSH to look for functions defined in the ~/.zsh_autoload_functions directory.
The second line states that ZSH should treat the load_github function as a function and autoload it using the ZSH shell style.
Write these changes to your ~/.zshrc file, then save it and run zsh in a new shell to ensure your latest changes are loaded. If you attempt to type out load_git and press tab, you should see ZSH recognizing the load_github function and performing tab completion for you.
Step 6. Enjoy fast and secure access to your secrets
You can now invoke load_github in any shell you like and enter your main vault password to have your credentials quickly and securely exported for use!


- No-nonsense DevOps insights
- Expert guidance
- Latest trends on IaC, automation, and DevOps
- Real-world best practices
