
As a developer, I often write my code on Mac or Linux machines, but sometimes need to test that code on Windows. In this blog post, I’ll show you how to do that by giving you all the background and code necessary to launch an AWS EC2 Windows instance and use it to test Python, Go, PHP, and more from your Mac or Linux laptop, so you can have confidence in deploying cross-platform solutions.
I’ll also demonstrate how you can use a Remote Desktop Protocol (RDP) client to share a local folder from your development machine, so that you can hack on your code from the comfort of your favorite setup, such as an Ubuntu desktop, like this:

and see your changes reflected in your test Windows EC2 instance within seconds:

If you’re in a hurry to get deployed and testing, you can jump below to Step 1. Grab the code and launch your instance.
Why is this useful and how do we know?
At Gruntwork, we deploy multi-account Reference Architectures into our customers’ AWS accounts every day, and we’re constantly looking for ways to make our process smoother.
We recently gave our onboarding experience a speed boost by writing bootstrap scripts that set up our customers with everything they need.
But one of the first problems we encountered in designing our scripts was that our customers come to us running Mac, Linux, and Windows, while as Gruntwork developers we run Mac and Linux as our daily drivers.
We needed a way to thoroughly test our bootstrap scripts against Windows that wouldn’t slow down our rapid pace of iteration.
Why is launching cloud instances better than just using a physical Windows machine?
Faced with a need to test cross-platform, you might be tempted to try firing up an old Windows laptop you have lying around, or tapping a teammate to temporarily re-commission their Windows gaming computer into your team’s shared Python 3 interpreter — but ultimately all of these approaches will end up running afoul of Boyd’s law: speed of iteration beats quality of iteration.
I prefer launching Windows instances because:
- You can iterate very quickly. You need only make a few quick edits in your favorite IDE or terminal on your preferred development machine, then run your changes in your windows RDP client to see them reflected essentially instantly. Now you can get a tight feedback loop going as you iterate on your local code and test it against your Windows cloud server.
- Instances are ephemeral. Once you’re done testing, you can tear Windows instances down to save on costs
- The process is reproducible. Cloud instances are reproducible and shareable — as demonstrated by this post! Instead of having to dust off that old Windows rig, you can give everyone on your team access to the same on-demand testing environment from anywhere in the world with the power of infrastructure as code.
- The process is script-able and extensible. You can extend the pattern here to build up a test matrix of various Windows versions, disk sizes and installation states to fit your organization’s unique needs
Step 1. Grab the code and launch your instance
I’ve created the Packer template you need to build an Amazon Machine Image (AMI) of a Windows 2016 Server, plus a complete Terraform example that deploys this AMI, enabling you to quickly spin up this same testing infrastructure in your own accounts.
The code is available to everyone in Gruntwork’s open-source Terratest repository under the terraform-aws-ec2-windows-example directory, so download the code and use it to experiment, learn, or adapt it to your own purposes.
For a detailed walk-through on deploying the example, see the Quick Start guide in the example’s README. However, for the purposes of quickly launching your own Windows instance using the code, follow these steps:
Git clone the repository to your computer:
git clone git@github.com:gruntwork-io/terratest.git
Change into the example’s packer directory:
cd terratest/examples/terraform-aws-ec2-windows-example/packer
Build the packer image:
# First ensure that your AWS credentials are correctly exported
# See https://blog.gruntwork.io/a-comprehensive-guide-to-authenticating-to-aws-on-the-command-line-63656a686799 if you need more info

packer build build.pkr.hcl
Be sure to note down the AMI ID that packer creates, as you’ll need it shortly to feed into Terraform.
Create a terraform.tfvars file:
# cd up one directory to the terraform files for the example
cd ..
touch terraform.tfvars
terraform.tfvars is a special file name that will be automatically picked up by terraform when you run commands. Set your terraform.tfvars file contents like so:
ami_id           = "<the AMI ID you copied in the previous step>"
region           = "us-east-1"
root_volume_size = 100
Terraform plan and apply to launch your Windows instance:
# First, run terraform plan and ensure the output looks good
terraform plan

# Next, run terraform apply --auto-approve to launch your instance
terraform apply --auto-approve
Step 2. Use RDP to sync your local development machine with your EC2 Windows instance
Remote Desktop Protocol is similar in concept to SSH, but for Windows — a means of remotely accessing and controlling a Windows machine.
Since RDP is the protocol, there are many different RDP clients that you can download and use depending on your operating system. On Linux, for example, I recommend the free and excellent Remmina which speaks RDP and other protocols. On Mac, there are a number of free and paid clients that you can find in the Apple App Store or as downloads online, such as Microsoft Remote Desktop, Parallels, and many more.
We’re going to use our RDP client to:
- Connect to our Windows EC2 instance
- Load a “shared folder” from our local development machine, such as the working directory of some code we want to test on Windows, to achieve hot-reloading
When you launch your Windows EC2 instance using our Quick Start guide, Terraform will output the public IPv4 address of your instance:

Grab this IP and enter it as the “Server” or “Host” entry when setting up a new connection in your RDP client.
Your Username is going to be Administrator, and your Password will be SuperS3cr3t!!!! as defined in the bootstrap_windows.txt script which configures remote access to our instance when packer build is run.

Next, look for a setting named something similar to “Share folder”. The interface is going to differ depending on the RDP client you’re using.
In the above screenshot, I’ve shared the local folder on my development machine where the Python script that I want to test against Windows resides.
Step 3. Connect to your Windows instance and find your shared folder.
There are a few caveats to be aware of the first time you launch and connect to a Windows EC2 instance:
- It can take upwards of 5 minutes after your Windows EC2 instance has completed initialization for its networking stack to become ready to accept connections, so if your connection attempts hang or timeout, give it a few minutes and try again
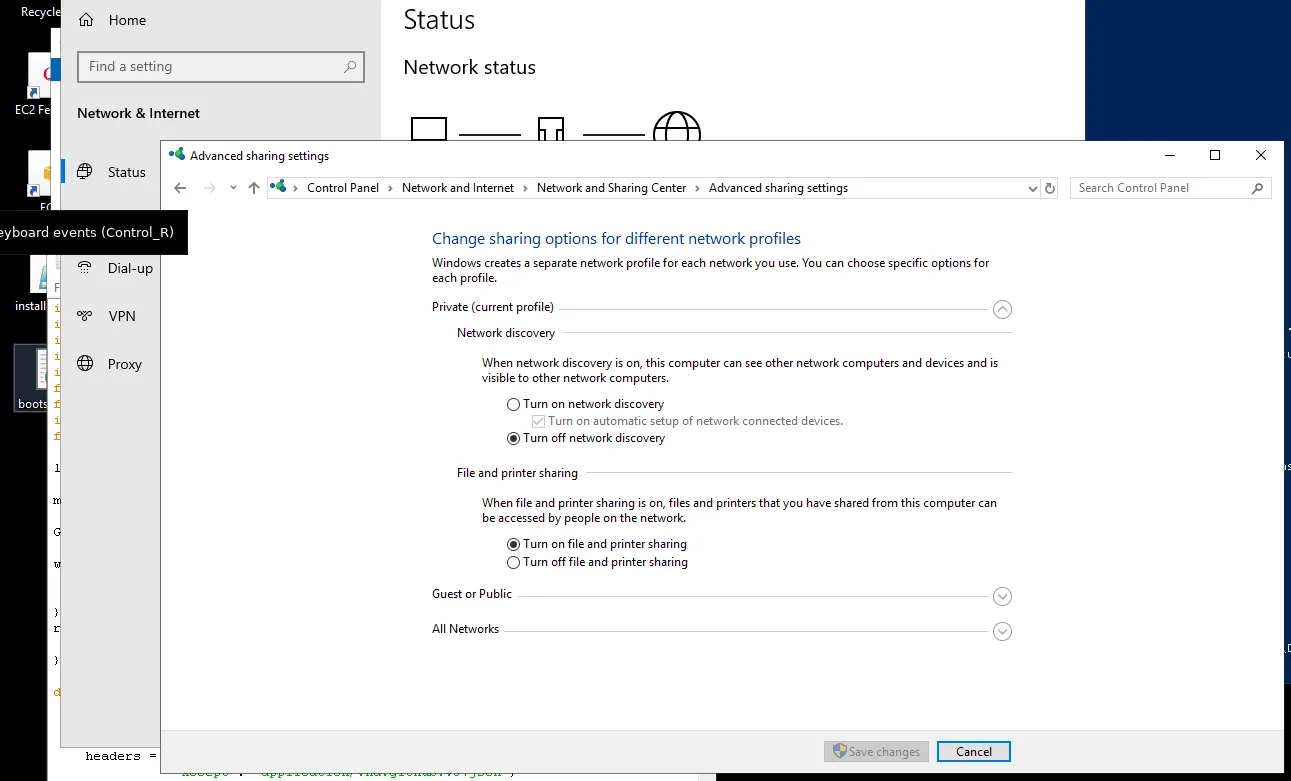
- You will need to enable Windows file sharing on your Windows host the first time you connect in order to enable you to see your shared folder from within your Windows instance
- The first time you connect to your Windows host, your RDP client will likely prompt you to accept the certificate presented by your host. Accept the certificate to continue.
With these in mind, use your RDP client to connect to your Windows test instance.
Step 4. Navigate and control your Windows instance with PowerShell
Once you’re connected, you’ll use the Windows PowerShell command-line prompt to control your host and accomplish your testing tasks.
To do so, right click the Windows icon in the bottom-left corner of the task bar and search for powershell:

Right click Run as administrator, which is similar in concept to prefixing your Unix commands with sudo.

Step 5. Verify and install any additional packages you might want
From an Administrator PowerShell, you can run choco to verify the Chocolatey package manager has been installed properly.

You can then also install any other packages you might need via choco install like so:
choco install -y php-service
or choco install -y mysql
If you wanted to persist your packages across launches of different Windows instances, so that your teammates could also use them, for example, you would just add your choco commands to the install_packages.ps1 script and build a new AMI with Packer.
Step 6. Set any environment variables your scripts or apps expect
Let’s imagine the script you’re testing expects a GITHUB_OAUTH_TOKEN environment variable that will contain a GitHub Personal Access token, used to authenticate your script to the GitHub API.
In order to set environment variables on your Windows instance, search for “Edit the system environment variables” by clicking the spyglass icon in your task bar:

Click the menu item that appears to reach the following interface, where you can set system-wide environment variables that your scripts and apps will be able to see:

Note that you’ll either need to close any running PowerShell sessions or run the refreshenv command in order to pull in any environment variables you just set this way.
Step 7. Find and run a script from your shared folder to achieve “hot-reloading”
When you use the Shared folder option via RDP, your code is likely going to end up under a special shared networked drive named \\tsclient .
For example, since I shared /home/zachary/Gruntwork/clients/infrastructure-live when connecting via RDP, the full path to my code on the Windows instance is \\tsclient\infrastructure-live.
Running chdir \\tsclient\infrastructure-live will drop you into this shared folder on the Windows instance, at which point you’re now able to interact with the code you’re writing at home from your Windows instance!

There’s another potential gotcha to be aware of when running executables, or Python scripts, in this example:
Be sure to prefix the path to your local script with .\ . So, if you’re trying to run the bootstrap_windows.py Python script in the same directory, you’d execute:
python .\bootstrap_windows.py
This will execute the shared Python script on your Windows host. Next, back in your home editor, you can modify your script, save it and RDP will instantaneously sync your changes across to your Windows instance, where you can re-run your Python script, and continue iterating in this fashion.
And with that, you’re now able to iterate on your code from the comfort of your preferred development machine and test it live on your Windows instance.
Saving time with Hashicorp Packer and machine images
Packer is a Hashicorp tool that simplifies the process of creating machine images that can be used to launch new machines.
As demonstrated above, one of the key benefits of using machine images is time savings: instead of needing to maintain a runbook of commands and installation scripts every time you want to bring up a test instance, you can instead do the work to define your desired machine state exactly once, and then use packer templates to share that state across your team and allow anyone to build the same machine image into their own cloud account.
Your machine image can already have all your desired testing tools, all your preferred target versions of software, even arbitrary files or test harnesses in arbitrary directories.
In our Windows example, you can find this packer build.pkr.hcl file. Note the provisioner blocks:
# Install Chocolatey package manager, then install any Chocolatey packages defined in scripts/install_packages.ps1

provisioner "powershell" {
scripts = [
"${path.root}/scripts/install_chocolatey.ps1",
"${path.root}/scripts/install_packages.ps1"
  ]
}
This pattern allows us to define PowerShell commands in separate scripts for easy maintainability. The first script installs the Chocolatey package manager which provides a packaging interface that will be familiar to anyone who has used apt or Homebrew.
With Chocolatey installed on your Windows instance, installing any other software runtimes or development tools you may need becomes straightforward, as demonstrated by the next script, install_packages.ps1:
choco install -y python3
choco install -y git
This means that any Windows instance launched from the Amazon Machine Image (AMI) built via this Packer template will already have Python 3 and git installed properly, saving you lots of setup time.
If you want to extend this example to install any additional packages you want, you need only add them as additional install commands in the install_packages.ps1 script.


- No-nonsense DevOps insights
- Expert guidance
- Latest trends on IaC, automation, and DevOps
- Real-world best practices
