Part 6. How to Work with Multiple Teams and Environments

Update, June 25, 2024: This blog post series is now also available as a book called Fundamentals of DevOps and Software Delivery: A hands-on guide to deploying and managing software in production, published by O’Reilly Media!
This is Part 6 of the Fundamentals of DevOps and Software Delivery series. In Part 5, you learned how to set up CI/CD to allow developers to work together efficiently and safely. This will get you pretty far, but as your company grows, you’ll start to hit problems that cannot be solved by CI/CD alone. Some of these problems will be due to pressure from the outside world: more users, more traffic, more data, and more local laws and regulations. Some of these problems will be due to pressure from within: more developers, more teams, and more products. All of this makes it harder to code, test, and deploy without hitting lots bugs, outages, and bottlenecks.
All of these are problems of scale, and for the most part, these are good problems to have, as they are typically signs that your business is becoming more successful. But to paraphrase the philosopher The Notorious B.I.G., more money means more problems. The most common approach companies use to solve problems of scale is divide and conquer. That is, you break things up into multiple smaller pieces, where each piece is easier to manage in isolation, typically using the following approaches:
- Break up your deployments
-
You deploy your software into multiple separate, isolated environments.
- Break up your codebase
-
You split your codebase into multiple libraries and/or services.
In this blog post, you’ll learn the advantages and drawbacks of these approaches and how to implement them. You’ll also go through several hands-on examples, including setting up multiple AWS accounts and running microservices in Kubernetes. Let’s start with the approach you’re likely to see at almost every company, which is breaking up your deployments.
Breaking Up Your Deployments
Throughout this blog post series, you’ve deployed just about everything—servers, Kubernetes clusters, serverless functions, and so on—into a single AWS account. This is fine for learning and testing, but in the real world, it’s more common to have multiple deployment environments, where each environment has its own set of isolated infrastructure. In the next several sections, you’ll learn why you may want to deploy across multiple environments, how to set up multiple deployment environments, some of the challenges with multiple environments, and finally, you’ll go through an example of setting up multiple environments in AWS.
Why Deploy Across Multiple Environments
The most common reasons to deploy into multiple environments are the following:
-
Isolating tests
-
Isolating products and teams
-
Reducing latency
-
Complying with local laws and regulations
-
Increasing resiliency
Let’s dive into each of these, starting with testing.
Isolating tests
You typically need a way to test changes to your software (a) before you expose those changes to your users and (b) in a way that limits the blast radius, so if something goes wrong during testing, the damage is constrained, and doesn’t affect users or your production environment.
To some extent, as soon as you deployed your app onto a server (in Part 1), you already had two environments: your local development environment (LDE), which is your own computer, and production, which is the server. Usually, the differences between your LDE and production are large enough that testing solely in the LDE is not sufficient. What you need is one or more environments that closely resemble production, but are completely isolated. A common setup you’ll see at many companies is to have the following three environments:
- Production
-
This is the environment that is exposed to your users.
- Staging
-
This environment is more or less identical to production, though typically scaled down to save money: i.e., you have the same architecture in staging and production, but staging uses fewer and smaller servers. The staging environment is only exposed to employees at your company (and sometimes a handful of trusted partners and customers), so they can test new versions of the software before those new versions are deployed to production. That is, you stage releases in this environment, like a practice run before deploying to production.
- Development
-
This environment is also a scaled-down clone of production, and is only exposed to your dev team, who uses it to test changes during the development process, before pushing those changes to staging. Deployments to dev are more frequent: e.g., you might automatically deploy every merged PR into dev.
This trio of development, staging, and production, often shortened to dev, stage, and prod, shows up at most companies, although sometimes with slightly different names: e.g., stage is sometimes called QA, as that’s where the quality assurance (QA) team does testing, or UAT (user acceptance testing), as that’s where end-users and stakeholders test the application to make sure it meets expectations.
Isolating products and teams
Larger companies often have multiple products and multiple product teams, and at a certain scale, having all of them work in the same environment or even the same set of environments can lead to a number of problems, as different products may have different requirements in terms of security, compliance, uptime, deployment frequency, and so on. Therefore, it’s common in larger companies for each team or product to have its own isolated set of environments.
For example, the search team might have their software deployed in the search-dev, search-stage, and search-prod environments, while the profile team might have their software deployed in the profile-dev, profile-stage, and profile-prod environments. This ensures that teams can customize their environments to their own needs, limits the blast radius if one team or product has issues, and allows teams to work mostly in isolation from each other.
|
Key takeaway #1
Breaking up your deployment into multiple environments allows you to isolate tests from production and teams from each other. |
Reducing latency
If you have users in multiple locations around the world, you may want to run your software on data centers that are geographically close to those users. One of the big reasons for this is latency: that is, the amount of time it takes to send data between your data center and your users' devices. This information is traveling at nearly the speed of light, but when you’re building software used across the globe, the speed of light can be too slow! Table 10 shows the latency of common computer operations:
| Operation | Time in ns |
|---|---|
Random read from CPU cache (L1) | 1 |
Random read from main memory (DRAM) | 100 |
Compress 1 kB with Snappy | 2,000 |
Read 1 MB sequentially from DRAM | 3,000 |
Random read from solid state disk (SSD) | 16,000 |
Read 1 MB sequentially from SSD | 49,000 |
TCP packet round trip within same datacenter | 500,000 |
Random read from rotational disk | 2,000,000 |
Read 1 MB sequentially from rotational disk | 5,000,000 |
TCP packet round trip from California to New York | 40,000,000 |
TCP packet round trip from California to Australia | 183,000,000 |
These numbers are useful for doing back-of-the-envelope calculations. For example, you can estimate that having data centers on multiple continents, rather than one continent, will reduce latency to your users by around 100,000,000 ns (100 ms). This might not seem like much, but remember, this is the overhead for a single TCP packet, which is typically limited to 1 KB in size, and most apps these days sends hundreds or thousands of KB of data, so the extra latency can add up to many seconds of additional overhead for every page load and button press.
Therefore, companies with a global reach often end up deploying software across multiple data centers across the globe. For example, you might have one production environment in Ireland (prod-ie) to give EU users lower latency and one production environment in the US (prod-us) to give your North American users lower latency.
Complying with local laws and regulations
If you operate in certain countries, work in certain industries, or work with certain customers, you may be subject to laws and regulations that require you to set up your environments in specific ways. For example, if you store and process credit card information, you may be subject to PCI DSS (Payment Card Industry Data Security Standard); if you store and process healthcare information, you may be subject to HIPAA (Health Insurance Portability and Accountability Act) and HITRUST (Health Information Trust Alliance); if you are building software for the US government, you may be subject to FedRAMP (Federal Risk and Authorization Management Program); and if you are building software in certain countries, you may be subject to data residency laws, such as the EU’s GDPR (Global Data Protection Regulation), which requires businesses that operate in an EU country, or have customers in an EU country, to store and process data on servers physically located within that country.
A common pattern is to set up a dedicated environment for complying with laws and regulations. For example, if you’re subject to PCI DSS, you might have one prod environment that meets all the PCI DSS requirements, and is used solely to run your payment processing software, and another prod environment that isn’t as locked down, and is used to run all your other software. Setting up multiple environments this way lets you minimize the surface area, and thus cost and time, of what has to be administered under the more stringent requirements of a compliance standard.
Increasing resiliency
In Part 3, you saw that a single server can be a single point of failure; the solution was to deploy multiple servers. It turns out that, even if you have multiple servers, if all of them are in a single data center (a single environment), that one data center can be a single point of failure, too. It’s possible for a power outage, cooling problem, network connectivity issue, and a variety of other problems to disrupt the functionality of an entire data center, and all the servers within it. Companies that need a higher degree of resiliency deploy across multiple data centers that are in separate locations around the world (e.g., prod-ie and prod-us, as in the previous section).
Now that you’ve seen a few of the reasons to break up your deployment across multiple environments, let’s talk about how to actually do it.
How to Set Up Multiple Environments
There are many different ways to define an "environment," including the following:
- Logical environments
-
A logical environment is one defined solely in software (i.e., through naming and permissions), whereas the underlying hardware (servers, networks, data centers) is unchanged. For example, you could create multiple logical environments in a single Kubernetes cluster by using namespaces. In Part 3, since you didn’t specify a namespace, everything you deployed into Kubernetes went into the
defaultnamespace, but you can also create custom namespaces For example, you could create a dev namespace by runningkubectl create namespace devand deploy into that namespace by runningkubectl apply --namespace dev. - Separate servers
-
One notch above logical environments is to set up each environment on separate servers. For example, instead of a single Kubernetes cluster, you deploy one cluster for dev, one for stage, and so on.
- Separate networks
-
One step above separate servers is to put the servers for each environment in a separate, isolated network: e.g., one network for dev, one for stage, and so on. You’ll see an example of how to set up separate networks in Part 7.
- Separate accounts
-
If you deploy into the cloud, many cloud providers allow you to create multiple accounts. Note that different cloud providers use different terminology here, such as projects in Google Cloud and subscriptions in Azure. I’ll use the term "account" throughout this blog post series. By default, accounts are completely isolated from each other, including the servers, networks, and permissions you grant in each one, so a common approach is to define one environment per account: e.g., one account for dev, one account for stage, and so on.
- Separate data centers in the same geographical region
-
The next level up is to run different environments in different data centers in the same geographical region: e.g., multiple data centers on the US east coast.
- Separate data centers in different geographical regions
-
The final level is to run different environments in different data centers that are in multiple geographical regions: e.g., one data center on the US east coast, one on the US west coast, one in Europe, and so on.
These approaches all have advantages and drawbacks. One dimension to consider is how isolated one environment is from another: e.g, with this approach, could a bug in dev somehow affect prod? Another dimension to consider is resiliency: e.g., how well does this approach tolerate a server, network, or even entire data center going down? The preceding list is sorted from least to most isolated and resilient. That is, logical environments offer the least isolation and resiliency, whereas separate data centers in multiple regions offer the most. Separate data centers in multiple regions is also the only approach that can reduce latency to your users and allow you to comply with local laws and regulations.
However, the flip side of the coin is operational overhead: how many extra servers, networks, accounts, and data centers do you have to set up, maintain, and pay for? The preceding list is also sorted from least to most overhead: logical environments entail the least overhead, whereas separate data centers in multiple regions is the most time-consuming and expensive. Separate data centers in multiple regions is also an approach that may require you to redesign your architecture, something you’ll learn more about in the next section.
Challenges with Multiple Environments
Having multiple environments can offer a lot of benefits, but multiple environments can also introduce a number of new challenges, including the following:
-
Increased operational overhead
-
Increased data storage complexity
-
Increased application configuration complexity
Let’s go through these one at a time, starting with increased operational overhead.
Increased operational overhead
Perhaps the most obvious challenge with multiple environments is that you now have more moving parts to set up and maintain. You may need to run more servers, set up more data centers, hire more people around the world, and so on. Using the cloud allows you to offload much of this overhead onto the cloud provider, but managing multiple AWS accounts still results in more overhead, as each account needs to be configured with authentication, authorization, networking, security tooling, and so on. But even this overhead may be just a drop in the bucket compared to the overhead of having to change your entire architecture to work across environments that are geographically separated, as discussed in the next section.
Increased data storage complexity
Having multiple data centers around the world, so they are closer to your users, reduces the latency between the data center and those users, but it may also increase the latency between the different parts of your software running in different data centers. This may force you to rethink your architecture, especially when it comes to data storage.
For example, let’s say you had a web app that needed to query a database. If the database you were talking to was in the same data center as the app, then as per Table 10, the networking overhead for the query would be roughly 500,000 ns (0.5 ms) for each packet round trip, which is negligible for most web apps. However, if you had multiple data centers around the world, and the database you were talking to was on a different continent, now the networking overhead could be as high as 183,000,000 ns (183 ms), a 366x increase for every single packet you send. Even a single database query will typically require multiple packets to make round trips, so this extra overhead adds up quickly, and it can make your app unusably slow.
No problem, you say, you’ll just ensure that the database is always in the same data center as the web app. But now you need multiple databases, and that may require you to change how you store and retrieve data, including how you generate primary keys (an auto incrementing primary key will not work with multiple data stores), how you handle data consistency (uniqueness constraints, foreign key constraints, and transactions all become difficult with multiple databases), how you look up data (querying and joining multiple databases is complicated), and so on (you’ll learn about these topics in Part 9).
Some companies choose to avoid these challenges by only running in active/standby mode, where one data center is active and serves live traffic, and the other is a standby that only serves live traffic if the active data center goes down. That way, you are only ever reading/writing data in one location at a time. This is useful to boost resiliency, but doesn’t help with latency or local laws and regulations. If you have to have multiple data centers live at the same time, known as active/active, then you will most likely have to rearchitect your data storage patterns to work across multiple geographies.
|
Key takeaway #2
Breaking up your deployment into multiple regions allows you to reduce latency, increase resiliency, and comply with local laws and regulations, but you may have to rework your entire architecture. |
Increased application configuration complexity
With multiple environments, you may have to configure your apps differently in each one. Some of the settings that may differ between environments include performance settings (e.g., CPU, memory, hard-drive, garbage collection), security settings (e.g., database passwords, API keys, TLS certificates), networking settings (e.g., IP addresses, ports, domain names), service discovery settings (e.g., IP addresses, ports, and domain names for the services you rely on), and feature settings (feature toggles to turn on and off).
In the early stages of a company, with a small number of apps and environments, managing these configurations is straightforward. As you grow, and you add more apps, environments, and complexity, the number of configuration settings can explode. For large companies, it’s not unusual to have thousands of settings to manage, which can be a significant challenge. In fact, Google found configuration changes to be one of their biggest causes of outages, as shown in Table 11:
| Cause | Percent of outages |
|---|---|
Binary push | 37% |
Configuration push | 31% |
User behavior change | 9% |
Processing pipeline | 6% |
Service provider change | 5% |
Performance decay | 5% |
Capacity management | 5% |
Hardware | 2% |
Google found that pushing configuration changes is just as risky as pushing code changes (pushing a new binary), and the longer a system has been around, the more configuration changes tend to become the dominant cause of outages.
|
Key takeaway #3
Configuration changes are just as likely to cause outages as code changes. |
So how should you manage application configuration to minimize these problems? Broadly speaking, there are two methods for configuring applications:
- At build time: configuration files checked into version control
-
The most common way to handle configuration is to have configuration files that are checked into version control, along with the rest of the code for the app. These files can be in the same language as the app itself: e.g., Ruby on Rails apps use configuration files defined in Ruby. However, as config files are often shared across software written in multiple languages, it’s more common to use language-agnostic formats such JSON or YAML, or even languages designed for configuration, such as Cue or Jsonnet (full list).
- At run time: configuration data read from a data store
-
Another way to configure your app is to have the app read from a data store at run time. One option is to use a general-purpose data store, such MySQL, PostgreSQL, or Redis. However, the more common option is to use a data store specifically designed for configuration data, and in particular, a data store that can notify your app when a configuration value changes. For example, data stores such as Consul and etcd (full list) allow you to subscribe to change notifications, so your app gets the latest data any time a configuration changes.
I recommend using build-time configuration for as much of your configuration as possible. That way, you can treat it just like the rest of your code, ensuring every configuration change ends up in version control, gets code reviewed, and goes through your entire CI/CD pipeline (including all the automated tests). I only recommend using run-time configuration for use cases where the configuration changes frequently, such as service discovery and feature toggles, where having to deploy new code to get the latest configuration values would be too slow.
Now that you’ve seen the reasons to deploy into multiple environments, the different options for setting up multiple environments, and the challenges involved with multiple environments, let’s try an example: setting up multiple AWS accounts.
Example: Set Up Multiple AWS Accounts
When you first start using AWS, you create a single account, and deploy everything into it. This works well up to a point, but as your company grows, you’ll want to set up multiple environments due to the requirements mentioned earlier: isolating tests, isolating products and teams, improving resiliency and latency, and so on. While you can meet some of these requirements in a single AWS account—e.g., it’s easy to use multiple availability zones and regions in a single AWS account to get better latency and resiliency—some of the other requirements can be tricky.
In particular, isolating tests, products, and teams can be hard to do in a single account. This is because just about everything in an AWS account is managed via API calls, and by default, AWS APIs, or more specifically IAM, does not have a first-class notion of environments, so your API calls can affect anything in the entire account. For example, if you give one team permissions to manage EC2 instances, it’s possible that, due to human error, someone will accidentally modify the EC2 instances of the wrong team; or perhaps your automated tests have permissions to bring EC2 instances up and down, but due to a bug in your test code, you accidentally take down the EC2 instances in production.
Don’t get me wrong: IAM is powerful, and using various IAM features such as tags, conditions, permission boundaries, and SCPs, it is possible to create your own notion of environments and enforce isolation between them, even in a single account. However, precisely because IAM is powerful, it’s hard to get this right (see the AWS IAM policy evaluation logic documentation for just a small taste of IAM’s complexity). Many teams have gotten IAM permissions wrong—especially IAM permissions for managing IAM permissions—which can lead to disastrous results.
While you can’t avoid IAM entirely, for the common use case of creating separate environments, there is a simpler alternative: use separate AWS accounts. By default, granting someone permissions in one AWS account does not give them any permissions in any other account. In other words, using multiple AWS accounts gives you isolation between environments by default, so you’re less likely to make mistakes.
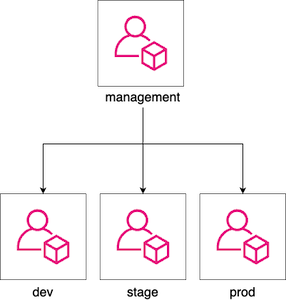
This is why AWS itself recommends a multi-account strategy. With this strategy, you use AWS Organizations to create and manage your AWS accounts, with one account at the root of the organization, called the management account, and all other accounts (e.g., dev, stage, prod) as child accounts of the root, as shown in Figure 49:
Figure 49. AWS multi-account structure
One advantage of this approach is centralized management, as you can access and administer all the child accounts from the management account. Another advantage is centralized billing, as all the charges for the child accounts will roll up to the management account. Let’s try it out and create some child accounts.
Create child accounts
You probably created your first AWS account by signing up on the AWS website. To create more AWS accounts, instead of signing up again and again on the website, you can treat your initial AWS account as the management account, and use AWS Organizations to create all the other accounts as child accounts.
Typically, since the management account has powerful permissions, you only use it to create and manage other AWS
accounts, and you do not run any other workloads in it. Therefore, as a first step, undeploy everything from your AWS
account that you deployed in earlier blog posts: e.g., run tofu destroy on any OpenTofu modules you
previously deployed and use the EC2 Console to manually undeploy anything you deployed via Ansible, Bash, etc (see also
AWS Resource Explorer and Cloud
Nuke). When you’re done, you should essentially have an empty AWS account.
|
Example Code
As a reminder, you can find all the code examples in the blog post series’s sample code repo in GitHub. |
Next, you can use the aws-organizations module, which is in the blog post series’s
sample code repo in the ch6/tofu/modules/aws-organizations folder, to create three child
accounts (development, staging, and production) using AWS Organizations. Head into the folder where you’ve been working
on the code samples for this blog post series and make sure you’re on the main branch, with the latest code:
$ cd fundamentals-of-devops
$ git switch main
$ git pull origin mainNext, create a new ch6 folder for this blog post’s code examples, and within the ch6 folder, create a tofu/live/child-accounts folder:
$ mkdir -p ch6/tofu/live/child-accounts
$ cd ch6/tofu/live/child-accountsWithin that folder, create main.tf with the contents shown in Example 101:
Example 101. Create child accounts (ch6/tofu/live/child-accounts/main.tf)
provider "aws" {
region = "us-east-2"
}
module "child_accounts" {
source = "brikis98/devops/book//modules/aws-organizations"
version = "1.0.0"
create_organization = true (1)
# TODO: fill in your own account emails!
accounts = { (2)
development = "username+dev@email.com"
staging = "username+stage@email.com"
production = "username+prod@email.com"
}
}The preceding code uses the aws-organizations module as follows:
| 1 | Before you can use AWS Organizations, you must enable it in your AWS account. If you already enabled it, set
create_organization to false. Otherwise, leave it set at true and the aws-organizations module will enable
it for you. |
| 2 | Configure the email addresses to use for the dev, stage, and prod account root users. Each AWS account is associated with a single root user, who has essentially unrestricted access across that account. Note that you’ll have to fill in your own email addresses here, and that each email address must be different, as AWS requires a globally unique email address for the root user of each AWS account. |
|
Create multiple email aliases with email subaddressing
Some email providers, such as GMail, support email subaddressing (RFC
5233) where they ignore any text in an email address after a plus sign, which allows you to create multiple aliases
for a single email address. For example, if your email address is |
Next, create an outputs.tf file with the output variables shown in Example 102:
Example 102. Output variables (ch6/tofu/live/child-accounts/outputs.tf)
output "accounts" {
description = "A map of accounts: {account_name = {id, iam_role_arn}}."
value = module.child_accounts.accounts
}The preceding code adds an output variable called accounts which will contain data about your newly-created AWS
accounts, as you’ll see shortly. Deploy the child-accounts module as usual, authenticating to AWS, and running
init and apply:
$ tofu init
$ tofu applyAfter apply completes, you should see the accounts output variable, which will contain an id and iam_role_arn
for each of your child accounts:
Outputs:


accounts = {

  development = {

    iam_role_arn = "arn:aws:iam::222222222222:role/OrganizationAccountAccessRole"

    id = "222222222222"

  }

  production = {

    iam_role_arn = "arn:aws:iam::444444444444:role/OrganizationAccountAccessRole"

    id = "444444444444"

  }

  staging = {

    iam_role_arn = "arn:aws:iam::333333333333:role/OrganizationAccountAccessRole"

    id = "333333333333"

  }

}
The id is the ID of the child account. The iam_role_arn is the ARN of an IAM role AWS Organizations automatically
creates in each child account, which you can assume from the management account to get admin permissions in that child
account (more on this in the next section). Congrats, you just created new AWS accounts using code!
|
Get your hands dirty
Here are a few exercises you can try at home to go deeper:
|
You now have some new AWS accounts, but they aren’t useful until you deploy infrastructure into them, and to do that, you need to learn how to access them.
Access your child accounts
Now that you’ve created child accounts, there are several different ways to access them. I recommend using IAM
Identity Center to grant users access to an appropriate permission set in your newly-created child accounts, and then
using profiles in the AWS CLI to authenticate to those accounts in your terminal (see
How to
authenticate to AWS with IAM Identity Center for instructions). Alternatively, if you have an IAM user, you can
create profiles for the AWS CLI that assume the IAM roles (based on the iam_role_arn values) that AWS organizations
created in each account (see
Switch to an IAM role (AWS CLI) for
instructions).
I’m going to assume that, using either IAM Identity Center or IAM roles, you created profiles for the AWS CLI called
dev-admin, stage-admin, and prod-admin to access the dev, stage, and prod accounts, respectively. Most tools that
talk to AWS APIs give you a way to specify the profile to use. One way to do this is to use the AWS_PROFILE
environment variable. For example, Example 103 shows how you can use the dev-admin profile to access
the dev account:
Example 103. Use the AWS CLI with the dev-admin profile
$ AWS_PROFILE=dev-admin aws sts get-caller-identity
{
"UserId": "<USER>",
"Account": "<ACCOUNT_ID>",
"Arn": "<ARN>"
}The get-caller-identity command returns information about the authenticated user, so if you configured the dev-admin
profile correctly, ACCOUNT_ID should be the ID of the dev account. In the next section, you’ll see how to use
profiles to deploy infrastructure into the dev, stage, and prod accounts.
Deploy into your child accounts
Let’s now try to deploy the lambda-sample module from earlier blog posts into the dev, stage, and
prod accounts. Copy the lambda-sample module from Part 5 into a new ch6/tofu/ folder:
$ cd fundamentals-of-devops
$ cp -r ch5/tofu/live/lambda-sample ch6/tofu/live
$ cd ch6/tofu/live/lambda-sampleNext, make the following changes to the lambda-sample module:
-
Add new input variables: Update variables.tf as shown in Example 104:
Example 104. Add input variables (ch6/tofu/live/lambda-sample/variables.tf)variable "environment" { description = "The name of the environment to deploy into" type = string } variable "memory_size" { description = "The amount of memory, in MB, to assign the function" type = number }This code adds two input variables:
environment, which allows you to specify the name of the current environment, andmemory_size, which allows you to allocate different amounts of memory for the Lambda function in each environment. -
Update the
backendconfiguration: Update backend.tf as shown in Example 105:Example 105. Use thelocalbackend (ch6/tofu/live/lambda-sample/backend.tf)terraform { backend "local" { (1) path = "${var.environment}.tfstate" (2) } }This code makes two updates to the
backendconfiguration:1 Since you’re just running this example by yourself for learning, switch back to the localbackend, rather than thes3backend, so you don’t have to take the time right now to create an S3 bucket and DynamoDB table in each child account (as you would in a real-world use case).2 Instead of always writing the state file to terraform.tfstate, each environment now gets its own state file called <ENV>.tfstate, where <ENV>is the name of the current environment based on theenvironmentinput variable (e.g., development.tfstate, production.tfstate). Note that using variables in abackendconfiguration is currently only supported in OpenTofu. You’ll need to use a different approach for Terraform. -
Update the Lambda function. Update main.tf as shown in Example 106:
Example 106. Use the new input variables (ch6/tofu/live/lambda-sample/main.tf)module "function" { source = "brikis98/devops/book//modules/lambda" version = "1.0.0" # ... (other params omitted) ... memory_size = var.memory_size (1) timeout = 5 environment_variables = { NODE_ENV = "production" ENV_NAME = var.environment (2) } create_url = true }This code makes two updates to the Lambda function:
1 Set memory_sizeto thememory_sizeinput variable.2 Pass a new ENV_NAMEenvironment variable to the Lambda function. You’ll see how this is used next. -
Update the JavaScript code. Update src/index.js as shown in Example 107:
Example 107. Output the environment name (ch6/tofu/live/lambda-sample/src/index.js)exports.handler = (event, context, callback) => { callback(null, {statusCode: 200, body: `Hello from ${process.env.ENV_NAME}!`}); };The only change is to include the environment name, based on the
ENV_NAMEenvironment variable you just added, in the response text.
You’re now ready to deploy this function across multiple environments. To configure each environment, you’ll create a variable definition file, which is a file with a .tfvars extension that sets the input variables for that environment. For example, to configure the dev environment, create dev.tfvars with the contents shown in Example 108:
Example 108. Dev variable definition file (ch6/tofu/live/lambda-sample/dev.tfvars)
environment = "development"
memory_size = 128This sets the name of the environment to "development" and configures the Lambda function to use 128 MB of memory. Create an analogous stage.tfvars file for the staging environment, as shown in Example 109:
Example 109. Stage variable definition file (ch6/tofu/live/lambda-sample/stage.tfvars)
environment = "staging"
memory_size = 128And finally, create prod.tfvars, as shown in Example 110:
Example 110. Prod variable definition file (ch6/tofu/live/lambda-sample/prod.tfvars)
environment = "production"
memory_size = 256Notice how the production environment allocates more memory for the Lambda function. This is a common pattern where you configure pre-production environments with fewer resources (to save money) and production environments with more resources (to handle the load).
To deploy the dev environment, first, run tofu init, adding the -var-file flag to pass in the variables definition
file for dev, and the -reconfigure flag to tell OpenTofu to configure a new backend, ignoring any previous backend
configuration:
$ tofu init -var-file=dev.tfvars -reconfigureThis will configure OpenTofu to store state in development.tfstate. Next, authenticate to your dev account by setting
the AWS_PROFILE environment variable to the dev profile you created in the previous section, and run tofu apply:
$ AWS_PROFILE=dev-admin tofu apply -var-file=dev.tfvarsYou should see a plan output to create the Lambda function, Lambda function URL, and so on. If everything looks good,
type in yes and hit Enter. When apply completes, you should see the function_url output variable, which
contains a URL you can try to access the Lambda function. Try this URL out:
$ curl <DEV_URL>
Hello from development!Congrats, you now have a serverless web app running in your dev account! To deploy into staging, repeat the process, but use the staging variable definition file, and authenticate to the staging account:
$ tofu init -var-file=stage.tfvars -reconfigure
$ AWS_PROFILE=stage-admin tofu apply -var-file=stage.tfvarsYou should see a plan output that shows OpenTofu will create all the resources (Lambda function, Lambda function URL,
etc.) again from scratch. That’s because you’re using a separate state file for each environment, so when you’re in the
staging environment (staging.tfstate), OpenTofu doesn’t look at any of the infrastructure you deployed in the dev
environment (development.tfstate). If everything looks good with the plan, type in yes and hit Enter. When apply
completes, you should have a different URL you can try:
$ curl <STAGE_URL>
Hello from staging!And there you go, you now have a second environment running in a second AWS account! Complete the picture by deploying into the third environment, production:
$ tofu init -var-file=prod.tfvars -reconfigure
$ AWS_PROFILE=prod-admin tofu apply -var-file=prod.tfvarsWhen you’re done, you should see "Hello from production!" At this point, you have three environments, across three AWS accounts, with a separate copy of the serverless webapp in each one, and the OpenTofu code to manage it all.
|
Get your hands dirty
Here’s an exercise you can try at home to go deeper:
|
You now have three copies of the serverless webapp, all configured exactly the same way. In the next section, you’ll see how to configure each app differently.
Use different configurations for different environments
Let’s configure the Lambda function in each environment differently. To keep things simple, we’ll use JSON configuration files checked into version control. First, create a folder called config for the configuration files:
$ mkdir -p src/configWithin the config folder, create development.json as shown in Example 111:
Example 111. Dev config (ch6/tofu/live/lambda-sample/src/config/development.json)
{
"text": "development config"
}This file contains just a single config entry, text, which is the text the web app should return in that environment.
Create analogous config/staging.json and config/production.json files, but with text updated to different values
in each environment.
Next, update index.js to load the config file for the current environment and return the text value in the
response, as shown in Example 112:
Example 112. Load the config (ch6/tofu/live/lambda-sample/src/index.js)
const config = require(`./config/${process.env.ENV_NAME}.json`) (1)
exports.handler = (event, context, callback) => {
callback(null, {statusCode: 200, body: `Hello from ${config.text}!`}); (2)
};There are two updates to the app:
| 1 | Read the ENV_NAME environment variable and load the .json file of the same name from the config folder. This
will use development.json in the development environment, staging.json in the staging environment, and so on. |
| 2 | Read the text value from the config file and return it in the HTTP response. |
Now it’s time to deploy this change in each environment. Start with the dev environment, running init and apply
with the -var-file and AWS_PROFILE settings:
$ tofu init -var-file=dev.tfvars -reconfigure
$ AWS_PROFILE=dev-admin tofu apply -var-file=dev.tfvarsWhen apply completes, open the URL in the function_url output variable, and you should see "Hello from development
config!" Run the analogous init and apply commands to deploy the changes in staging and production as well. When
you test the URLs for those environments, you should see the text values you put into those configs: e.g., "Hello
from staging config!" and "Hello from production config!" Congrats, you’re now loading different configuration files in
different environments!
Close your child accounts
When you’re done testing and experimenting with multiple AWS accounts, you may wish to close some or all of the new child accounts. Going forward, just about all the examples in this blog post series will deploy into just a single account (to keep things simple), so you don’t need all three running. Note that AWS does not charge anything extra for the accounts themselves, but you may want to clean them up to keep your security surface area smaller, and to ensure you don’t accidentally leave resources running in those accounts (e.g., EC2 instances), as AWS charges for those as usual.
First, commit all your code changes to Git. That way, if you ever want to bring back the three accounts, you’ll have all the code to do it.
Second, undeploy the infrastructure in each account. To do that, run tofu init and tofu destroy in each account,
making sure to set the proper -var-file and AWS_PROFILE values. For example, here is how you undeploy the
infrastructure in dev:
$ tofu init -var-file=dev.tfvars -reconfigure
$ AWS_PROFILE=dev-admin tofu destroy -var-file=dev.tfvarsRepeat the analogous commands for the staging and production environments.
Third, run tofu destroy on the child-accounts module to start the process of closing the child accounts:
$ cd ../child-accounts
$ tofu destroyWhen you run destroy, AWS will initially mark the child accounts as "suspended" for 90 days, which is a fail-safe
that gives you a chance to recover anything you may have forgotten in those accounts before they are closed forever.
After 90 days, AWS will automatically close those accounts.
|
Destroy may temporarily fail if you created a new AWS Organization
If you had |
Breaking Up Your Codebase
Now that you’ve seen how to break up your deployments into multiple environments, let’s talk about how to break up your codebase. In the next several sections, you’ll learn why you may want to break up your codebase, how to do it, some of the challenges involved, and finally, you’ll go through an example of deploying several microservices in Kubernetes.
Why Break Up Your Codebase
The following are the most common reasons to break up your codebase:
-
Managing complexity
-
Isolating products and teams
-
Handling different scaling requirements
-
Using different programming languages
Let’s dive into each of these, starting with managing complexity.
Managing complexity
Software development doesn’t happen in a chart, an IDE, or a design tool; it happens in your head.
— Venkat Subramaniam and Andy Hunt
Practices of an Agile Developer (Pragmatic Programmers)
Practices of an Agile Developer (Pragmatic Programmers)
Once a codebase gets big enough, no one can understand all of it. There are just too many parts, too many interactions, and too many concepts to keep straight, and if you have to deal with all of them at once, your pace of development will drop, and the number of bugs will skyrocket. Consider Table 12, which shows the number of bugs in software projects of various sizes:
| Project size (lines of code) | Bug density (bugs per 1K lines of code) |
|---|---|
< 2K | 0 – 25 |
2K – 6K | 0 – 40 |
16K – 64K | 0.5 – 50 |
64K – 512K | 2 – 70 |
> 512K | 4 – 100 |
It’s no surprise that larger software projects have more bugs, but note that Table 12 shows that larger projects also have a higher bug density, or the number of bugs per 1,000 lines of code. To put this into perspective, take a developer, and have them add 100 lines of code to a small software project (<2K lines of code), and on average, you’ll find that new code has no new bugs, or maybe one or two. Take the same developer and have them add 100 lines of code to a large software project (>512K lines of code), and on average, you’ll find that they have introduced as many as ten new bugs. Same developer, same number of lines of new code, but 5-10x as many bugs. That’s the cost of complexity.
There is a limit to how much complexity the human mind can handle. In Steve McConnell’s book Code Complete (the source of Table 12), he defines managing complexity as "the most important technical topic in software development." There are many techniques for managing complexity, but almost all of them come down to one basic principle: divide and conquer. That is, find a way to organize your code so that you can focus on one small part at a time, while being able to safely ignore the rest. One of the main goals of most software abstractions, including object-oriented programming, functional programming, libraries, and microservices, is to break the codebase into discrete pieces, so that you only need to think about the simple interface of that piece, rather than the full complexity of the underlying implementation details.
Isolating products and teams
Another common reason to break up a codebase is to allow teams to work more independently. As your company grows, different teams will start to develop preferences for different product development practices, such as how they design their systems and architecture, how they test and review their code, how often they deploy, and how much tolerance they have for bugs and outages.
If you do all your work in a single, tightly-coupled codebase, then a problem in any one team or product can affect all the other teams and products, and that’s not always desirable. For example, if you open a pull request, and an automated test fails in some totally unrelated product, should that block you from merging? If you deploy new code that includes changes to ten different products, and one of them has a bug, should you roll back the changes for the other nine? If one team wants to deploy dozens of times per day, but another team has a product in a regulated industry where they can only deploy once per quarter, should everyone be stuck with the slower deployment cadence? There are no easy answers to these questions in a single codebase, but if you split up the codebase, each team can use different processes that meet their specific needs.
Note that teams working more independently doesn’t mean they never interact or integrate their work together. It’s just that the integrations are now limited to well-defined interfaces: e.g., the API of a library or a web service. This lets you benefit from the output of that team’s work (e.g., the data returned by their API) without being subject to the particular inputs they need to make that work possible. In fact, you do this all the time whenever you add a dependency on a third party, such as an open source library or a vendor’s API. You’re able to benefit from the work they are doing, while keeping all your coding practices (testing, code reviews, deployment cadence, etc.) largely separate.
Handling different scaling requirements
As your user base grows, you will hit more and more scaling challenges to handle the load, and you may find that some features have different scaling requirements than others. For example, one feature may benefit from distributing work across a large number of CPUs on many servers, whereas another feature may benefit from a large amount of memory on a single server. If everything is in one codebase—and more to the point, if everything is deployed together—meeting these conflicting scaling requirements can be difficult. As a result, many companies break up their codebase so that the different features can be deployed and scaled independently.
Using different programming languages
Most companies start with a single programming language, but as you grow, you may end up using multiple programming languages. Sometimes, this is because different developers at your company prefer different languages; sometimes, this is because you acquired a company that uses a different programming language; sometimes, this is because different languages may be a better fit for certain tasks. Each time you introduce a new language, you will have a new app to deploy, configure, update, and so on. In other words, you now have multiple services to manage, as you’ll see shortly.
Now that you’ve seen why you may want to break up a codebase, let’s talk about how to actually do it.
How to Break Up Your Codebase
Broadly speaking, there are two approaches to breaking up a codebase:
-
Split into multiple libraries
-
Split into multiple services
Note that these are not mutually exclusive options, as many companies choose to do both. The following sections will go into detail on these two options, starting with breaking the codebase into multiple libraries.
Breaking a codebase into multiple libraries
Just about all codebases are broken up into various abstractions, such as functions, interfaces, classes, and modules
(depending on the programming language you’re using). However, if the codebase gets big enough, you may choose to
break it up even further into libraries. An abstraction is a library if you no longer depend directly on the source
code of that abstraction, but on a versioned artifact you publish for that abstraction. The exact type of artifact
depends on the programming language: for example, in Java, that might be a .jar file; in Ruby, that might be a Ruby
Gem; and in JavaScript, that might be an NPM module.
For example, you might start with a codebase that has three parts, A, B, and C. Initially, part A depends
directly on the source code of B and C, as shown in Figure 50:
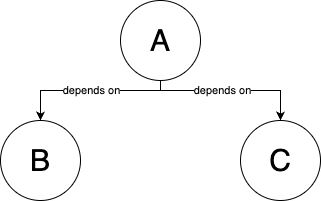
Figure 50. Part A depends on the source code of parts B and C
You could break up this codebase by turning B and C into libraries that publish artifacts (e.g., if this was Java,
the artifacts would be b.jar and c.jar), and update A to depend on a specific version of these artifacts, instead
of the source code, as shown in Figure 51.
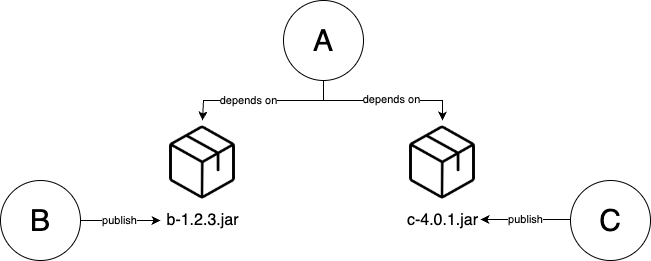
Figure 51. Part A depends on artifacts published by libraries B and C
Note that, as long as you use artifact dependencies, A, B, and C can all continue to live in a single repo, or you can split them into multiple repos. Multiple repos tends to be more common, as (a) it ensures you don’t accidentally fall back to source code dependencies, (b) it allows you to version the repos (e.g., using tags) independently, and (c) it gives teams more independence.
Breaking up your code into libraries has several advantages. First, it allows you to focus on one small part of your codebase (the library) at a time, while safely ignoring everything else. Second, each team can develop the internals of their libraries using whatever practices they want (e.g., for testing, code reviews, etc.). Third, teams can work more independently, as unlike source code dependencies, where every change immediately affects everyone who depends on your code, with libraries, your changes don’t affect anyone until (a) you’ve published a new versioned artifact and (b) users of your library have explicitly and deliberately chosen to pull in that new version.
|
Key takeaway #4
Breaking up your codebase into libraries allows developers to focus on smaller parts of the codebase at a time. |
Almost all software projects these days depend on libraries: namely, open source libraries. For example, the Node.js sample app you’ve been working on throughout this blog post series depends on Express.js, an open source web framework that you pull in through a versioned artifact (an NPM module). The maintainers of Express.js are able to develop this library completely independently of all the projects that depend on Express, following their own coding conventions, testing practices, release cadence, and so on. The point is not that you need to open source your own code, but that if you break up your codebase into libraries, you can benefit from being able to develop each library independently.
If you do split your codebase into libraries, I recommend the following practices:
- Semantic versioning
-
Semantic versioning (SemVer) is a set of rules for how to assign version numbers to your code. The goal is to communicate to users if a new version of your library has backward incompatible changes (AKA breaking changes), which are changes that would cause previously working code to fail or behave incorrectly after updating to the new version of the library. Typically, this happens when you make changes to the API: e.g., you remove something that was in the API before, or you add something new that wasn’t in the API before, and is now required. With SemVer, you use version numbers of the format
MAJOR.MINOR.PATCH, which you increment as follows:-
Increment the
MAJORversion when you make incompatible API changes. -
Increment the
MINORversion when you add backward compatible functionality. -
Increment the
PATCHversion when you make backward compatible bug fixes.
For example, if your library is currently at version
1.2.3, and you have made a backward incompatible change to the API, then to communicate this to your users, the next release would be2.0.0. On the other hand, if you made a backward compatible bug fix, the next release would be1.2.4. It’s also worth mentioning that1.0.0is typically seen as the first release that provides compatibility promises, so if you just created something new, you can use0.x.yto indicate that you’re not yet providing backward compatibility guarantees. -
- Automatic updates
-
You should set up automatic updates to keep your dependencies up to date. One of the benefits of using library dependencies is that changes to that library only affect you when you explicitly and deliberately pull in a new version of that library. However, this strength is also a drawback. It’s easy to forget to update a library for a long time. This can be a problem, as the old version may have bugs or security vulnerabilities, and if you don’t update for a while, updating to the latest version to pick up a fix can be difficult, especially if there have been many breaking changes since your last update.
This is yet another place where, if it hurts, you need to do it more often. In particular, you want to set up a process where you automatically update your dependencies and roll those updates out to production (sometimes called software patching). One way to do this is to use tools such as DependaBot, Renovate, or Patcher (full list), which automatically detect dependencies in your code and open pull requests to update those dependencies to new versions. That way, instead of having to remember to do updates yourself, the updates come to you, and all you have to do is check that they pass your suite of tests (as per Part 4), and if so, merge the PR , and let the code deploy automatically (as per Part 5).
Breaking a codebase into multiple services
Consider again parts A, B, and C from the previous section: whether you use source code dependencies
(Figure 50) or library dependencies (Figure 51), all the
parts of your codebase run in a single process and communicate with each other via in-memory function calls. Another
way to break up the codebase is to move from a single monolithic application into multiple services, where
each service is a part of your code that you develop independently and deploy in a separate process, typically on a
separate server, and all communication between services is done by sending messages over the network, as
shown in Figure 52:
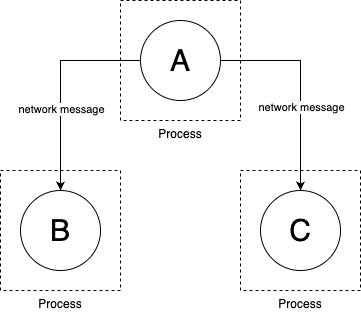
Figure 52. Service A communicates with services B and C via network messages
Over the years, there have been many different approaches to building services, and also many buzzwords and fads, which can make it hard to nail down concrete definitions. One approach is service-oriented architecture (SOA), which typically refers to building relatively large services that handle all the logic for an entire business line or product within your company. This was also sometimes called Web 2.0, when it referred to services exposed between different companies (e.g., APIs from Twitter, Facebook, Google, etc). A slightly more recent approach that arose around the same time as DevOps is microservices, which typically refers to smaller, more fine-grained services that handle one domain within a company: e.g., one microservice to handle user profiles, one microservice to handle search, one microservice to do fraud detection, and so on. Yet another approach is event-driven architecture, where services communicate asynchronously (you’ll learn more about this approach in Part 9).
Whichever model of services you choose, there are typically three main advantages to breaking up your code into services:
- Isolating teams
-
A common pattern is to have each service owned by a different team, which allows that team to focus on just a small part of the codebase, their service, to use whatever practices (testing, code reviews, etc.) best fit the needs of that service, and to safely ignore everything else.
- Using multiple programming languages
-
Since services run in separate processes, you can build them in different programming languages. This allows you to pick the programming languages that are the best fits for certain problem domains. It also makes it easier to integrate codebases from other companies (e.g., acquisitions) that used different programming languages without having to rewrite all the code.
- Scaling services independently
-
Since services run in separate processes, you can run them on separate servers, and scale those servers independently. For example, you might scale one service horizontally, deploying it across more servers as CPU load goes up, and another service vertically, deploying it on a single server with more RAM.
Almost all large companies eventually move to services for these three advantages, but especially due to the ability to isolate teams. To some extent, using services allows each team to operate like an independent company, which is essential to scaling.
|
Key takeaway #5
Breaking up your codebase into services allows different teams to own, develop, and scale each part independently. |
Moving to services can be an essential ingredient in helping a company scale, but beware, breaking up a codebase, whether into libraries or services, comes with a number of costs and challenges, so most companies should avoid it until the benefits clearly outweigh the costs described in the next section.
Challenges with Breaking Up Your Codebase
In recent years, it became trendy to break up a codebase, especially into microservices, almost to the extent where "monolith" became a dirty word. At a certain scale, moving to services is inevitable: every large company has a story of breaking up their monolith. But until you get to that scale, a monolith is a good thing. That’s because breaking up a codebase introduces a number of challenges, including the following:
-
Challenges with managing multiple code bases
-
Challenges with integration
-
Challenges with managing multiple services
Let’s go through these one at a time, starting with the challenges of managing multiple code bases.
Challenges with managing multiple code bases
Both libraries and services consist of two parts: the public API and the internal implementation details. Breaking up your codebase allows you to make changes more quickly to the internal implementation details, as each team can maintain those however they want. However, making changes to the public API becomes slower and more difficult, as you now need to worry about backward compatibility. Making backward incompatible changes in a library or service can cause headaches, bugs, and outages for everyone who depends on your library or service, so you have to be extra careful with public API changes.
For example, imagine that in part B of your codebase, you have a function called foo that you want to rename to
bar. If all the code that depends on B is in one codebase, this is easy:
-
Rename
footobarinB. -
Find all the places that reference
fooand update them tobar. Many IDEs can do this rename automatically. If there are too many places to update in one commit, use branch by abstraction (as introduced in Part 5). -
Done.
If B is a separate library, the process is more complicated:
-
Discuss with your team if you really want to do a backward incompatible change. Some libraries make compatibility promises, and can only break them rarely: e.g., some libraries batch all breaking changes into releases they do once per quarter or once per year, so you might have to wait a long time to do the rename.
-
Rename
footobarinB. -
Create a new release of
B, updating theMAJORversion number to indicate there are breaking changes, and write up migration instructions. -
Every team that relies on
Bnow chooses when to update to the new version. If they see there is a breaking change, they may wait longer before updating. And if those teams finally decide to upgrade, they have to find all usages offooand rename them tobar. -
Done.
If B is a separate service, the process is even more complicated:
-
Discuss with your team if you really want to do a backward incompatible change. These are expensive changes to make in a service, so you may choose not to do it, or you may have to wait a long time before doing the rename.
-
Add a new version of your API and/or a new endpoint that has
bar. Note that you do not removefooat this point. If you did, you might break the services that rely onfoo, causing bugs or outages. -
Deploy the new version of your service that has both
barandfooendpoints. -
Notify all users and update your docs to indicate there is a new
barendpoint and thatfoois deprecated. -
You wait for every team to switch from
footobarin their code and to deploy a new version of their service. You might even monitor the access logs ofBto see if thefooendpoint is still being used, identify the teams responsible, and bargain with them to switch tobar. Depending on the company and competing priorities, this could take weeks or months. Sometimes, especially if it’s a particularly expensive breaking change, you may have to maintain multiple versions of your API for years, as users of the old version refuse to update to the new version. -
At some point, if usage of
foogoes to zero, you can finally remove it from your code, and deploy a new version of your service. Sometimes, especially with public APIs, you might have to keep the oldfooendpoint forever. -
Done.
Phew. That’s a lot of work. If you spend enough time maintaining a library or service, you quickly learn how important it is to get the public API right, and you’ll likely spend a lot of time obsessing over your public API design. But no matter how much time you spend on it, you’ll never get it exactly right, so expect public API maintenance to be one of the overheads of splitting up the codebase.
The reason it’s hard to maintain a public API in libraries and services is because that’s a place where you have to interact with many other teams at your company. As it turns out, this is just one specific type of change that becomes harder if you split up your codebase. The more general problem is that any global changes—changes that require updating multiple libraries or services—become considerably harder.
For example, LinkedIn, like almost all companies, started with a single monolithic application. It was called Leo and was written in Java. Eventually, Leo became a bottleneck to scaling, both in terms of scaling to handle more developers and more traffic, so we started to break it up into dozens of libraries and services. For the most part, this was a huge win, as each team was able to iterate on features within their library or service much faster than when those features were mixed with everyone else’s features within Leo. However, we also had to do the occasional global change.
It was especially painful to make changes to a library called util-security.jar, which contained security utilities
that almost every single service relied on. When we found a vulnerability in that library, rolling out the new version
to all services took a gargantuan effort. First, we had to dig through dozens of services, many of which were defined in
different repos, to find every service who depended on util-security.jar. Next, we had to update each of those
services to the new version. Sometimes, this was a simple version number bump. Sometimes, the service was on an
ancient version of util-security.jar, so we had to upgrade them through numerous breaking changes. Sometimes, the
service depended on util-security.jar indirectly, through a chain of dependencies, so we had to update each of
those dependencies in the chain first, and only then could we update the service. Every update required opening a pull
request, waiting for code reviews, and bargaining with the team that owned the service to do a deployment.
What would’ve been a single commit and deploy within a monolith became a multi-week slog when dealing with dozens of microservices. To some extent, this is by design: the whole point of splitting up a codebase is to make it hard for changes in other parts of the codebase to affect you.
|
Key takeaway #6
When you split up a codebase, you optimize for being able to make changes faster within each part of the codebase, but this comes at the cost of it taking longer to make and integrate changes across the entire codebase. |
The challenge with splitting a codebase is knowing where to put the seams. If you get it right, then the majority of the changes you make will be within the part of the codebase owned by your team, which will allow you to go faster. If you get it wrong, then you’ll often have to make global changes across multiple parts of the codebase, which will make you go slower.
One place I see teams get this wrong all the time is splitting up the codebase too early. When you’ve been working with a codebase for years, you can usually look for the following patterns for where the codebase could be split:
- Files that change together
-
If every time you make a change of type X, you update a group of files
A, and every time you make a change of type Y, you update a group of filesB, thenAandBare good candidates to be broken out into separate libraries or services. - Files that teams focus on
-
If 90% of the changes by team X are in a group of files
Aand 90% of the changes by team Y are in a group of filesB, thenAandBare good candidates to be broken out into separate libraries or services. - Parts that could be open sourced
-
Are there parts of your code that you could envision as standalone open source projects? Or parts of your code that could be exposed as standalone web APIs? I’m not saying you actually need to open source your code or open up APIs, but merely use this as a litmus test. Anything that would work well as an open source project is a good candidate to be broken out into a library; anything that would work well as a standalone web API is a good candidate to be broken out into a service.
- Performance bottlenecks
-
If you know that 90% of the time it takes to serve a request is spent in part
Aof your code, and it’s mostly limited by RAM, then that might be a good candidate to break out into a service that you scale separately.
It’s rare to be able to accurately predict any of these items ahead of time. This is especially true of performance bottlenecks, which are notoriously hard to predict without running a profiler against real code and real data. That’s why it’s almost always better to start with a monolith, grow it as far as you can, and only when you can’t scale it any further, and the seams are obvious, should you break it up into smaller pieces.
This is one of the reasons that I shake my head when I see a tiny startup with a three-person engineering team launch their product with 12 microservices. Not only are you going to pay a high price in terms of operational overhead (something you’ll learn more about shortly), but you almost certainly put the seams in the wrong places. Inevitably, these teams find that every time they go to make the slightest change in their product, they have to update 7 different microservices, and deploy them all in just the right order. Meanwhile, the startup who built on top of a Ruby on Rails monolith is running circles around them, shipping changes 10x faster.
Challenges with integration
In Part 5, you learned all about continuous integration, and its central role in helping teams move
faster. Well, here’s a fun fact: splitting up your codebase into libraries and services is the opposite of continuous
integration. What’s the difference between a long-lived feature branch that you only merge into main after 8 months
versus a library dependency that you only update once every 8 months? Not much.
Once you’ve split up your codebase, what you’re effectively doing is late integration. And that’s by design: one of the main reasons to split up a codebase is to allow teams to work more independently from each other, which means you are going to be integrating your work together less frequently.
|
Key takeaway #7
Splitting up a codebase into multiple parts means you are choosing to do late integration instead of continuous integration between those parts, so only do it when those parts are truly independent. |
This is a good trade-off to make if the different teams are truly decoupled from each other: e.g., they work on totally separate products within your company. However, if the teams are actually tightly coupled, and have to interact often, then splitting them up into separate codebases will lead to problems. Either the teams will try to work mostly independently, and due to the lack of integration and proper testing run into lots of conflicts, bugs, and outages, or the teams will try to integrate their work all the time, and due to the frequent need to make global changes across multiple parts of the codebase, they will find development slows to a crawl.
An integration challenge that is unique to libraries is what’s sometimes referred to as dependency hell, which is where using versioned dependencies can lead problems such as the following:
- Too many dependencies
-
If you depend on dozens of libraries, and each of those libraries depends on more libraries, and each of those depends on even more, then merely downloading your dependencies can take up a ton of time, disk space, and bandwidth.
- Long dependency chains
-
You sometimes get long chains of dependencies: e.g., library
Adepends onB,Bdepends onC,Cdepends onD, and so on, until finally you get to some libraryZ. If you had to make a fix toZ, and you want to apply it toA, then you’d have to updateZand release a new version, then updateYand release a new version, thenX, and so on, all the way up the chain, until you finally get back toA. - Diamond dependencies
-
Imagine
Adepends onBandC, andBandC, in turn, each depend onD. This is all fine unlessBandCeach depend on different, incompatible versions ofD: e.g.,BneedsDat version1.0.0, whereasCneedsDat version2.0.0, as shown in Figure 53. You can’t have two conflicting versions at once, so now you’re stuck unlessBorCare updated, and these may be libraries you don’t control.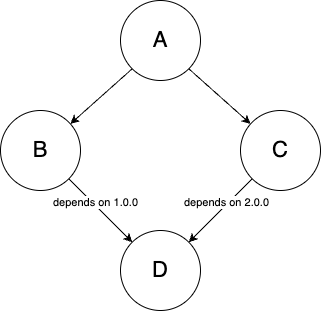 Figure 53. Diamond dependencies
Just about all codebases run into these issues from time to time due to dependencies on open source libraries, but if you break your own codebase up into many libraries, these problems may become considerably worse.
Challenges with managing multiple services
If you split a monolith into services, instead of having just a single type of app to manage, you now have many different types, possibly written in different languages, each with its own mechanisms for testing, deployment, monitoring, configuration, and so on. That’s already a lot of operational overhead, but there’s even more from the following items:
- Deployment ordering overhead
-
With N services, you not only have N things to deploy and manage, but you also have to consider the interactions between services, which grows at a rate of N2. For example, let’s say you have a service
Athat depends on a serviceB. As part of developing a new feature, you add a new endpoint calledfootoB, and you update the code inAto make calls to thefooendpoint. Now consider what happens at deployment time. If you deploy the new version ofAbefore the new version ofBis out, then whenAtries to use thefooendpoint, it’ll fail, as the old version ofBdoesn’t have that endpoint yet. So now you have to enforce deployment ordering:Bmust be deployed beforeA. But of course,Bitself may depend on new functionality in servicesCandD, and those services may depend on new functionality in other services, and so on. So now you have a deployment graph to maintain to ensure the right services are deployed in the right order. And this gets really messy if one of those services has a bug, and you have to roll back that service and everything that depended on it.One way to mitigate this problem is to ban deployment ordering entirely, requiring that you write code in a way that allows services to be deployed in any order, and rolled back at any time. One way to do that is to use feature flags, which you saw in Part 5. For example, you wrap the new functionality in
A—the part of the code that calls the newfooendpoint inB—in an if-statement which is off by default. That way, you can deployAandBat any time and in any order, as the new functionality won’t be visible to any users. When you’re sure both the new versions ofAandBare deployed, you then turn the feature toggle on, and the new functionality should start working. If you hit any issue with the new functionality orBhas to be rolled back, you can turn the feature toggle off again. - Debugging overhead
-
If you have a single monolithic app, and your users report a bug, you know the bug is in the app. If you have dozens of services, and your users report a bug, now you have to do an investigation to figure out which service is at fault. This is considerably harder for several reasons. One reason is the natural tendency for each team to immediately blame other teams, so no one will want to take ownership of the bug. Another reason is that when you have services that communicate over the network, rather than a monolith where everything happens in a single process, there are a large number of new, complicated failure conditions that are tricky to debug (you’ll learn more about this shortly).
One more reason is that, whereas debugging a single app can be hard, trying to track down a bug across dozens of separate services can be a nightmare. You can no longer look at the logs of a single app, and instead have to go look at logs from dozens of apps, each potentially in a different place and format (you’ll learn more about logging, including how to mitigate these issues, in Part 10); you can no longer reproduce the error by running a single app on your computer, and instead have to fire up dozens of services locally; you can no longer hook up a debugger to a single process and go through all the code step-by-step, and instead have to use all sorts of tracing tools (another topic you’ll learn about in Part 10) to identify the dozens of services that end up processing a single request. A bug that could take an hour to figure out in a monolith can take weeks to track down in a microservices architecture.
- Infrastructure overhead
-
The bureaucracy is expanding to meet the needs of the expanding bureaucracy.
— Oscar WildeMoving from a monolith to multiple services isn’t just about deploying a bunch of services. You typically also need to deploy a bunch of extra infrastructure to support the services themselves—and the more services you have, the more infrastructure you need to support them. For example, to help manage the deployments of 12 services, rather than 1 monolith, you may have to deploy a more complicated orchestration tool (e.g., Kubernetes); to help your services communicate with each other securely, you may have to deploy a service mesh tool (e.g., Istio); to help your services communicate with each other asynchronously, you may have to deploy a streaming platform (e.g. Kafka); to help with debugging and monitoring your microservices architecture, you may have to deploy a distributed tracing tool (e.g., Jaeger); and so on.
- Performance overhead
-
One of the benefits of services is that they help you deal with performance bottlenecks by allowing you to scale different parts of your codebase independently. One of the drawbacks of services is that, in almost every other way, they actually make performance considerably worse. This is due networking overhead and serialization overhead, as discussed in the next two paragraphs.
The networking overhead is due to the fact that, with multiple services, all the parts of your codebase run in separate processes, communicating with each other over the network, rather than via function calls (as in a monolith). If you refer once more to Table 10, you’ll see that a random read from main memory takes roughly 100 ns, whereas the round trip for a single TCP packet in a data center takes 500,000 ns. That means that the mere act of moving a part of your code to a separate service makes it at least 5,000 times slower!
The serialization overhead is due to the fact that communicating over the network is not only slower in terms of the time it takes for the message to do a roundtrip, but also all the serialization you have to do to that message. That is, all the packing, encoding, decoding, unpacking to send a message over the network. This includes the format of the messages (e.g., JSON), the format of the application layer protocol (e.g, HTTP), the format for encryption (e.g., TLS), the format for compression (e.g., Snappy), and so on. Just to put it into perspective, per Table 10, you can see that compressing 1KB with Snappy takes around 2,000 ns, so just the compression step by itself is at least 20x slower than a random read from main memory.
You can partially mitigate networking and serialization overhead by rewriting your code to use concurrency, caching, batching, and de-duping, but all of this makes your code considerably more complicated, and it’ll still be slower than keeping everything in a single process.
- Distributed system complexities
-
Splitting a monolith into services turns a single app into a distributed system. Distributed systems are hard. Dealing with distributed systems introduces a number of new challenges, including data storage complexity, which you’ll learn about in Part 9, and new failure modes and I/O complexity, which you’ll learn about in the next two paragraphs.
The new failure modes arise because you’ve shifted from a single process, where all communication is via function calls that have a small number of possible errors (e.g., the function may return an expected error, or it may throw an unexpected error, or the whole process may crash), to multiple processes that communicate over the network, where you now have to deal with many new types of errors. For example, a network request may fail because the network is down, or because the network is misconfigured and sends your request to the wrong place, or because the service you’re trying to talk to is down, or the service may take too long to respond, or it may start responding, but crash part of the way through, or it may send multiple responses, or responses not serialized the way you’re expecting, and so on.
The I/O complexity is also due to using the network for communication. Network requests are a type of I/O (input/output), and since most types of I/O are orders of magnitude slower than operations in memory (refer to Table 10), you typically need to rewrite your code to do other work concurrently while waiting on the I/O to complete. One common approach for concurrency is to use a thread pool, where you run code across many concurrent threads, and in each thread, you use synchronous I/O that blocks that thread until the I/O completes. This allows you to keep your code structure mostly the same, but the challenge is in correctly sizing your thread pool: too many threads and your CPU will spend all its time context switching between them (thrashing); too few threads, and you’ll spend all your time waiting, which will decrease throughput. Another common concurrency approach is to use asynchronous I/O that is non-blocking, so the code can keep executing while waiting on I/O, and you’ll be notified when that I/O completes (this is what Node.js does). This approach allows you to avoid having to fight with thread pool sizes, but it requires you to rewrite your code to handle those notifications via mechanisms such as callbacks, promises, or async/await.
Now that you’ve seen all the challenges with splitting up your codebase, you might be feeling a little less excited about that sexy microservices architecture you saw at Google or Netflix. If so, that’s a good thing. You’re probably not working at Google or Netflix, so you shouldn’t blindly copy their architecture, as much of it was designed to handle problems of extraordinary scale, and if you don’t have those problems, then that architecture is more likely to slow you down than to help you.
|
Key takeaway #8
Splitting up a codebase into libraries and services has a considerable cost: you should only do it when the benefits outweigh those costs, which typically only happens at a larger scale. |
Let’s assume that you’re at a company of a large enough scale to merit splitting up the codebase, and see what it looks like to run multiple services in Kubernetes.
Example: Deploy Microservices in Kubernetes
These days, Kubernetes is a popular orchestration tool for managing microservices, so let’s give it a shot. You’re going to convert the simple Node.js sample app you’ve seen throughout the blog post series into two apps, as shown in Figure 54:
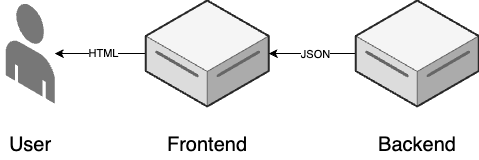
Figure 54. A frontend microservice fetches data from a backend microservice and presents that data to the user
- Backend sample app
-
This app will represent a backend microservice, which is responsible for data management, including storing and processing data for some domain within your company, and exposing this data via an API (e.g., JSON over HTTP) to other microservices within your company (but not directly to users).
- Frontend sample app
-
This app will represent a frontend microservice, which is responsible for presentation, including gathering data from backends and showing that data to users in some sort of user interface (e.g., HTML rendered in a web browser).
The following two sections will walk you through how to create these services and deploy them in Kubernetes, starting with the backend sample app.
Creating a backend sample app
As a first step, copy the Node.js sample app that you last saw in Part 5 into a new folder called sample-app-backend:
$ cd fundamentals-of-devops
$ cp -r ch5/sample-app ch6/sample-app-backendSince you’ll be deploying this backend into a Kubernetes cluster, you should also copy the Kubernetes Deployment and Service configurations from Part 3 into sample-app-backend:
$ cp ch3/kubernetes/*.yml ch6/sample-app-backend/Next, update the files in sample-app-backend as follows:
- app.js
-
The backend should expose just a single endpoint, which responds to HTTP requests with JSON, as shown in Example 113:
Example 113. Return JSON (ch6/sample-app-backend/app.js)app.get('/', (req, res) => { res.json({text: "backend microservice"}); });Normally, a backend microservice would look up data in a database of some kind, but to keep this example simple, this sample app uses
res.jsonto return static JSON, which includes a field calledtext. - package.json
-
Rename the app to "sample-app-backend," as shown in Example 114:
Example 114. Rename the app (ch6/sample-app-backend/package.json)"name": "sample-app-backend", "description": "Backend app for 'Fundamentals of DevOps and Software Delivery'", - sample-app_deployment.yml
-
Update the app name as shown in Example 115:
Example 115. Rename the app (ch6/sample-app-backend/sample-app-deployment.yml)metadata: name: sample-app-backend-deployment (1) spec: replicas: 3 template: metadata: labels: app: sample-app-backend-pods (2) spec: containers: - name: sample-app-backend (3) image: sample-app-backend:0.0.1 (4) ports: - containerPort: 8080 env: - name: NODE_ENV value: production selector: matchLabels: app: sample-app-backend-pods (5)1 Update the name of the Deployment to "sample-app-backend-deployment." 2 Update the labels on the pods to "sample-app-backend-pods." 3 Update the name of the container to "sample-app-backend." 4 Update the Docker image to deploy to "sample-app-backend" at version 0.0.1, which is a Docker image you’ll build shortly. 5 Update the pods to target "sample-app-backend-pods." - sample-app_service.yml
-
As shown in Example 116, update the app name, and switch to a
ClusterIPService, which is a type of service that is only reachable from within the Kubernetes cluster, and not from the outside world:Example 116. Rename the app and switch toClusterIP(ch6/sample-app-backend/sample-app-service.yml)metadata: name: sample-app-backend-service (1) spec: type: ClusterIP (2) selector: app: sample-app-backend-pods (3) ports: - protocol: TCP port: 80 targetPort: 80801 Update the name of the Service to "sample-app-backend-service." 2 Switch the service typefromLoadBalancertoClusterIP.3 Update the pods to target "sample-app-backend-pods."
Build a Docker image for the backend app using the dockerize command you added back in Part 4:
$ cd ch6/sample-app-backend/
$ npm run dockerizeThis will create a new Docker image called "sample-app-backend" at version 0.0.1. Let’s deploy this Docker image into a Kubernetes cluster. The easiest one to test with is Kubernetes running locally in Docker Desktop, just as in Part 3. You can authenticate to the Kubernetes cluster in Docker Desktop as follows:
$ kubectl config use-context docker-desktopNow you can use kubectl apply to deploy the Deployment and Service:
$ kubectl apply -f sample-app-deployment.yml
$ kubectl apply -f sample-app-service.ymlIf you run kubectl get services, you should see the Service for the backend:
$ kubectl get services
NAME TYPE CLUSTER-IP EXTERNAL-IP PORT(S)
sample-app-backend-service ClusterIP 10.99.156.12 <none> 80/TCPNote the backend Service name. You’ll need this in the frontend app, which is the focus of the next section.
Creating a frontend sample app
Create the frontend app using a process similar to the one you just used for the backend app. First, copy the Node.js sample app from Part 5 and the Kubernetes Deployment and Service configurations from Part 3 into a new folder called sample-app-frontend:
$ cd fundamentals-of-devops
$ cp -r ch5/sample-app ch6/sample-app-frontend
$ cp ch3/kubernetes/*.yml ch6/sample-app-frontend/Next, update the files in sample-app-frontend as follows:
- app.js
-
The frontend should expose just a single endpoint, which makes an HTTP request to the backend and renders the response as HTML, as shown in Example 117:
Example 117. Call the backend and render HTML (ch6/sample-app-frontend/app.js)const backendHost = 'http://sample-app-backend-service'; (1) app.get('/', async (req, res) => { const response = await fetch(backendHost); (2) const responseBody = await response.json(); (3) res.render('hello', {name: responseBody.text}); (4) });1 What you’re seeing here is an example of service discovery in Kubernetes. Whenever you create a Service in Kubernetes named foo, Kubernetes creates a DNS entry for that Service, so requests tohttp://fooare automatically routed to that Service. This code sets the hostname for the backend to the name of the Service you created in the previous section. You’ll learn more about service discovery and DNS in Part 7.2 Use the fetchfunction to make an HTTP request to the backend microservice, using the hostname from (1).3 Read the body of the response from the backend and to parse it as JSON. 4 Render the helloEJS template, passing it thetextfrom the backend’s JSON. - views/hello.ejs
-
Update the
helloEJS template with the HTML shown in Example 118:Example 118. Add HTML markup (ch6/sample-app-frontend/views/hello.ejs)<p>Hello from <b><%= name %></b>!</p> - package.json
-
Rename the app to "sample-app-frontend," as shown in Example 119:
Example 119. Rename the app (ch6/sample-app-frontend/package.json)"name": "sample-app-frontend", "description": "Frontend app for 'Fundamentals of DevOps and Software Delivery'", - sample-app_deployment.yml
-
Update the app name as shown in Example 120:
Example 120. Rename the app (ch6/sample-app-frontend/sample-app-deployment.yml)metadata: name: sample-app-frontend-deployment (1) spec: replicas: 2 (2) template: metadata: labels: app: sample-app-frontend-pods (3) spec: containers: - name: sample-app-frontend (4) image: sample-app-frontend:0.0.1 (5) ports: - containerPort: 8080 env: - name: NODE_ENV value: production selector: matchLabels: app: sample-app-frontend-pods (6)1 Update the name of the Deployment to "sample-app-frontend-deployment." 2 Update the number of replicas to two. This is an example of scaling two services independently (sample-app-backend has three replicas). 3 Update the labels on the pods to "sample-app-frontend-pods." 4 Update the name of the container to "sample-app-frontend." 5 Update the Docker image to deploy to "sample-app-frontend" at version 0.0.1, which is a Docker image you’ll build shortly. 6 Update the pods to target "sample-app-frontend-pods." - sample-app_service.yml
-
Update the app name, as shown in Example 121:
Example 121. Rename the app (ch6/sample-app-frontend/sample-app-service.yml)metadata: name: sample-app-frontend-loadbalancer (1) spec: type: LoadBalancer (2) selector: app: sample-app-frontend-pods (3)1 Update the name of the Service to "sample-app-frontend-service." 2 Keep the service typeasLoadBalancerso that you can access this Service from the outside world, which is typically what you want for a frontend.3 Update the pods to target "sample-app-frontend-pods."
Build a Docker image for the frontend app using the dockerize command:
$ cd ch6/sample-app-frontend
$ npm run dockerizeThis will create a new Docker image called "sample-app-frontend" at version 0.0.1. To deploy this Docker image into
a Kubernetes cluster, use kubectl apply:
$ kubectl apply -f sample-app-deployment.yml
$ kubectl apply -f sample-app-service.ymlIf you run kubectl get services, you should now see the Services for both the backend and the frontend:
$ kubectl get services
NAME TYPE EXTERNAL-IP PORT(S)
kubernetes ClusterIP <none> 443/TCP
sample-app-backend-service ClusterIP <none> 80/TCP
sample-app-frontend-loadbalancer LoadBalancer localhost 80:32081/TCPNotice how EXTERNAL-IP for the frontend is set to localhost and that it’s listening on port 80, so you can test it
by going to http://localhost. If you open this URL in a web browser, you should see the HTML rendered, as shown
in Figure 55:
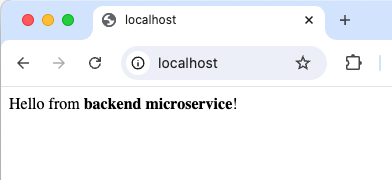
Figure 55. The HTML response from the frontend
Congrats, you’re now running two microservices in Kubernetes that are talking to each other! A separate team could own each service, developing, deploying, and scaling the service completely independently.
|
Get your hands dirty
Here are a few exercises you can try at home to go deeper:
|
When you’re done testing, you may want to run kubectl delete on each of the Deployments and Services to undeploy them
from your Kubernetes cluster. You should also commit your changes to Git, as you will continue to iterate on this code
in subsequent blog posts.
Conclusion
You’ve now seen how to address some of the problems of scale that affect a company as it grows, including breaking up your deployment into multiple environments, and breaking up your codebase into multiple libraries and services. These approaches have a number of benefits and costs, as you learned from the 8 key takeaways from this blog post:
-
Breaking up your deployment into multiple environments allows you to isolate tests from production and teams from each other.
-
Breaking up your deployment into multiple regions allows you to reduce latency, increase resiliency, and comply with local laws and regulations, but you may have to rework your entire architecture.
-
Configuration changes are just as likely to cause outages as code changes.
-
Breaking up your codebase into libraries allows developers to focus on smaller parts of the codebase at a time.
-
Breaking up your codebase into services allows different teams to own, develop, and scale each part independently.
-
When you split up a codebase, you optimize for being able to make changes faster within each part of the codebase, but this comes at the cost of it taking longer to make and integrate changes across the entire codebase.
-
Splitting up a codebase into multiple parts means you are choosing to do late integration instead of continuous integration between those parts, so only do it when those parts are truly independent.
-
Splitting up a codebase into libraries and services has a considerable cost: you should only do it when the benefits outweigh those costs, which typically only happens at a larger scale.
One topic that came up again and again as you looked at multiple environments and multiple services is the key role of networking, both in how services communicate and in how you define environments. Networking also plays a key role in security. So far, just about everything you’ve deployed throughout this blog post series—all the EC2 instances, EKS clusters, and so on—has been directly accessible over the public Internet, which is convenient for learning and testing, but it means that any slight lapse in security—e.g., leaving a firewall port open by accident or running out-of-date software that has a vulnerability—can be immediately exploited by malicious actors.
In Part 7, you’ll learn how to set up your network to give you extra layers of protection, so you’re never just one mistake away from disaster, as well as how to use networking to define environments, do service discovery, connect to servers for debugging, and more.
Update, June 25, 2024: This blog post series is now also available as a book called Fundamentals of DevOps and Software Delivery: A hands-on guide to deploying and managing software in production, published by O’Reilly Media!
Last updated 2025-02-17 01:44:24 UTC


