This is Part 2 of the Fundamentals of DevOps and Software Delivery series.
In Part 1, you learned how to deploy your app using PaaS and IaaS, but it required a lot of manual
steps clicking around a web UI. This is fine while you’re learning and experimenting, but if you manage everything at
a company this way—what’s sometimes called ClickOps—it quickly leads to problems:
Deployments are slow and tedious
So you can’t deploy too often.
Deployments are error-prone
So you end up with lots of bugs, outages, and late-night debugging sessions.
Only one person knows how to deploy
So that person is overloaded, they never have time for long-term improvements, and if they were to leave or
get hit by a bus, everything would grind to a halt.[10]
Fortunately, these days, there is a better way to do things: you can manage your infrastructure as code (IaC).
Instead of clicking around manually, you use code to define, deploy, update, and destroy your infrastructure. This
represents a key insight of DevOps: most tasks that you used to do manually can now be automated using
code, as shown in Table 6.
Table 6. A key insight of DevOps is that you can manage almost everything as code
If you search around, you’ll quickly find that there are many tools out there that allow you to manage your
infrastructure as code, including Chef, Puppet, Ansible, Pulumi, Terraform, OpenTofu, CloudFormation, Docker, Packer,
and so on. Which one should you use? Many of the comparisons you find online between these tools do little more than
list the general properties of each tool and make it sound like you could be equally successful with any of them. And
while that’s true in theory, it’s not true in practice. There are considerable differences between these tools, and
your odds of success go up significantly if you know how to pick the right tool for the job.
This blog post will help you navigate the IaC space by introducing you to the four most common
categories of IaC tools:
Ad hoc scripts: e.g., use a Bash script to deploy a server.
Configuration management tools: e.g., use Ansible to deploy a server.
Server templating tools: e.g., use Packer to build an image of a server.
Provisioning tools: e.g., Use OpenTofu to deploy a server.
You’ll work through examples where you deploy the same infrastructure using each of these approaches, which will allow
you to see how different IaC categories perform across a variety of dimensions (e.g., verbosity, consistency, error
handling, and so on), so that you can pick the right tool for the job.
Before digging into the details of various IaC tools, it’s worth asking, why bother? Learning and adopting new tools has
a cost, so what are the benefits of IaC that make this worthwhile? This is the focus of the next section.
The Benefits of IaC
When your infrastructure is defined as code, you are able to use a wide variety of software engineering practices to
dramatically improve your software delivery processes, including the following:
Speed and safety
If the deployment process is automated, it will be significantly faster, since a computer can carry out the deployment
steps far faster than a person, and safer, given that an automated process will be more consistent, more repeatable, and
not prone to manual error.
Documentation
If your infrastructure is defined as code, then the state of your infrastructure is in source files that anyone can
read, rather than locked away in a single person’s head. In other words, IaC acts as documentation, allowing
everyone in the organization to understand how things work.
Version control
Storing your IaC source files in version control (which you’ll do in Part 4) makes it easier
to collaborate on your infrastructure, debug issues (e.g., by checking the version history to find out what changed),
and to resolve issues (e.g., by reverting back to a previous version).
Validation
If the state of your infrastructure is defined in code, for every single change, you can perform a code review,
run a suite of automated tests, and pass the code through static analysis tools—all practices that are known to
significantly reduce the chance of defects (you’ll see examples of all of these practices in
Part 4).
Self-service
If your infrastructure is defined in code, developers can kick off their own deployments, instead of relying on
others to do it.
Reuse
You can package your infrastructure into reusable modules so that instead of doing every deployment for every
product in every environment from scratch, you can build on top of known, documented, battle-tested
pieces.
Happiness
There is one other important, and often overlooked, reason for why you should use IaC: happiness. Manual deployments
are repetitive and tedious. Most people resent this type of work, since it involves no creativity, no challenge, and
no recognition. You could deploy code perfectly for months, and no one will take notice—until that one day when you
mess it up. IaC offers a better alternative that allows computers to do what they do best (automation) and
developers to do what they do best (creativity).
Now that you have a sense of why IaC is so valuable, in the following sections, you’ll explore the most common
categories of IaC tools, starting with ad hoc scripts.
Authenticating to AWS on the command line
To run the code examples in this blog post series that use AWS, you’ll need to authenticate to AWS on the command line.
This requires using an access key, which you can create by heading over to the IAM
Console, clicking Users, and selecting the IAM user you created in Part 1. Next, click on the
"Security credentials" tab, scroll down to the "Access keys" section, and click "Create access key" as shown in
Figure 20:
Figure 20. Create an access key for your IAM user.
On the next page, select "Command Line Interface (CLI)" as the use case, tick the Confirmation check box, and click
Next. This will take you to a page where you should enter a description and click "Create access key." Finally,
you’ll end up on a page that shows two values, an access key id and a secret access key. This is the only time AWS
will show you these values, so make sure to save both of them in a secure password manager, such as 1Password (you’ll
learn more about secrets management in Part 8).
To use the access key on the command line, you need to set the access key id and secret access key as the
environment variables AWS_ACCESS_KEY_ID and AWS_SECRET_ACCESS_KEY, respectively:
Note that these environment variables apply only to the current shell, so if you open a new terminal window, you’ll
need to export these variables again.
Ad Hoc Scripts
The first approach you might think of for managing your infrastructure as code is to use an ad hoc script. You take
whatever task you were doing manually, break it down into discrete steps, and use your favorite scripting language
(e.g., Bash, Ruby, Python) to capture each of those steps in code. When you run that code, it can automate the process
of creating infrastructure for you. The best way to understand this is to try it out, so let’s go through an example
of an ad hoc script written in Bash.
Example: Deploy an EC2 Instance Using a Bash Script
As an example, let’s create a Bash script that automates all the manual steps you did in Part 1 to
deploy a simple Node.js app in AWS. Head into the fundamentals-of-devops folder you created in
Part 1 to work through the examples in this blog post series, and create a new subfolder for this
part and the Bash script:
console
$ cdfundamentals-of-devops
$ mkdir-pch2/bash
Copy the exact same user data script from Part 1 into a file called
user-data.sh within the ch2/bash folder:
#!/usr/bin/env bashset-e
exportAWS_DEFAULT_REGION="us-east-2"SCRIPT_DIR="$(cd"$(dirname"${BASH_SOURCE[0]}")"&&pwd)"user_data=$(cat"$SCRIPT_DIR/user-data.sh")(1)security_group_id=$(awsec2create-security-group\--group-name"sample-app"\--description"Allow HTTP traffic into the sample app"\--outputtext\--queryGroupId)(2)awsec2authorize-security-group-ingress\--group-id"$security_group_id"\--protocoltcp\--port80\--cidr"0.0.0.0/0">/dev/null
(3)instance_id=$(awsec2run-instances\--image-id"ami-0900fe555666598a2"\--instance-type"t2.micro"\--security-group-ids"$security_group_id"\--user-data"$user_data"\--tag-specifications'ResourceType=instance,Tags=[{Key=Name,Value=sample-app}]'\--outputtext\--queryInstances[0].InstanceId)public_ip=$(awsec2describe-instances\--instance-ids"$instance_id"\--outputtext\--query'Reservations[*].Instances[*].PublicIpAddress')(4)echo"Instance ID = $instance_id"echo"Security Group ID = $security_group_id"echo"Public IP = $public_ip"
If you’re not an expert in Bash syntax, all you have to know about this script is that it uses the
AWS Command Line Interface (CLI) to do the following:
1
Create a security group.
2
Update the security group to allow inbound HTTP requests on port 80.
3
Deploy an EC2 instance that uses that security group and runs the Node.js app on boot in a user data script.
4
Output the IDs of the security group and EC2 instance and the public IP of the EC2 instance.
Watch out for snakes: these are simplified examples for learning, not for production
The examples in this blog post are still simplified for learning and not suitable for production
usage, due to the security concerns and user data limitations explained in Watch out for snakes: these examples have several problems. You’ll
see how to work around some of these limitations starting in the next blog post.
If you want to try the script out, you’ll first need to give the script execute permissions:
$ ./deploy-ec2-instance.sh
Instance ID = i-0335edfebd780886fSecurity Group ID = sg-09251ea2fe2ab2828Public IP = 52.15.237.52
After the script finishes, give the EC2 instance a minute or two to boot up, and then try opening up
http://<Public IP> in your web browser, where <Public IP> is the IP address the script outputs at the very end.
You should see:
Hello, World!
Congrats, you are now managing your infrastructure as code! Well, sort of. This script, and most ad hoc scripts, have
quite a few drawbacks in terms of using them to manage infrastructure, as discussed in the next section.
Get your hands dirty
Here are a few exercises you can try at home to go deeper:
What happens if you run the Bash script a second time? Do you get an error? If so, why?
How would you have to tweak the script if you wanted to run multiple EC2 instances?
When you’re done experimenting with this script, you should manually undeploy the EC2 instance by finding it in the
EC2 Console: check the top right corner to make sure you’re in the same region
used by the script (us-east-2), then on the Instances page, look for the instance ID the script outputs at the end,
click "Instance state," and choose "Terminate instance" in the drop down, as shown in
Figure 19. This ensures that your account doesn’t start accumulating any unwanted
charges.
How Ad Hoc Scripts Stack Up
Below is a list of criteria, which I’ll refer to as the IaC category criteria in this blog post,
that you can use to compare different categories of IaC tools. In this section, I’ll flush out how ad hoc scripts
stack up according to the IaC category criteria; in later sections, you’ll see how the other IaC categories perform
along the same criteria, giving you a consistent way to compare the different options.
CRUD
CRUD stands for create, read, update, and delete. To manage infrastructure as code, you typically need that code to
support all four of these operations, whereas most ad hoc scripts only handle create. For example, this script can
create a security group and EC2 instance, but if you run this script a second or third time, the script doesn’t know
how to "read" the state of the world, so it has no awareness that the security group and EC2 instance already exist,
and will always try to create new infrastructure from scratch. Likewise, this script has no built-in support for
deleting any of the infrastructure it creates (which is why you had to terminate the EC2 instance manually). So while
ad hoc scripts make it much faster to create infrastructure, they don’t really help you manage it.
Scale
Solving the CRUD problem in an ad hoc script for a single EC2 instance is hard enough, but a real architecture may
contain hundreds of instances, plus databases, load balancers, networking configuration, and so on, and there’s no
easy way to scale up scripts to keep track of and manage so much infrastructure.
Deployment strategies
In real-world architectures, you typically need to use various deployment strategies to roll out updates, such as
zero-downtime rolling deployments, blue-green deployments, canary deployments, and so on (you’ll learn more about
deployment strategies in Part 5). With ad hoc scripts, you’d have to write the logic for each
deployment strategy from scratch.
Idempotency and error handling
To manage infrastructure, you typically want code that is idempotent, which means it can be re-run multiple times
and still produce the desired result. Most ad hoc scripts are not idempotent and do not handle
errors gracefully. If you hit an error part way through running this script, it just exits, leaving work in a
partially completed state, but retaining no memory of what the script got done. If you then try to re-run the script,
you’ll often get a different error because some of the partially completed work will now interfere with the new
work the script is trying to do. For example, perhaps you ran the script the first time, and it created the security
group called "sample-app" successfully, but when it tried to create the EC2 instance, AWS was out of capacity,
and you got an error. If you wait until AWS has more capacity and try to re-run the script, you’ll now get an error as
the script tries to create a security group called "sample-app" again, which isn’t allowed, as AWS requires
security group names to be unique.
Consistency
The great thing about ad hoc scripts is that you can use any programming language you want, and you can write the
code however you want. The terrible thing about ad hoc scripts is that you can use any programming language you want,
and you can write the code however you want. I wrote the Bash script one way; you might write it another way;
your coworker may choose a different language entirely. If you’ve ever had to maintain a large repository of ad hoc
scripts, you know that it almost always devolves into a mess of unmaintainable spaghetti code. As you’ll see shortly,
tools that are designed specifically for managing infrastructure as code often provide a single, idiomatic way to
solve each problem, so that your codebase tends to be more consistent and easier to maintain.
Verbosity
The Bash script to launch a simple EC2 instance, plus the user data script, add up to around 80 lines of code—and
that’s without the code for CRUD, deployment strategies, idempotency, and error handling. An ad hoc script that
handles all of these properly would be hundreds or thousands of lines of code. And we’re talking about just one EC2
instance; your production infrastructure may include hundreds of instances, plus databases, load balancers, network
configurations, and much more. The amount of custom code it takes to manage all of this with ad hoc scripts quickly
becomes untenable. As you’ll see shortly, tools that are designed specifically for managing infrastructure as code
typically provide APIs that are more concise for accomplishing common infrastructure tasks.
Ad hoc scripts have always been, and will always be, a big part of software delivery. They are the glue and duct tape
of the DevOps world. However, they are not the best choice as a primary tool for managing infrastructure as code.
Key takeaway #1
Ad hoc scripts are great for small, one-off tasks, but not for managing all your infrastructure as code.
If you’re going to be managing all of your infrastructure as code, you should use an IaC tool that is purpose-built for
the job, such as one of the ones discussed in the next several sections.
Configuration Management Tools
After trying out ad hoc scripts, and hitting all the issues mentioned in the previous section, the software industry
moved on to configuration management tools, such as Chef, Puppet,
and Ansible. These tools first started to appear before cloud computing was ubiquitous, so
the way they were originally designed was to assume someone else had done the work of setting up the hardware (e.g.,
your Ops team racked the servers in your own data center), and the primary purpose of these tools was to handle the
software, including configuring the operating system, installing dependencies, deploying and updating apps, and so on.
Each configuration management tool has you write code in a different domain specific language (DSL): for
example, with Chef, you write code in a DSL built on top of Ruby; with Puppet, you write code in a custom declarative
language specifically designed for Puppet; with Ansible, you write code in a DSL built on top of YAML. Once you’ve
written the code, most configuration management tools use a mutable infrastructure paradigm, where you have
long-running servers that the configuration management tools update (mutate) over and over again, over many years.
In order to update your servers, configuration management tools rely on the following two items:
Master servers
You run one or more master servers (Chef Server, Puppet Server, or Ansible Automation Controller[11]), which are responsible for communicating with the rest of your servers, tracking the state of those
servers, and running a reconciliation loop that continuously ensures the configuration of each server matches your
desired configuration. The master servers also typically provide a central UI and API that you can use to see the
state of your servers, perform various operations, and generate reports.
Agents
Chef and Puppet require you to install custom agents (Chef Client and Puppet Agent) on each server, which are
responsible for connecting to and authenticating with the master servers. You can configure the master servers to
either push changes to these agents, or to have the agents pull changes from the master servers. Ansible, on the
other hand, pushes changes to your servers over SSH, which is pre-installed on most servers by default (you’ll learn
more about SSH in Part 7). Whether you rely on agents or SSH, this leads to a chicken-and-egg
problem: in order to be able to configure your servers (with configuration management tools), you first have to
configure your servers (install agents or set up SSH authentication). Solving this chicken-and-egg problem
requires either manual intervention or external tools (e.g., you’ll see an example shortly of how you can use AWS
APIs to configure SSH access for Ansible).
The best way to understand configuration management is to see it in action, so let’s go through an example of using
Ansible.
Example: Deploy an EC2 Instance Using Ansible
To be able to use configuration management, the first thing you need is a server. If you have an existing server you
can use—e.g., a physical server on-prem or a virtual server in the cloud—and you have SSH access to that server, you
can skip this section, and go to the next one.
If you don’t have a server you can use, this section will show you how to deploy an EC2 instance using Ansible. Note
that deploying and managing servers (hardware) is not really what configuration management tools were designed to
do—later in this blog post, you’ll see how provisioning tools are typically a better fit for this
task—but for spinning up a single server for learning and testing, Ansible is good enough.
-name:Deploy an EC2 instance in AWShosts:localhostgather_facts:noenvironment:AWS_REGION:us-east-2tasks:-name:Create security group(1)amazon.aws.ec2_security_group:name:sample-app-ansibledescription:Allow HTTP and SSH trafficrules:-proto:tcpports:[8080]cidr_ip:0.0.0.0/0-proto:tcpports:[22]cidr_ip:0.0.0.0/0register:aws_security_group-name:Create a new EC2 key pair(2)amazon.aws.ec2_key:name:ansible-ch2file_name:ansible-ch2.key(3)no_log:trueregister:aws_ec2_key_pair-name:Create EC2 instance with Amazon Linux 2003(4)amazon.aws.ec2_instance:name:sample-app-ansiblekey_name:"{{aws_ec2_key_pair.key.name}}"instance_type:t2.microsecurity_group:"{{aws_security_group.group_id}}"image_id:ami-0900fe555666598a2tags:Ansible:ch2_instances(5)
Instead of a general-purpose programming language (GPL), such as Bash or Ruby or Python, Ansible uses a DSL defined on
top of YAML. The YAML in the preceding playbook does the following:
1
Create a security group: Allow inbound HTTP requests on port 8080 and inbound SSH requests on port 22.
2
Create an EC2 key pair: An EC2 key pair is a public/private key pair that can be used to authenticate to an EC2
instance.
3
Save the private key: Store the private key of the EC2 key pair locally in a file called
ansible-ch2.key. You’ll use this private key in the next section to authenticate to the EC2 instance.
4
Deploy an EC2 instance: The instance uses the security group and public key from the previous steps.
5
Tag the instance: This sets the Ansible tag on the instance to "ch2_instances." You’ll use this tag in the next
section.
You should get log output for that looks something like this (truncated for readability):
PLAY [Deploy an EC2 instance in AWS]


TASK [Create security group]

changed: [localhost] => {"changed": true, "description": "..."}


TASK [Create a new EC2 key pair]

changed: [localhost] => {"censored": "...", "changed": true}


TASK [Create EC2 instance with Amazon Linux 2003]

changed: [localhost] => {"changed": true, "instance_ids": ["..."]}


PLAY RECAP

localhost: ok=3    changed=3    unreachable=0    failed=0
Now that you have a server to work with, you can see what configuration management tools are really designed to do:
configuring servers to run software.
Example: Configure a Server Using Ansible
In order for Ansible to be able to configure your servers, you have to provide an inventory, which is a file that
specifies which servers you want configured, and how to connect to them. If you have a set of physical servers on-prem,
you can put the IP addresses of those servers in an inventory file, as shown in Example 5:
Example 5. Example Ansible inventory file (inventory.yml)
The preceding file organizes your servers into groups: the webservers group has two servers in it and the
dbservers group has three servers. You’ll then be able to write Ansible playbooks that target specific groups.
If you are running servers in the cloud, where servers come and go often, and IP addresses change more frequently,
you’re better off using an inventory plugin that can dynamically discover your servers. For example, if you deployed
an EC2 instance in AWS in the previous section, you can use the aws_ec2 inventory plugin by creating a file called
inventory.aws_ec2.yml with the contents shown in Example 6:
Create groups based on the Ansible tag of the instance. In the previous section, you set this tag
to "ch2_instances," so that will be the name of the group.
2
By default, Ansible adds a leading underscore to group names. This disables it so the group name matches the tag
name.
For each group in your inventory, you can also specify group variables to configure how to connect to the servers in
that group. You define these variables in YAML files in the group_vars folder, with the name of the file set to the
name of the group. For example, for the EC2 instance in the ch2_instances group, you should
create a file in group_vars/ch2_instances.yml with the contents shown in Example 7:
Use "ec2-user" as the username to connect to the EC2 instance. This is the username you need to use with Amazon
Linux AMIs.
2
Use the private key at ansible-ch2.key to authenticate to the instance. This is the private key of the EC2 key
pair the playbook created in the previous section.
3
Skip host key checking so you don’t get interactive prompts from Ansible.
Alright, with the inventory stuff out of the way, you can now create a playbook to configure your server to run the
Node.js sample app. Create a file called configure_sample_app_playbook.yml with the contents shown in
Example 8:
-name:Configure the EC2 instance to run a sample apphosts:ch2_instances(1)gather_facts:truebecome:trueroles:-sample-app(2)
This playbook does two things:
1
Target the servers in the ch2_instances group, which should be a group with the EC2 instance you
deployed in the previous section. If you are configuring some other server (e.g., your own servers on-prem), update
this to the name of the group to target in your inventory file.
2
Configure the servers using an Ansible role called sample-app, as discussed next.
An Ansible role is a structured way to organize tasks, templates, files, and other configuration you might want to
apply to a server. The standard folder structure for Ansible roles looks like this:
Each folder has a specific purpose: e.g., the tasks folder defines tasks to run on a server; the files
folder has files to copy to the server; the templates folder lets you use
Jinja templates to dynamically fill in data in files; and so on.
Having this standardized structure makes it easier to navigate and understand an Ansible code base.
To create the sample-app role for this playbook, create a roles/sample-app folder in the same directory as
configure_sample_app_playbook.yml:
Within roles/sample-app, you should create files and tasks subfolders, which are the only parts of the
standardized role folder structure you’ll need for this simple example. Copy the Node.js sample app you saw earlier in
in Section 1.2.1 into files/app.js:
You should get log output for each step, including a recap at the end that looks something like this:
PLAY RECAP

xxx.us-east-2.compute.amazonaws.com : ok=5    changed=4    failed=0
The value on the left, "xxx.us-east-2.compute.amazonaws.com," is a domain name you can use to access the instance.
Open http://xxx.us-east-2.compute.amazonaws.com:8080 (note it’s port 8080 this time, not 80) in your web
browser, and you should see:
Hello, World!
Congrats, you’re now using a configuration management tool to manage your infrastructure as code!
Get your hands dirty
Here are a few exercises you can try at home to go deeper:
What happens if you run the Ansible playbook a second time? How does this compare to the Bash script?
How would you have to change the playbook to run multiple EC2 instances?
When you’re done experimenting with Ansible, you should manually undeploy the EC2 instance by finding it in the
EC2 Console: check the top right corner to make sure you’re in the same region
used by the Ansible playbook (us-east-2), then on the Instances page, look for the instance ID the script outputs at
the end, click "Instance state," and choose "Terminate instance" in the drop down, as shown in
Figure 19. This ensures that your account doesn’t start accumulating any unwanted
charges.
How Configuration Management Tools Stack Up
Here is how configuration management tools stack up using the IaC category criteria:
CRUD
Most configuration management tools support three of the four CRUD operations: they can create the initial
configuration, read the current configuration to see if it matches the desired configuration, and if not, update the
existing configuration. That said, support for read and update is a bit hit or miss. It works well for reading and
updating the configuration within a server (if you use tasks that are idempotent, as you’ll see shortly), but for
managing the servers themselves, or any other type of cloud infrastructure, it only works if you remember to assign
each piece of infrastructure a unique name or tag, which is easy to do with just a handful of resources, but becomes
more challenging at scale. Most configuration management tools do not support delete (which is why you had to
undeploy the EC2 instance manually).
Scale
Most configuration management tools are designed specifically for managing multiple remote servers. For
example, you could easily update the preceding Ansible code to deploy 3 EC2 instances, and Ansible will automatically
configure all 3 to run the web server (you’ll see an example of this in Part 3).
Deployment strategies
Some configuration management tools have built-in support for deployment strategies. For example, Ansible has built-in
support for rolling deployments, so if you deployed 20 servers, then updated the configuration in the Ansible role
(e.g., to deploy a new version of the app) and re-ran Ansible, it could roll out the change in batches (e.g.,
updating 5 servers at a time), with zero downtime.
Idempotency and error handling
Some tasks you do with configuration management tools are idempotent, some are not. For example, the yum task in
Ansible is idempotent: it only installs the software if it’s not installed already, so it’s safe to re-run that task
as many times as you want. On the other hand, arbitrary shell tasks may or may not be idempotent, depending on what
shell commands you execute. For example, the preceding playbook uses a shell task to directly execute the node
binary, which is not idempotent. After the first run, subsequent runs of this playbook will fail, as the Node.js
app is already running and listening on port 8080, so you’ll get an error about conflicting ports. In
Part 3, you’ll see a better way of running apps with Ansible that is idempotent.
Consistency
Most configuration management tools enforce a consistent, predictable structure to the code, including documentation,
file layout, clearly named parameters, secrets management, and so on. While every developer organizes their ad hoc
scripts in a different way, most configuration management tools come with a set of conventions that makes it easier
to navigate and maintain the code, as you saw with the folder structure for Ansible roles.
Verbosity
Most configuration management tools provide a DSL for specifying server configuration that is more
concise than the equivalent in an ad hoc script. For example, you saw Ansible’s YAML-based DSL. At first, it might
not seem like the code is any shorter than the Bash script: in fact, it’s roughly equal, with around 80 lines of
Bash code (script to deploy EC2 instance plus user data script) versus about 80 lines of YAML with Ansible (playbook
plus role). However, the 80 lines of Ansible code are doing considerably more: the Ansible code supports most CRUD
operations, deployment strategies, idempotency, scaling operations to many servers, and consistent code structure. An
ad hoc script that supported all of this would be many times the length.
Configuration management tools brought a number of advantages over ad hoc scripts, but they also introduced their
own drawbacks. One big drawback is that some configuration management tools have a considerable setup cost: e.g., you
may need to set up master servers and ways to connect to all your other servers (agents or SSH). A second big drawback
is that most configuration management tools were designed for a mutable infrastructure paradigm: this can be
problematic due to configuration drift, where over time, your long-running servers can build up unique histories of
changes, so each server is subtly different from the others, which can make it hard to reason about what’s deployed and
debug issues.
As cloud and virtualization becomes more and more ubiquitous, it’s becoming more common to use an immutable
infrastructure paradigm, where instead of long-running physical servers, you use short-lived virtual servers that you
replace every time you do an update. This is inspired by functional programming, where variables are immutable, so
after you’ve set a variable to a value, you can never change that variable again, and if you need to update something,
you create a new variable. Because variables never change, it’s a lot easier to reason about your code.
The idea behind immutable infrastructure is similar: once you’ve deployed a server, you never make changes to it again.
If you need to update something, such as deploying a new version of your code, you deploy a new server. Because
servers never change after being deployed, it’s a lot easier to reason about what’s deployed. The typical analogy used
here (my apologies to vegetarians and animal lovers), is cattle vs pets: with mutable
infrastructure, you treat your servers like pets, giving each one its own unique name, taking care of it, and trying to
keep it alive as long as possible; with immutable infrastructure, you treat your servers like cattle, each one more or
less indistinguishable from the others, with random or sequential IDs instead of names, and you kill them off and
replace them regularly.
Key takeaway #2
Configuration management tools are great for managing the configuration of servers, but not for deploying the servers
themselves, or other infrastructure.
While it’s possible to use configuration management tools with immutable infrastructure patterns, it’s not what they
were originally designed for, and that led to new approaches, as discussed in the next section.
Server Templating Tools
An alternative to configuration management that has been growing in popularity recently is to use server templating
tools, such as virtual machines and containers. Instead of launching a bunch of servers and configuring them by running
the same code on each one, the idea behind server templating tools is to create an image of a server that captures a
fully self-contained "snapshot" of the operating system (OS), the software, the files, and all other relevant details.
You can then use some other IaC tool (e.g., provisioning tools, as you’ll see in the next section) to install that
image on all of your servers.
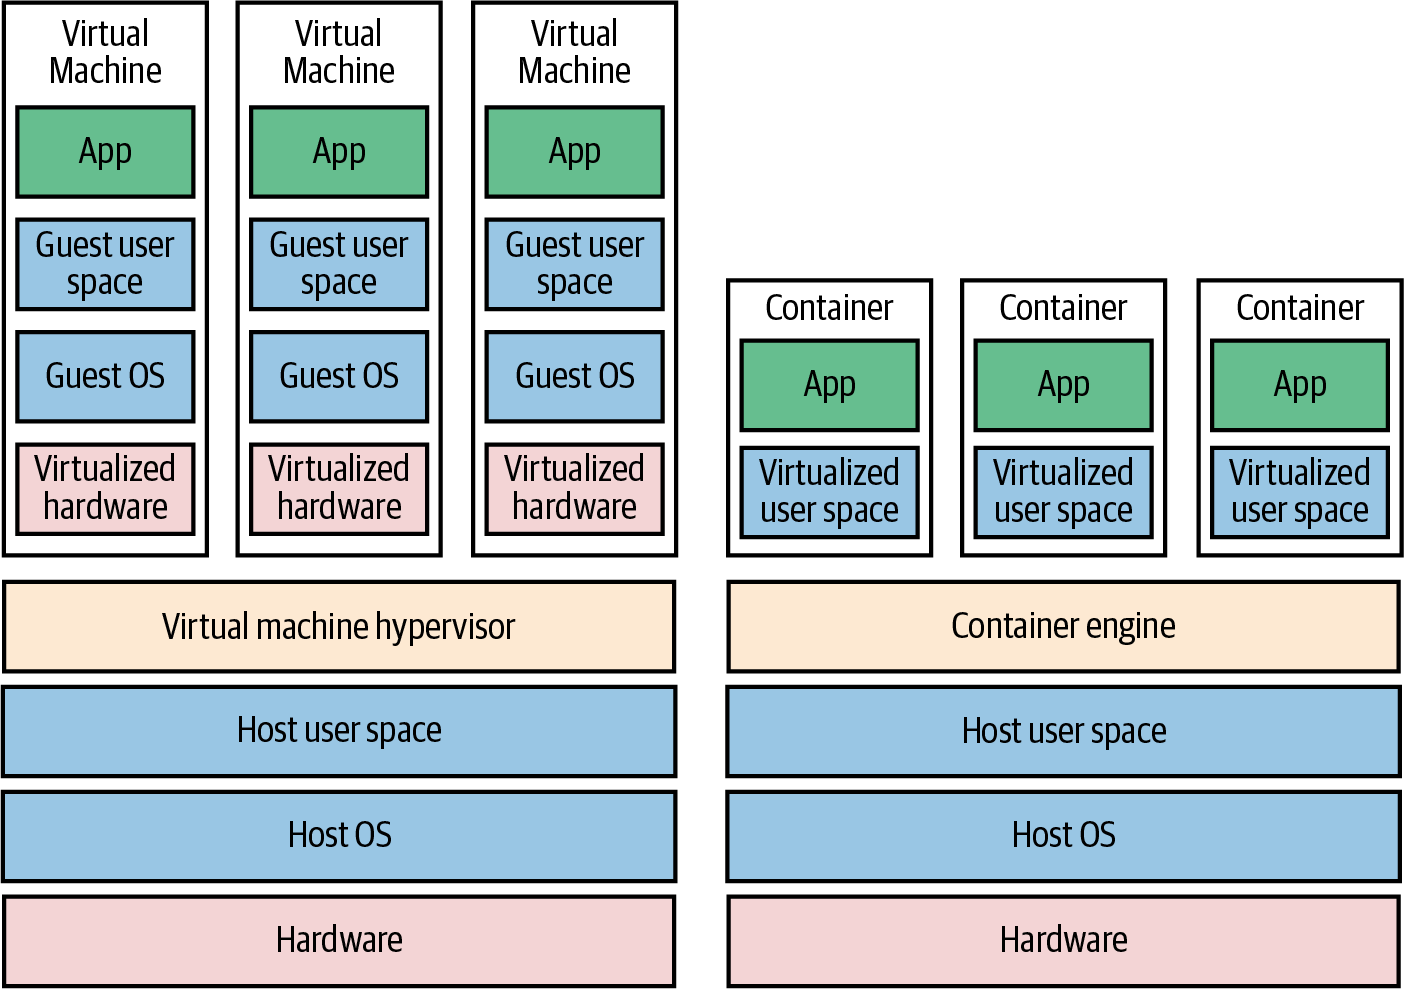
Figure 21. The two main types of images: VMs, on the left, and containers, on the right. VMs virtualize the hardware, whereas containers virtualize only user space.
As shown in Figure 21, there are two categories of tools for working with images:
Virtual machines
A virtual machine emulates an entire computer system, including the hardware. You run a hypervisor, such as
VMware vSphere, VirtualBox,
or Parallels, to virtualize (i.e., simulate) the underlying CPU, memory, hard drive, and
networking.
The benefit of this is that any VM image that you run on top of the hypervisor can see only the virtualized hardware,
so it’s fully isolated from the host machine and any other VM images, and it will run exactly the same way in all
environments (e.g., your computer, a QA server, a production server). The drawback is that virtualizing all this
hardware and running a totally separate OS for each VM incurs a lot of overhead in terms of CPU usage, memory usage,
and startup time. You can define VM images as code using tools such as Packer (which you
typically use to create images for production servers) and Vagrant (which you typically use
to create images for local development).
Containers
A container emulates the user space of an OS.[12] You run a container engine, such as Docker or cri-o, to
isolate processes, memory, mount points, and networking.
The benefit of this is that any container you run on top of the container engine can see only its own user space, so
it’s isolated from the host machine and other containers, and will run exactly the same way in all environments (your
computer, a QA server, a production server, etc.). The drawback is that all of the containers running on a single
server share that server’s OS kernel and hardware, so it’s much more difficult to achieve the level of isolation and
security you get with a VM.[13] However, because the kernel
and hardware are shared, your containers can boot up in milliseconds and have virtually no CPU or memory overhead. You
can define container images as code using tools such as Docker.
You’ll go through an example of using container images with Docker in Part 3. In this
blog post, let’s go through an example of using VM images with Packer.
Example: Create a VM Image Using Packer
As an example, let’s take a look at using Packer to create a VM image for AWS called an Amazon Machine Image (AMI).
First, create a folder called packer:
packer{required_plugins{amazon={version=">= 1.3.1"source="github.com/hashicorp/amazon"}}}source"amazon-ebs" "amazon_linux"{(1)ami_name="sample-app-packer-${uuidv4()}"ami_description="Amazon Linux 2023 AMI with a Node.js sample app."instance_type="t2.micro"region="us-east-2"source_ami="ami-0900fe555666598a2"ssh_username="ec2-user"}build{(2)sources=["source.amazon-ebs.amazon_linux"]provisioner"file"{(3)source="app.js"destination="/home/ec2-user/app.js"}provisioner"shell"{(4)inline=["curl -fsSL https://rpm.nodesource.com/setup_21.x | sudo bash -","sudo yum install -y nodejs"]pause_before="30s"}}
You create Packer templates using the HashiCorp Configuration Language (HCL) in files with a .hcl extension.
The preceding template does the following:
1
Source images: Packer will start a server running each source image you specify. The preceding code will
result in Packer starting an EC2 instance running the Amazon Linux AMI you saw in the Bash and Ansible examples.
2
Build steps: Packer then connects to the server (e.g., via SSH) and runs the build steps in the order
you specified. When all the build steps have finished, Packer will take a snapshot of the server and shut the
server down. The preceding example runs two build steps, as described in (3) and (4), and the snapshot it creates
is an AMI that has everything installed and configured to run the sample app.
3
File provisioner: The first build step runs a file provisioner to copy files to the server. The
preceding code uses this to copy the Node.js sample app code in app.js to the server.
4
Shell provisioner: The second build step runs a shell provisioner to execute shell commands on the
server. The preceding code uses this to install Node.js.
So this Packer template is nearly identical to the Bash script and Ansible playbook, except the result of executing
Packer is not a server running your app, but the image of a server with your app and all its dependencies installed.
The idea is to use other IaC tools to launch one or more servers running that image; you’ll see an example later in
this blog post of using OpenTofu to launch an EC2 instance running this AMI.
The first command, packer init, installs any plugins used in this Packer template. Packer can create images for
many cloud providers—e.g., AWS, GCP, Azure, etc.—and the code for each of these providers lives not in the Packer binary
itself, but in separate plugins that you install via the init command. The second command, packer build, kicks off
the build process. When the build is done, which typically takes 3-5 minutes, you should see some log output that looks
like this:
==> Builds finished. The artifacts of successful builds are:

--> amazon-ebs.amazon_linux: AMIs were created:

us-east-2: ami-0ee5157dd67ca79fc
Congrats, you’re now using a server templating tool to manage your server configuration as code! The ami-xxx value is
the ID of the AMI that was created from this template. Save the value somewhere, as later in this
post, you’ll see an example of how to deploy this AMI.
Get your hands dirty
Here are a few exercises you can try at home to go deeper:
What happens if you run packer build on this template a second time? Why?
Figure out how to update the Packer template so it builds images not only for AWS, but also images you can run on
other clouds (e.g., Azure or GCP) or on your own computer (e.g., VirtualBox or Docker).
How Server Templating Tools Stack Up
How do server templating tools stack up using the IaC category criteria?
CRUD
Server templating only needs to support the create operation in CRUD. This is because server templating is a key
component of the shift to immutable infrastructure: if you need to roll out a change, instead of updating an existing
server, you use your server templating tool to create a new image, and deploy that image on a new server. So, with
server templating, you’re always creating totally new images; there’s never a reason to read, update, or delete. That
said, server templating tools aren’t used in isolation; you need some other tool to deploy these images (e.g.,
a provisioning tool, as you’ll see shortly), and you typically want that tool to support all CRUD operations.
Scale
Server templating tools scale very well, as you can create an image once, and then roll that same image out
to 1 server or 1,000 servers, as necessary.
Deployment strategies
Server templating tools only create images; you use other tools and whatever deployment strategies those tools
support to roll the new images out.
Idempotency and error handling
Server templating tools are idempotent by design. Since you create a new image every time, the tool just executes the
exact same steps every time. If you hit an error part of the way through, just re-run, and try again.
Consistency
Most server templating tools enforce a consistent, predictable structure to the code, including documentation,
file layout, clearly named parameters, secrets management, and so on.
Verbosity
Because server templating tools don’t have to deal with most CRUD operations and are idempotent "for free," the
amount of code you need is typically pretty small. Moreover, server templating tools provide concise DSLs. As a
result, the code tends to be fairly short.
Key takeaway #3
Server templating tools are great for managing the configuration of servers with immutable infrastructure practices.
As I mentioned a few times, server templating tools are powerful, but they don’t work by themselves. You need another
tool to actually deploy and manage the images you create, such as provisioning tools, which are the focus of the next
section.
Provisioning Tools
Whereas configuration management and server templating define the code that runs on each server,
provisioning tools such as OpenTofu, Terraform,
CloudFormation, OpenStack Heat, and
Pulumi are responsible for creating the servers themselves. In fact, you can use provisioning
tools to create not only servers but also databases, caches, load balancers, queues, monitoring, subnet configurations,
firewall settings, routing rules, TLS certificates, and many other aspects of your infrastructure.
Under the hood, most provisioning tools work by translating the code you write into API calls to the cloud provider
you’re using. For example, if you write OpenTofu code to create a server in AWS (which you will do in the next section),
when you run OpenTofu, it will parse your code, and based on the configuration you specify, make a number of API calls
to AWS to create an EC2 instance, security group, etc.
That means that, unlike with configuration management tools, you don’t have to do any extra work to set up master
servers or connectivity. All of this is handled using the APIs and authentication mechanisms already provided by
the cloud you’re using. Let’s see this in action by going through an example with OpenTofu.
Example: Deploy an EC2 Instance Using OpenTofu
Terraform versus OpenTofu
Terraform is a popular provisioning tool that HashiCorp open sourced in 2014 under the Mozilla Public License (MPL)
2.0. In 2023, HashiCorp switched Terraform to the non-open source Business Source License (BSL). As a result,
the community created OpenTofu, a fork of Terraform that remains open source under the MPL 2.0 license, and is managed
by the Linux Foundation. I prefer to use open source tools whenever possible, so this blog post series will use
OpenTofu for all example code, but most of the examples should work with Terraform as well.
As an example of using a provisioning tool, lets create an OpenTofu module that can deploy an EC2 instance. You write
OpenTofu modules in HCL (the same language you used with Packer), in configuration files with a .tf extension.
OpenTofu will find all files with the .tf extension in a folder, so you can name the files whatever you want, but
there are some standard conventions, such as putting the main resources in main.tf, input variables in
variables.tf, and output variables in outputs.tf.
First, create a new tofu/ec2-instance folder for the module:
provider"aws"{(1)region="us-east-2"}resource"aws_security_group""sample_app"{(2)name="sample-app-tofu"description="Allow HTTP traffic into the sample app"}resource"aws_security_group_rule""allow_http_inbound"{(3)type="ingress"protocol="tcp"from_port=8080to_port=8080security_group_id=aws_security_group.sample_app.idcidr_blocks=["0.0.0.0/0"]}resource"aws_instance""sample_app"{(4)ami=var.ami_id(5)instance_type="t2.micro"vpc_security_group_ids=[aws_security_group.sample_app.id]user_data=file("${path.module}/user-data.sh")(6)tags={Name="sample-app-tofu"}}
The code in main.tf does something very similar to the Bash script and Ansible playbook from earlier in the
blog post:
1
Configure the AWS provider: OpenTofu works with many providers, such as AWS, GCP, Azure, and so on. This code
configures the AWS provider to use the us-east-2 (Ohio) region. AWS has datacenters all over the world, grouped
into regions and
availability zones. An AWS region is a separate geographic area, such as us-east-2 (Ohio), eu-west-1
(Ireland), and ap-southeast-2 (Sydney). Within each region, there are multiple isolated datacenters known as
availability zones (AZs), such as us-east-2a, us-east-2b, and so on.
2
Create a security group: For each type of provider, there are many different kinds of resources that you can
create, such as servers, databases, and load balancers. The general syntax for creating a resource in OpenTofu is
as follows:
terraform
resource"<PROVIDER>_<TYPE>" "<NAME>"{[CONFIG...]}
where PROVIDER is the name of a provider (e.g., aws), TYPE is the type of resource to create in that provider
(e.g., security_group), NAME is an identifier you can use throughout the OpenTofu code to refer to this
resource (e.g., sample_app), and CONFIG consists of one or more arguments that are specific to
that resource.
The preceding code creates an aws_security_group resource, which, as you can guess from the name, is a security group
that controls what network traffic can go in and out of the EC2 instance.
3
Allow HTTP requests: Use the aws_security_group_rule resource to add a rule to the security group from (2) that
allows inbound HTTP requests on port 8080.
4
Deploy an EC2 instance: Use the aws_instance resource to create an EC2 instance that uses the security group
and sets the Name tag to "sample-app-tofu."
5
Set the AMI: The EC2 instance sets the AMI to var.ami_id. This is a reference to an input variable defined
in variables.tf, as shown in Example 12.
6
Set the user data: The EC2 instance configures a user data script by reading in the user-data.sh file shown in
Example 13.
In the same folder as main.tf, create a file called variables.tf to define input variables, as shown in
Example 12:
variable"ami_id"{description="The ID of the AMI to run."type=string}
As you’ll see shortly, this input variable will allow you to pass in the ID of a custom AMI to run in the EC2 instance:
namely, the AMI you built from the Packer template in the previous section. You should also create a file called
user-data.sh, which contains the user data script shown in Example 13:
Note how this user data script is much shorter than the one you saw in the Bash code. That’s because all the
dependencies (Node.js) and code (app.js) are already installed in the AMI by Packer. So the only thing this user data
script does is start the sample app. This is a more idiomatic way to use user data.
Finally, create a file called outputs.tf with the contents shown in Example 14:
output"instance_id"{description="The ID of the EC2 instance"value=aws_instance.sample_app.id
}output"security_group_id"{description="The ID of the security group"value=aws_security_group.sample_app.id
}output"public_ip"{description="The public IP of the EC2 instance"value=aws_instance.sample_app.public_ip
}
The preceding code defines output variables, which you can use to log and share values between modules. The preceding
code defines output variables for the EC2 instance ID, security group ID, and EC2 instance public IP.
The init command installs any providers used in this Tofu configuration. OpenTofu works with many
cloud providers, including AWS, which is used in the preceding example, as well as Azure, GCP, Alibaba Cloud, OCI,
and so on. The code for each provider doesn’t live in the tofu binary, but in separate provider binaries, which you
download via the init command.
Once init has completed, run the apply command to start the deployment process:
console
$ tofuapply
The first thing the apply command will do is prompt you for the ami_id value:
var.ami_id

  The ID of the AMI to run.


  Enter a value:
You can paste in the ID of the AMI you built using Packer in the previous section and hit Enter. Alternatively, if you
don’t want to be prompted interactively, you can instead use the -var flag when running apply:
console
$ tofuapply-varami_id=<YOUR_AMI_ID>
You can also set the value for any input variable foo using the environment variable TF_VAR_foo:
console
$ exportTF_VAR_ami_id=<YOUR_AMI_ID>
$ tofuapply
The second thing the apply command will do is show you the execution plan (just plan for short), which will look
something like this (truncated for readability):
OpenTofu will perform the following actions:


  # aws_instance.sample_app will be created

  + resource "aws_instance" "sample_app" {

      + ami                                  = "ami-0ee5157dd67ca79fc"

      + instance_type                        = "t2.micro"

      ... (truncated) ...

    }


  # aws_security_group.sample_app will be created

  + resource "aws_security_group" "sample_app" {

      + description            = "Allow HTTP traffic into the sample app"

      + name                   = "sample-app-tofu"

      ... (truncated) ...

    }


  # aws_security_group_rule.allow_http_inbound will be created

  + resource "aws_security_group_rule" "allow_http_inbound" {

      + from_port                = 8080

      + protocol                 = "tcp"

      + to_port                  = 8080

      + type                     = "ingress"

      ... (truncated) ...

    }


Plan: 3 to add, 0 to change, 0 to destroy.


Changes to Outputs:

  + instance_id       = (known after apply)

  + public_ip         = (known after apply)

  + security_group_id = (known after apply)
The plan lets you see what OpenTofu will do before actually making any changes, and prompts you for confirmation before
continuing. This is a great way to sanity-check your code before unleashing it onto the world. The plan output is
similar to the output of the diff command that is part of Unix, Linux, and git: anything with a plus sign (+) will
be created, anything with a minus sign (–) will be deleted, and anything with a tilde sign (~) will be modified
in place. Every time you run apply, OpenTofu will show you this execution plan; you can also generate the execution
plan without applying any changes by running tofu plan instead of tofu apply.
In the preceding plan output, you can see that OpenTofu is planning on creating an EC2 Instance, security group, and
security group rule, which is exactly what you want. Type yes and hit Enter to let OpenTofu proceed. You should see
log output that looks like this:
Do you want to perform these actions?

  OpenTofu will perform the actions described above.

  Only 'yes' will be accepted to approve.


  Enter a value: yes


aws_security_group.sample_app: Creating...

aws_security_group.sample_app: Creation complete after 2s

aws_security_group_rule.allow_http_inbound: Creating...

aws_security_group_rule.allow_http_inbound: Creation complete after 0s

aws_instance.sample_app: Creating...

aws_instance.sample_app: Still creating... [10s elapsed]

aws_instance.sample_app: Still creating... [20s elapsed]

aws_instance.sample_app: Creation complete after 22s


Apply complete! Resources: 3 added, 0 changed, 0 destroyed.


Outputs:


instance_id = "i-0a4c593f4c9e645f8"

public_ip = "3.138.110.216"

security_group_id = "sg-087227914c9b3aa1e"
You can see the three output variables from outputs.tf at the end, including the public IP address in public_ip.
Wait a minute or two for the EC2 instance to boot up, copy the public_ip, open http://<public_ip>:8080 in your web
browser, and you should see:
Hello, World!
Congrats, you’re using a provisioning tool to manage your infrastructure as code!
Example: Update and Destroy Infrastructure Using OpenTofu
One of the big advantages of provisioning tools is that they support not just deploying infrastructure, but also
updating and destroying it. For example, now that you’ve deployed an EC2 instance using OpenTofu, make a change to the
configuration, such as adding a new Test tag with the value "update," as shown in
Example 15:
Run the apply command again, and you should see output that looks like this (truncated for readability):
console
$ tofuapply
aws_security_group.sample_app: Refreshing state...aws_security_group_rule.allow_http_inbound: Refreshing state...aws_instance.sample_app: Refreshing state...OpenTofu used the selected providers to generate the following execution plan.Resource actions are indicated with the following symbols: ~ update in-placeOpenTofu will perform the following actions: # aws_instance.sample_appwillbeupdatedin-place
~ resource "aws_instance" "sample_app" { id = "i-0738de27643533e98" ~ tags = { "Name" = "sample-app-tofu" + "Test" = "update" } # (31unchangedattributeshidden) # (8unchangedblockshidden) }Plan: 0 to add, 1 to change, 0 to destroy.
Every time you run OpenTofu, it records information about what infrastructure it created in an OpenTofu state file.
OpenTofu manages state using backends; if you don’t specify a backend, the default is to use the local backend,
which stores state locally in a terraform.tfstate file in the same folder as the OpenTofu module (you’ll see how to
use other backends in Part 5). This file contains a custom JSON format that records a mapping from the
OpenTofu resources in your configuration files to the representation of those resources in the real world.
When you run apply the first time on the ec2-instance module, OpenTofu records in the state file the IDs of
the EC2 instance, security group, security group rules, and any other resources it created. When you run apply again,
you can see "Refreshing state" in the log output, which is OpenTofu updating itself on the latest status of the world.
As a result, the new plan output that you see is the diff between what’s currently deployed in the real world and
what’s in your OpenTofu code. The preceding diff shows that OpenTofu wants to create a single tag called Test, which is
exactly what you want, so type yes and hit Enter, and you’ll see OpenTofu perform an update operation, updating the
EC2 instance with your new tag.
When you’re done testing, you can run tofu destroy to have OpenTofu undeploy everything it deployed earlier, which
should give you log output that looks something like this (log output truncated for readability):
When you run destroy, OpenTofu shows you a destroy plan, which tells you about all the resources it’s about to
delete. This gives you one last chance to check that you really want to delete this stuff before you actually do it.
It goes without saying that you should rarely, if ever, run destroy in a production environment—there’s no "undo"
for the destroy command. If everything looks good, type yes and hit Enter, and in a minute or two, OpenTofu will
clean up everything it deployed.
Get your hands dirty
Here are a few exercises you can try at home to go deeper:
How would you have to tweak the OpenTofu code if you wanted to run multiple EC2 instances?
Figure out how to configure the EC2 instance with an EC2 key pair so you can connect to it over SSH.
Example: Deploy an EC2 Instance Using an OpenTofu Module
One of OpenTofu’s more powerful features is that the modules are reusable. In a general
purpose programming language (e.g., JavaScript, Python, Java), you put reusable code in a function; in OpenTofu, you
put reusable code in a module. You can then use that module multiple times to spin up many copies of the same
infrastructure, without having to copy/paste the code.
So far, you’ve been using the ec2-instance module as a root module, which is any module on which you run apply
directly. However, you can also use it as a reusable module, which is a module meant to be included in other modules
(e.g., in other root modules) as a means of code re-use.
Let’s give it a shot. First, create a folder called modules to store your reusable modules:
module"sample_app_1"{source="../../modules/ec2-instance" # TODO: fill in with your own AMI ID!ami_id="ami-09a9ad4735def0515"}
To use one module from another, all you need is the following:
A module block.
A source parameter that contains the file path of the module you want to use. The preceding code sets source to
the relative file path of the ec2-instance module in the modules folder.
If the module defines input variables, you can set those as parameters within the module block. The ec2-instance
module defines an input variable called ami_id, which you’ll need to set to the ami_id to the ID of the AMI you
built in the server templating section earlier in this blog post.
If you were to run apply on this code, it would use the ec2-instance module code to create a single EC2 instance.
But the beauty of code reuse is that you can use the module multiple times, as shown in
Example 17:
module"sample_app_1"{source="../../modules/ec2-instance" # TODO: fill in with your own AMI ID!ami_id="ami-09a9ad4735def0515"}module"sample_app_2"{source="../../modules/ec2-instance" # TODO: fill in with your own AMI ID!ami_id="ami-09a9ad4735def0515"}
This code has two module blocks, so if you run apply on it, it will create two EC2 instances. If you had three
module blocks, it would create three EC2 instances; four module blocks would create four EC2 instances; and so on.
And, of course, you can mix and match different modules, include modules in other modules, and so on. It’s not unusual
for modules to be reused dozens or hundreds of times across a company, so that you put in the work to create
a module that meets your company’s needs once, and then use it over and over again.
However, there are two changes you need to make to the ec2-instance module in order for it to work effectively as a
reusable module.
The first change is to namespace all the resources created by the ec2-instance module. Currently, it hard-codes all
names, such as the name of the security group, to "sample-app-tofu." AWS requires all security group names to be unique,
so if you ran apply on these two module blocks, you’d get an error due to the name conflicts. To fix this,
introduce a name input variable in modules/ec2-instance/variables.tf, as shown in Example 18:
variable"name"{description="The base name for the instance and all other resources"type=string}
Next, update the ec2-instance module to use the name input variable everywhere that was hard-coded to
"sample-app-tofu," including the aws_security_group resource and the tags in the aws_instance resource, as shown
in Example 19:
module"sample_app_1"{source="../../modules/ec2-instance" # TODO: fill in with your own AMI ID!ami_id="ami-09a9ad4735def0515"name="sample-app-tofu-1"}module"sample_app_2"{source="../../modules/ec2-instance" # TODO: fill in with your own AMI ID!ami_id="ami-09a9ad4735def0515"name="sample-app-tofu-2"}
Now you’ll get two EC2 instances, one with all resources named "sample-app-tofu-1," and the other with all resources
named "sample-app-tofu-2."
The second change is to remove the provider block from the ec2-instance module. Having a provider block inside
a module isn’t wrong per se, but typically, reusable modules do not declare provider blocks, and instead inherit
those from the root module. This allows the provider block to be configured in different ways in different usages of
the module. For example, one usage might configure the provider to use a different region, another usage might
configure it to a different AWS account, and so on. All you need to do is to move the provider block from the
ec2-instance (reusable) module to the sample-app (root) module, as shown in
Example 21:
provider"aws"{region="us-east-2"}module"sample_app_1"{source="../../modules/ec2-instance" # TODO: fill in with your own AMI ID!ami_id="ami-09a9ad4735def0515"name="sample-app-tofu-1"}module"sample_app_2"{source="../../modules/ec2-instance" # TODO: fill in with your own AMI ID!ami_id="ami-09a9ad4735def0515"name="sample-app-tofu-2"}
One last step: create an outputs.tf file in the sample-app folder with the contents shown in
Example 22:
output"sample_app_1_public_ip"{description="The public IP of the sample-app-1 instance"value=module.sample_app_1.public_ip}output"sample_app_2_public_ip"{description="The public IP of the sample-app-2 instance"value=module.sample_app_2.public_ip}output"sample_app_1_instance_id"{description="The ID of the sample-app-1 instance"value=module.sample_app_1.instance_id}output"sample_app_2_instance_id"{description="The ID of the sample-app-2 instance"value=module.sample_app_2.instance_id}
The preceding code "proxies" the output variables from the underlying ec2-instance module usages so that you can see
those outputs when you run apply on the sample-app root module.
OK, you’re finally ready to run this code:
console
$ tofuinit
$ tofuapply
When apply completes, you should have two EC2 instances running, and the output variables should show their IPs and
instance IDs. If you wait a minute or two for the instances to boot up, and open http://<IP>:8080 in your browser,
where <IP> is the public IP of either instance, you should see the familiar "Hello, World!" text. When you’re done
experimenting, run tofu destroy to clean everything up again.
Example: Deploy an EC2 Instance Using an OpenTofu Module from GitHub
There’s one more trick with OpenTofu modules: the source parameter can be set to not only a local file path, but also
to a URL. For example, the blog post series’s sample code repo in GitHub includes an
ec2-instance module that is more or less identical to your own ec2-instance module. You can use the module from the
series’s sample code repo by setting the source parameters to a URL, as shown in
Example 23:
The preceding code sets the source URL to a GitHub URL. Note the intentional use of two slashes (//): the
part to the left of the two slashes specifies the GitHub repo and the part to the right of the two slashes specifies
the subfolder within that repo.
Run init on this code one more time:
console
$ tofuinit
Initializing the backend...Initializing modules...Downloading git::https://github.com/brikis98/devops-book.git...Downloading git::https://github.com/brikis98/devops-book.git...Initializing provider plugins...
The init command is responsible for downloading provider code and module code, and you can see in the preceding
output that, this time, it downloaded the module code from GitHub. If you now run apply, you should get the exact
same two EC2 instances as before. When you’re done experimenting, run destroy to clean everything up.
You’ve now seen the power of reusable modules. A common pattern at many companies is for the Ops team to define and
manage a library of vetted, reusable OpenTofu modules—e.g., one module to deploy servers, another to deploy databases,
another to configure networking, and so on—and for the Dev teams to use these modules as a self-service way to deploy
and manage the infrastructure they need for their apps.
This blog post series will make use of this pattern in future blog posts: instead of writing every line
of code from scratch, you’ll be able to use modules directly from this series’s sample code repo to
deploy the infrastructure you need for each post.
Get your hands dirty
Here are a few exercises you can try at home to go deeper:
Update your ec2-instance module to make it more configurable: e.g., add input variables to
configure the instance type it uses, the port it opens up for HTTP requests, and so on.
Use data sources in OpenTofu to find the ID of your AMI automatically, instead of manually hard-coding the ID.
How Provisioning Tools Stack Up
So, how do provisioning tools stack up using the IaC category criteria from before?
CRUD
Most provisioning tools have full support all four CRUD operations. For example, you just saw OpenTofu create an EC2
instance, read the EC2 instance state, update the EC2 instance (to add a tag), and delete the EC2 instance.
Scale
Provisioning tools scale very well. For example, the self-service approach mentioned in the previous section—where
you have a library of reusable modules managed by Ops and used by Devs to deploy the infrastructure they need—can
scale to thousands of developers and tens of thousands of resources, something that would be a nightmare to manage
with ad hoc scripts.
Deployment strategies
Provisioning tools typically let you use whatever deployment strategies are supported by the underlying
infrastructure. For example, OpenTofu allows you to use instance refresh to do a zero-downtime, rolling deployment
for groups of servers in AWS; you’ll try out an example of this in Part 3.
Idempotency and error handling
Whereas most ad hoc scripts are procedural, where you specify step by step how to achieve some desired end state,
most provisioning tools are declarative, where you specify the end state you want, and the provisioning tool
automatically figures out how to get you from your current state to that desired end state. As a result, most
provisioning tools are idempotent and can handle errors automatically. For example,
you already saw in the CRUD discussion that you can re-run OpenTofu multiple times, and it will refresh its state,
and come up with an execution plan to try to make the state of the world match the desired state in your code,
handling changes in your code, changes in the outside world, and errors along the way.
Consistency
Most provisioning tools enforce a consistent, predictable structure to the code, including documentation,
file layout, clearly named parameters, secrets management, and so on.
Verbosity
The declarative nature of provisioning tools and the custom DSLs they provide typically result in concise code,
especially considering that code supports all CRUD operations, deployment strategies, scale, idempotency, and error
handling out-of-the-box. The OpenTofu code for deploying an EC2 instance is about half the length of the Bash code,
even though it does considerably more, and the more complex the infrastructure you’re managing, the larger this gap
becomes.
Provisioning tools should be your go-to option for managing infrastructure. Moreover, many provisioning tools
can be used to not only manage traditional infrastructure (e.g., servers), but many other aspects of software delivery
as well. For example, you can use OpenTofu to manage your version control system (e.g., using the
GitHub provider), metrics (e.g., using
the Grafana provider), and your on-call rotation (e.g., using
the PagerDuty provider), tying them all together with code.
Key takeaway #4
Provisioning tools are great for deploying and managing servers and infrastructure.
Although I’ve been comparing IaC tools this entire blog post, the reality is that you’ll probably need
to use multiple IaC tools together, as discussed in the next section.
Using Multiple IaC Tools Together
Each of the tools you’ve seen in this blog post has strengths and weaknesses. No one of them
can do it all, so for most real-world scenarios, you’ll need to use several different tools, and it’s your job to pick
the right tool(s) for the job.
Key takeaway #5
You usually need to use multiple IaC tools together to manage your infrastructure.
The following sections show three common combinations I’ve seen work well at a number of companies.
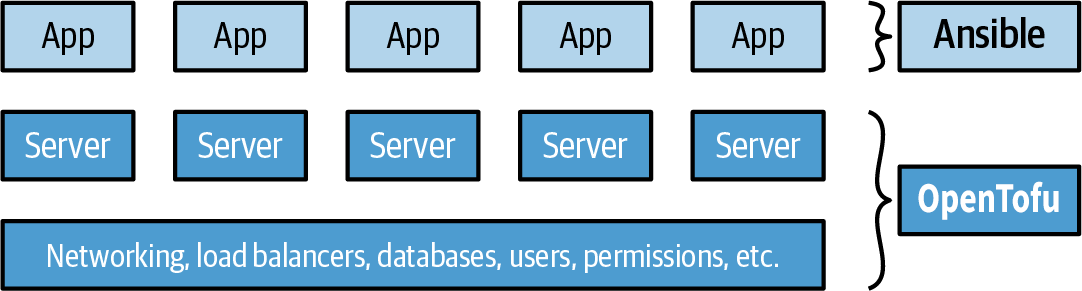
Provisioning Plus Configuration Management
Example: OpenTofu and Ansible. You use OpenTofu to deploy all the underlying infrastructure, including the network
topology, data stores, load balancers, and servers. You then use Ansible to deploy your apps on top of those servers,
as depicted in Figure 22:
Figure 22. OpenTofu deploys the infrastructure, including servers, and Ansible deploys apps onto those servers.
This is an easy approach to get started with and there are many ways to get Ansible and OpenTofu to work together
(e.g., OpenTofu adds tags to your servers, and Ansible uses an inventory plugin to automatically discover servers with
those tags). The major downside is that using Ansible typically means mutable infrastructure, rather than immutable, so
as your codebase, infrastructure, and team grow, maintenance and debugging can become more difficult.
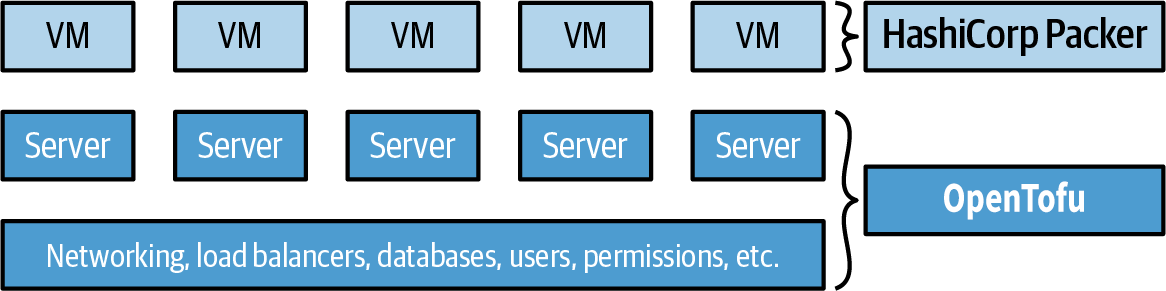
Provisioning Plus Server Templating
Example: OpenTofu and Packer. You use Packer to package your apps as VM images. You then use OpenTofu to deploy servers
with these VM images and the rest of your infrastructure, including the network topology, data stores, and load
balancers, as illustrated in Figure 23:
Figure 23. OpenTofu deploys the infrastructure, including servers, and Packer creates the VMs that run on those servers.
This is also an easy approach to get started with. In fact, you already had a chance to try this combination out
earlier in this post. Moreover, this is an immutable infrastructure approach, which will
make maintenance easier. The main drawback is that VMs can take a long time to build and deploy, which slows down
iteration speed.
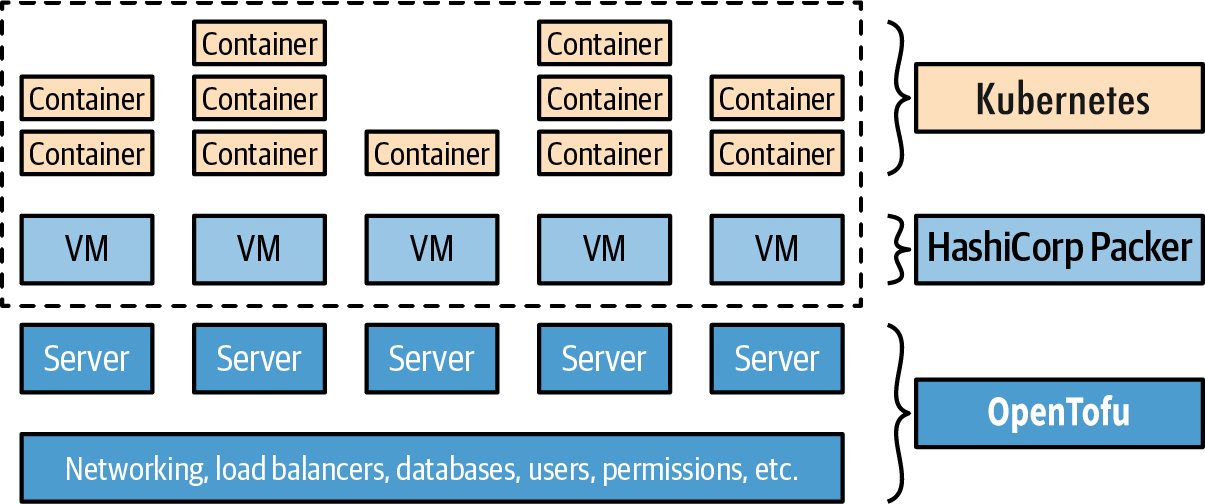
Provisioning Plus Server Templating Plus Orchestration
Orchestration tools, such as Kubernetes, Nomad, and OpenShift, help you deploy and manage apps on top of your
infrastructure. You’ll do a deep-dive on orchestration in Part 3.
Example: OpenTofu, Packer, Docker, and Kubernetes.
You use Packer to create a VM image that has Docker and Kubernetes agents installed. You then use OpenTofu to deploy
a cluster of servers, each of which runs this VM image, and the rest of your infrastructure, including the
network topology, data stores, and load balancers. Finally,
when the cluster of servers boots up, it forms a Kubernetes cluster that you use to run and manage your Dockerized
applications, as shown in Figure 24:
Figure 24. OpenTofu deploys the infrastructure, including servers; Packer creates the VMs that run on those servers; and Kubernetes manages those VMs as a cluster for running Docker containers.
The advantage of this approach is that Docker images build fairly quickly, you can run and test them on your local
computer, and you can take advantage of all of the built-in functionality of Kubernetes, including various deployment
strategies, auto healing, auto scaling, and so on. The drawback is the added complexity, both in terms of extra
infrastructure to run (Kubernetes clusters are difficult and expensive to deploy and operate, though most major cloud
providers now provide managed Kubernetes services, which can offload some of this work) and in terms of several extra
layers of abstraction (Kubernetes, Docker, Packer) to learn, manage, and debug.
Adopting IaC
At the beginning of this blog post, you heard about all the benefits of IaC
(self-service, speed and safety, code reuse, and so on), but it’s important to understand that adopting IaC has
significant costs, too. Not only do your team members have to learn new tools and techniques, they also have to get
used to a totally new way of working. It’s a big shift to go from the old-school sysadmin approach of spending all day
managing infrastructure manually and directly (e.g., connect to a server and update its configuration) to the new DevOps
approach of spending all day coding and making changes indirectly (e.g., write some code and let an automated process
apply the changes).
Key takeaway #6
Adopting IaC requires more than just introducing a new tool or technology: it also requires changing the culture and
processes of the team.
Changing culture and processes is a significant undertaking, especially at larger companies. Because every team’s
culture and processes are different, there’s no one-size-fits-all way to do it, but here are a few tips that will be
useful in most situations:
Focus on the most important problems
It might be slightly heretical for the author of a book on DevOps to say this, but not every team needs IaC. Adopting
IaC has a relatively high cost, and although it will pay off in the long term for some scenarios, it won’t for
others. For example, if your team is spending all of its time dealing with bugs and outages that result from a manual
deployment process, then it might make sense to prioritize IaC, but if you’re at a tiny startup where one person can
easily manage all your infrastructure, or you’re working on a prototype or side project that might be thrown away in
a few months, managing infrastructure by hand may be the right choice.
Don’t adopt IaC, or any other practice, just because you read somewhere that it’s a "best practice." Instead, identify
the problems your team has, and always focus on solving the most important ones. As you saw in Section 1.1.2,
at a certain scale, most companies face problems that are best solved by IaC, but until you get to that scale and start
hitting those problems, it’s OK to focus on other priorities.
Work incrementally
Even if you do prioritize adopting IaC, or any other practice, don’t try to do it all in one massive step. Instead,
whenever you adopt any new practice, do it incrementally, as you learned in Part 1: break up
the work into small steps, each of which brings value by itself. For example, don’t try to do one giant project where
you try to migrate all of your infrastructure to IaC by writing tens of thousands of lines of code. Instead, use
an iterative process where you identify the most problematic part of your infrastructure (e.g., the part that is
causing the most bugs and outages), fix the problems in that part (e.g., perhaps by migrating that part to IaC), and
repeat.
Give your team the time to learn
If you want your team to adopt IaC, then you need to be willing to dedicate sufficient time and resources to it. If
your team doesn’t get the time and resources that it needs, then your IaC migration is likely to fail. One scenario
I’ve seen many times is that no one on the team has any clue how to use IaC properly, so you end up with a jumble of
messy, buggy, unmaintainable code that causes more problems than it solves; another common scenario is that part of
the team knows how to do IaC properly, and they write thousands of lines of beautiful code, but the rest of the team
has no idea how to use it, so they continue making changes manually, which invalidates most of the benefits of IaC.
If you decide to prioritize IaC, then I recommend that (a) you get everyone bought in, (b) you make learning
resources available, such as classes, documentation, video tutorials, and, of course, this blog post series, and
(c) you provide sufficient dedicated time for team members to ramp up before you start using IaC everywhere.
Get the right people on the team
If you want to be able to use infrastructure as code, you have to learn how to write code. In fact, as you saw at the
beginning of the blog post, a key shift with modern DevOps is managing more and more as code,
so as a company adopts more DevOps practices, strong coding skills become more and more important. If you have team
members who are not strong coders, be aware that some will be able to level up (given sufficient time and resources,
as per the previous point), but some will not, which means you may have to hire new developers with coding skills for
your team.
Conclusion
You now understand how to manage your infrastructure as code. Instead of clicking around a web UI, which is tedious and
error-prone, you can automate the process, making if faster and more reliable. Moreover, whereas manual deployments
always require someone at your company to do the busywork, with IaC, you can reuse code written by others, including
both open source code (e.g., Ansible Galaxy,
Docker Hub, Terraform Registry) and commercial code
(e.g., Gruntwork Infrastructure as Code Library).
This also includes the examples in the rest of this blog post series, most of which will be defined as code: you’ll see
snippets of the code in the series itself, and you can find the fully-working examples in the
sample code repo in GitHub.
To help you pick the right category of IaC tool, here are the 6 key takeaways you’ve seen
throughout the blog post:
Ad hoc scripts are great for small, one-off tasks, but not for managing all your infrastructure as code.
Configuration management tools are great for managing the configuration of servers, but not for deploying the servers
themselves, or other infrastructure.
Server templating tools are great for managing the configuration of servers with immutable infrastructure practices.
Provisioning tools are great for deploying and managing servers and infrastructure.
You usually need to use multiple IaC tools together to manage your infrastructure.
Adopting IaC requires more than just introducing a new tool or technology: it also requires changing the culture and
processes of the team.
If the job you’re doing is provisioning infrastructure, you’ll probably want to use a provisioning tool. If the job
you’re doing is configuring servers, you’ll probably want to use a server templating or configuration management tool.
And as most real-world software delivery setups require you to do multiple jobs, you’ll most likely have to combine
several tools together: e.g., provisioning plus server templating.
It’s worth remembering that there is also a lot of variety within an IaC category: e.g., there are big differences
between Ansible and Chef within the configuration management category, and between OpenTofu and CloudFormation within
the provisioning tool category. For a more detailed comparison, have a look at
this
comparison of Chef, Puppet, Ansible, Pulumi, CloudFormation, and Terraform/OpenTofu.
Going deeper on OpenTofu / Terraform
Many of the examples in the rest of this blog post series involve provisioning infrastructure, and I use OpenTofu
as the provisioning tool for most of these examples, so you may want to become more familiar with this toolset. The
best way to do that, with apologies for a bit of self-promotion, is to grab a copy of my other book,
Terraform: Up & Running.
Being able to use code to run a server is a huge advantage over managing it manually, but a single server is
also a single point of failure. What if it crashes? What if the load exceeds the capacity of a single server? How do you
roll out changes without downtime? These topics are the focus of
Part 3, How to Deploy Your Apps.