$ mkdir fundamentals-of-devops
$ cd fundamentals-of-devopsPart 1. How to Deploy Your App

Update, June 25, 2024: This blog post series is now also available as a book called Fundamentals of DevOps and Software Delivery: A hands-on guide to deploying and managing software in production, published by O’Reilly Media!
This is Part 1 of the Fundamentals of DevOps and Software Delivery series. In the introduction to the blog post series, you heard about how DevOps consists of dozens of different concepts, but it almost always starts with just one question:
I wrote an app. Now what?
You and your team have spent months putting together an app. You picked a programming language, implemented the backend, designed and built a user interface, and finally, it’s time to expose the app to real users. How, exactly, do you do that?
There are so many questions to figure out here. Should you use AWS or Azure? (And what about Heroku or Vercel?) Do you need one server or multiple servers? (Or serverless?) Do you need to use Docker? (Or Kubernetes?) Do you need a VPC? (Or a VPN?) How do you get a domain name? (And what about a TLS certificate?) What’s the right way to set up your database? (And how do you back it up?) Why did that app crash? Why does nothing seem to be working? Why is this so hard???
OK, easy now. Take a deep breath. If you’re new to software delivery—you’ve worked as an app developer your whole career, or you’re just starting out in operations—it can be overwhelming, and you can get stuck in analysis paralysis. This blog post series is here to help. I will walk you through each of these questions—and many others you didn’t think to ask—and help you figure out the answers, step-by-step.
The first step will be to deploy the app on a server and get it running in the most basic way you can. You’ll work through examples where you deploy the same app on your own computer, on Render (a Platform as a Service), and on AWS (an Infrastructure as a Service). After that, you’ll see how to evolve your basic deployment as your company grows.
Without further ado, let’s jump right into it, and start deploying some apps!
Example: Deploy the Sample App Locally
The first place you should be able to deploy any app is locally, on your own computer. This is typically how you’d build the app in the first place, writing and running your code locally until it’s working. How you deploy an app locally depends on the technology. Throughout this blog post series, you’re going to be using a simple Node.js sample app.
|
Example Code
As a reminder, you can find all the code examples in the blog post series’s sample code repo in GitHub. |
Create a new folder on your computer, perhaps called something like fundamentals-of-devops, which you can use to store code for various examples you’ll be running throughout the blog post series. You can run the following commands in a terminal to create the folder and go into it:
In that folder, create new subfolders for this blog post and the sample app:
$ mkdir -p ch1/sample-app
$ cd ch1/sample-appThe sample app you’ll be using is a minimal "Hello, World" Node.js app, written in JavaScript. You don’t need to understand much JavaScript to make sense of the app. In fact, one of the nice things about getting started with Node.js is that all the code for a simple web app fits in a single file that’s ~10 lines long. Within the sample-app folder, create a file called app.js, with the contents shown in Example 1:
Example 1. A Node.js "Hello, World" sample app (ch1/sample-app/app.js)
const http = require('http');
const server = http.createServer((req, res) => {
res.writeHead(200, { 'Content-Type': 'text/plain' });
res.end('Hello, World!\n'); (1)
});
const port = process.env.PORT || 8080; (2)
server.listen(port,() => {
console.log(`Listening on port ${port}`);
});This is a "Hello, World" app that does the following:
| 1 | Respond to all requests with a 200 status code and the text "Hello, World!" |
| 2 | Listen for requests on the port number specified via the PORT environment variable, or if PORT is not set,
default to port 8080. |
To run the app, you must first install Node.js (minimum version 21). Once that’s
done, you can start the app with node app.js:
$ node app.js
Listening on port 8080You can then open http://localhost:8080 in your browser, and you should see:
Hello, World!
Congrats, you’re running the app locally! That’s a great start, but if you want to expose your app to users, you’ll need to run it on a server, as discussed next.
Deploying an App on a Server
When you run an app on your computer, it is only available on localhost, a hostname configured to point to the loopback network interface, which means it bypasses any real network interface, and can only be accessed from your own computer, and not from the outside world. This is by design, and for the most part, a good thing, as the way you run apps on a personal computer for development and testing is not the way you should run them when you want to expose them to outsiders.
|
Key takeaway #1
You should never expose apps running on a personal computer to the outside world. |
Instead, if you’re going to expose your app to the outside world, you should run it on a server. A server is a computer specifically designed for running apps and exposing those apps to the outside world. There are many differences between a server and a personal computer, including the following:
- Security
-
Most servers run a stripped-down operating system (OS) and are hardened against attacks (e.g., firewall, intrusion prevention tools, file integrity monitoring). Your personal computer has all sorts of extra software on it (any of which could have a vulnerability) and is not hardened.
- Availability
-
Most servers are designed to be on all the time, and have redundant power. Your personal computer may shut off at any time.
- Performance
-
Most servers run just the apps on them. You use your personal computer for other tasks (e.g., coding, browsing) that may impact your app’s performance.
- Collaboration
-
Most apps are worked on by teams, and whereas other developers don’t (and shouldn’t) have access to your personal computer, servers are usually designed for team access.
For these reasons, always use a server to run your production apps. Broadly speaking, there are two ways to get access to servers (two options for hosting your apps):
-
You can buy and set up your own servers ("on-prem").
-
You can rent servers from others ("the cloud").
We’ll discuss each of these in the next section.
On-Prem and Cloud Hosting
The traditional way to run software is to buy servers and set them up on-premises (on-prem for short), in a physical location you own. When you are just starting out, the location could be as simple as a closet in your office, but as a company grows, so do the computing demands, and you eventually need a data center, with all the requisite equipment (e.g., racks, servers, hard drives, cooling) and staff (e.g., electricians, network administrators, security). So for decades, if you wanted to build a software company, you also had to invest quite a bit into hardware.
This started to change in 2006 with the launch of Amazon Web Services (AWS), the first cloud computing platform (cloud for short), which allowed you to rent servers using a software interface, either via a few clicks (which you’ll do in this blog post), or via a few lines of code (which you’ll do in Part 2). This was a profound shift that let you get up and running in minutes instead of months, at the cost of a few cents (or even free) instead of thousands of dollars.
There are two main cloud offerings: Infrastructure as a Service (IaaS), which gives you access to low-level computing resources (servers, hard-drives, networks), and leaves it up to you to put them together into a software delivery process, and Platform as a Service (PaaS), which gives you access to higher-level primitives, including an opinionated software delivery process. To get a feel for the difference, you’ll use a PaaS in the next section, and an IaaS in the section after that.
Example: Deploy an App Using PaaS (Render)
Popular PaaS providers include Heroku, Render, Fly.io, and Vercel (full list). Heroku was one of the first PaaS providers, and it used to be my go-to choice, but it discontinued its free tier in 2022. Therefore, for the examples in this blog post series, you’ll be using Render, which offers a free "Hobby" tier, so the example in this series shouldn’t cost you anything, supports running apps in many languages and frameworks (including Node.js) without having to set up a build system, framework, etc. (topics you’ll learn about later in the series), and has a good reputation in the community, often described as the spiritual successor to Heroku. To deploy the sample app using Render, go through the following steps:
Step 1: Sign up for a Render account. Create a new account on render.com.
Step 2: Deploy a new web service. Head to the Render Dashboard and click the Deploy a Web Service button. On the next page, select the Public Git Repository tab, and enter the URL of this blog post series’s sample code repo, https://github.com/brikis98/devops-book, as shown in Figure 1. This repo contains the Node.js code from Example 1 in the ch1/sample-app folder, so this lets you deploy the app without creating your own GitHub repo.
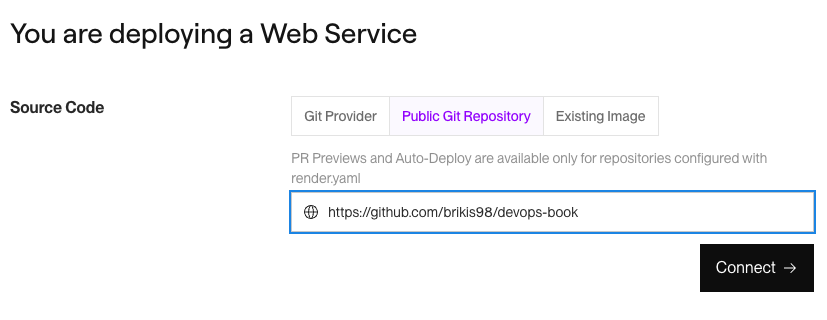
Figure 1. Use this blog post series’s sample code repo to create a web service in Render
Click the Connect button, and then configure your web service as shown in Table 3:
| Configuration | Value |
|---|---|
Name | sample-app |
Language | Node |
Root Directory | ch1/sample-app |
Build Command |
|
Start Command |
|
Instance Type | Free |
Leave the other settings (e.g., Project, Branch, Region) at their default values and click the Deploy Web Service button at the bottom of the page to start the deployment.
Step 3: Test your app. After a couple of minutes, the deployment log should say something like "Your service is live", as shown Figure 2:
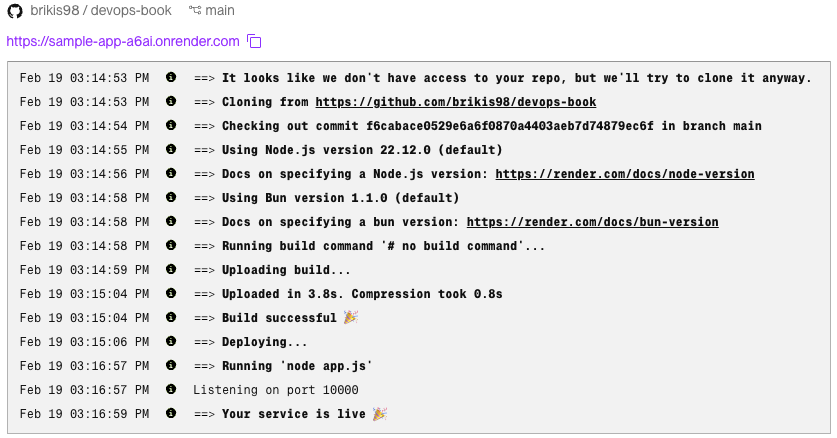
Figure 2. A completed deployment in Render
At the top-left of the page, you should see a randomly-generated URL for your app of the form
https://<NAME>.onrender.com. Open this URL, and you should see:
Hello, World!
Congrats, in just a few steps, you now have an app running on a server!
|
Get your hands dirty
Here are a few exercises you can try at home to go deeper:
|
When you’re done experimenting with Render, undeploy your app by clicking the Settings tab, scrolling to the bottom, and clicking the Delete Web Service button.
Using a PaaS typically means you get not just a server, but a lot of powerful functionality out-of-the-box: e.g.,
scaling to multiple servers, domain names (<NAME>.onrender.com), encryption (HTTPS URLs), monitoring
(logs and metrics), and more. This is the power of PaaS: in a matter of minutes, a good PaaS can take care of so
many software delivery concerns for you. It’s like magic. And that’s the greatest strength of PaaS: it just works.
Except when it doesn’t. When that happens, this same magic becomes the greatest weakness of PaaS. By design, with a PaaS, just about everything is happening behind the scenes, so if something doesn’t work, it can be hard to debug it or fix it. Moreover, to make the magic possible, most PaaS offerings have a number of limitations: e.g., limitations on what you can deploy, what types of apps you can run, what sort of access you can have to the underlying hardware, what sort of hardware is available, and so on. If the PaaS doesn’t support it—if the CLI or UI the PaaS provides doesn’t expose the ability to do something you need—you typically can’t do it at all.
As a result, while many projects start on PaaS, if they grow big enough and require more control, they end up migrating to IaaS, which is the topic of the next section.
Example: Deploy an App Using IaaS (AWS)
Broadly speaking, the IaaS space falls into three buckets:
- Virtual private server (VPS)
-
There are a number of companies who primarily focus on giving you access to a virtual private server (VPS) for as cheap as possible. These companies might offer a few other features (e.g., networking, storage) as well, but the main reason you’d go with one of these providers is that you just want a replacement for having to rack your own servers, and prefer to have someone else do it for you, and give you access. Some of the big players in this space include Hetzner, DigitalOcean, Vultr, and Akamai Connected Cloud (full list).
- Content delivery networks (CDNs)
-
There are also a number of companies who primarily focus on content delivery networks (CDNs), which are servers that are distributed all over the world, typically for the purpose of serving and caching content. Again, these companies might offer a few other features (e.g., protection against attacks), but the main reason you’d go with one of these providers is that your user base is geographically distributed, and you need a fast and reliable way to serve them content with low latency. You’ll learn all about CDNs in Part 9.
- Cloud providers
-
Finally, there are a handful of large companies trying to provide general-purpose cloud solutions that offer everything: VPS, CDN, containers, serverless, data storage, file storage, machine learning, natural language processing, edge computing, and more. The big players in this space include Amazon Web Services (AWS), Google Cloud Platform (GCP), and Microsoft Azure (full list).
In general, the VPS and CDN providers are specialists in their respective areas, so in those areas, they will typically beat a general-purpose cloud provider in terms of features, pricing, and user experience. For example, a VPS from Hetzner is usually faster, cheaper, and in some ways easier to use than one from AWS. So if you only need those specific items, you’re better off going with a specialist. However, if you’re building the infrastructure for an entire company, your architecture usually needs many types of infrastructure, and the general-purpose cloud providers will typically be a better fit, as they offer a one-stop-shop to meet all your needs.
For the examples in this blog post series, the IaaS provider you’ll be using is AWS, which offers a free tier, so most of the examples in this blog post series shouldn’t cost you anything, provides a huge range of reliable and scalable cloud services (servers, serverless, containers, databases, load balancers, etc.), so you can use it for most of the examples in this series, and is widely recognized as the dominant cloud provider (it has 31% share of the market and has been the leader in Gartner’s Magic Quadrant for the last 13 years), so it’s something you’re likely to use at work.
|
An AWS account is required to proceed!
This blog post series includes a number of examples that deploy into AWS. To run these examples, you need an AWS account you can authenticate to with administrator access. If you don’t already have an AWS account, or you don’t know how to authenticate to it, check out the How to authenticate to AWS with IAM Identity Center tutorial on this blog post series’s website to learn how to create an AWS account (for free), create a user account with sufficient permissions, and authenticate to AWS on both the web and the command line. |
To deploy the sample app in AWS, go through the following steps:
Step 1: Choose an AWS region. AWS has datacenters all over the world, grouped into
regions and availability zones. An AWS region is a separate geographic area, such as us-east-2 (Ohio), eu-west-1
(Ireland), and ap-southeast-2 (Sydney). Within each region, there are multiple isolated datacenters known as
availability zones (AZs), such as us-east-2a, us-east-2b, and so on. Just about all the examples in this
blog post series will use the us-east-2 (Ohio) region, so go into the
AWS Console, and in the top right, pick us-east-2 as the region to use, as shown
in Figure 3. You may even want to
configure us-east-2 as your
default region, so you don’t accidentally end up in a different one. I’ve been using AWS for more
than a decade, and I still end up in the wrong region by accident if I don’t do this.

Figure 3. Pick
us-east-2 (Ohio) as your AWS regionStep 2: Deploy an EC2 instance. To deploy a server in AWS, called an EC2 instance, head over to the EC2 Console and click the "Launch instance" button. This will take you to a page where you configure your EC2 instance, as shown in Figure 4.
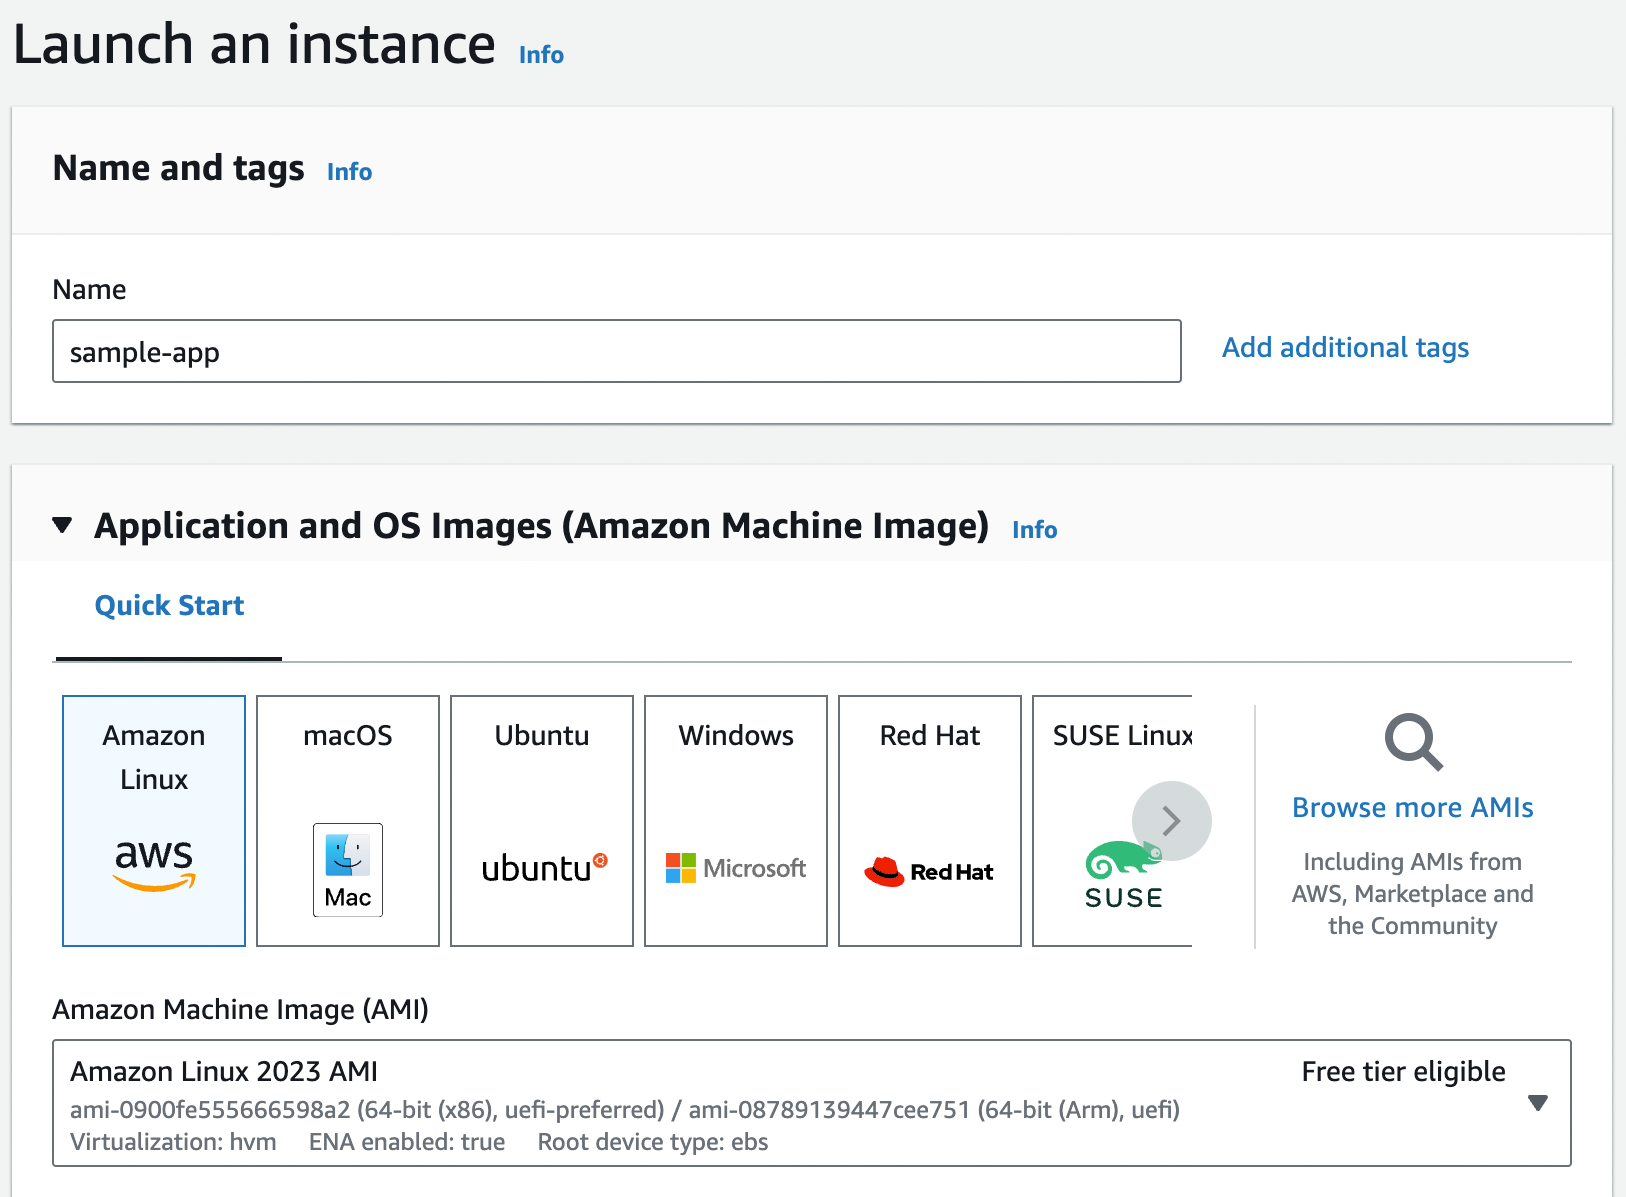
Figure 4. Configure the name and AMI to use for your EC2 instance.
Fill in a name for the instance, such as "sample-app." Below that, you need to pick the Amazon Machine Image (AMI) to use, which specifies what operating system and other software will be installed (you’ll learn more about machine images in Part 2). For now, stick with the default, which should be Amazon Linux.
Step 3: Configure the EC2 instance. Next, you need to configure the instance type and key pair, as shown in Figure 5:
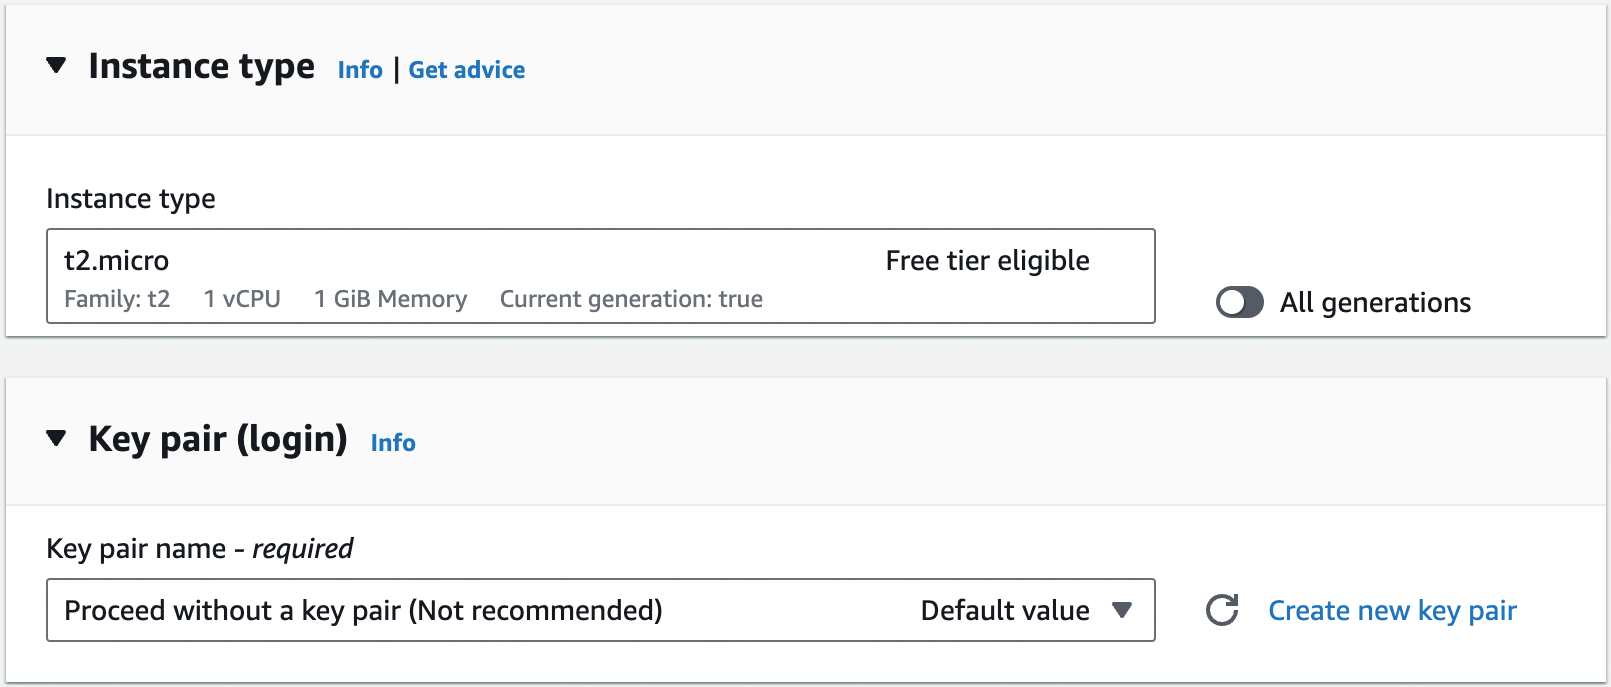
Figure 5. Configure the instance type and key pair to use for your EC2 instance.
The instance type specifies what type of server to use: that is, what sort of CPU, memory, hard drive, etc. it’ll
have. For this quick test, you can use the default, which should be something like t2.micro or t3.micro, small
instances (1 CPU, 1GB of memory) that are part of the AWS free tier. The key pair can be used to connect to the EC2
instance via SSH, a topic you’ll learn more about in Part 7. You’re not going to be using SSH for
this example, so select "Proceed without a key pair."
Step 4: Configure the network settings. Scroll down to the network settings, as shown in
Figure 6. You’ll learn about networking in Part 7. For now, you can leave most
of these settings at their defaults: Network should be set to your Default VPC (in Figure 6, my Default
VPC has the ID vpc-deb90eb6, but your ID will be different), Subnet should be set to "No preference," and Auto-assign
public IP should be set to "Enable." The only thing you should change is the Firewall (security groups) setting,
selecting the "Create security group" radio button, disabling the "Allow SSH traffic from" setting, and enabling the
"Allow HTTP traffic from the internet" setting, as shown in Figure 6. By default, EC2 instances have
firewalls, called security groups, that don’t allow any network traffic in our out. Allowing HTTP traffic tells the
security group to allow inbound TCP traffic on port 80, so that the sample app can receive requests.
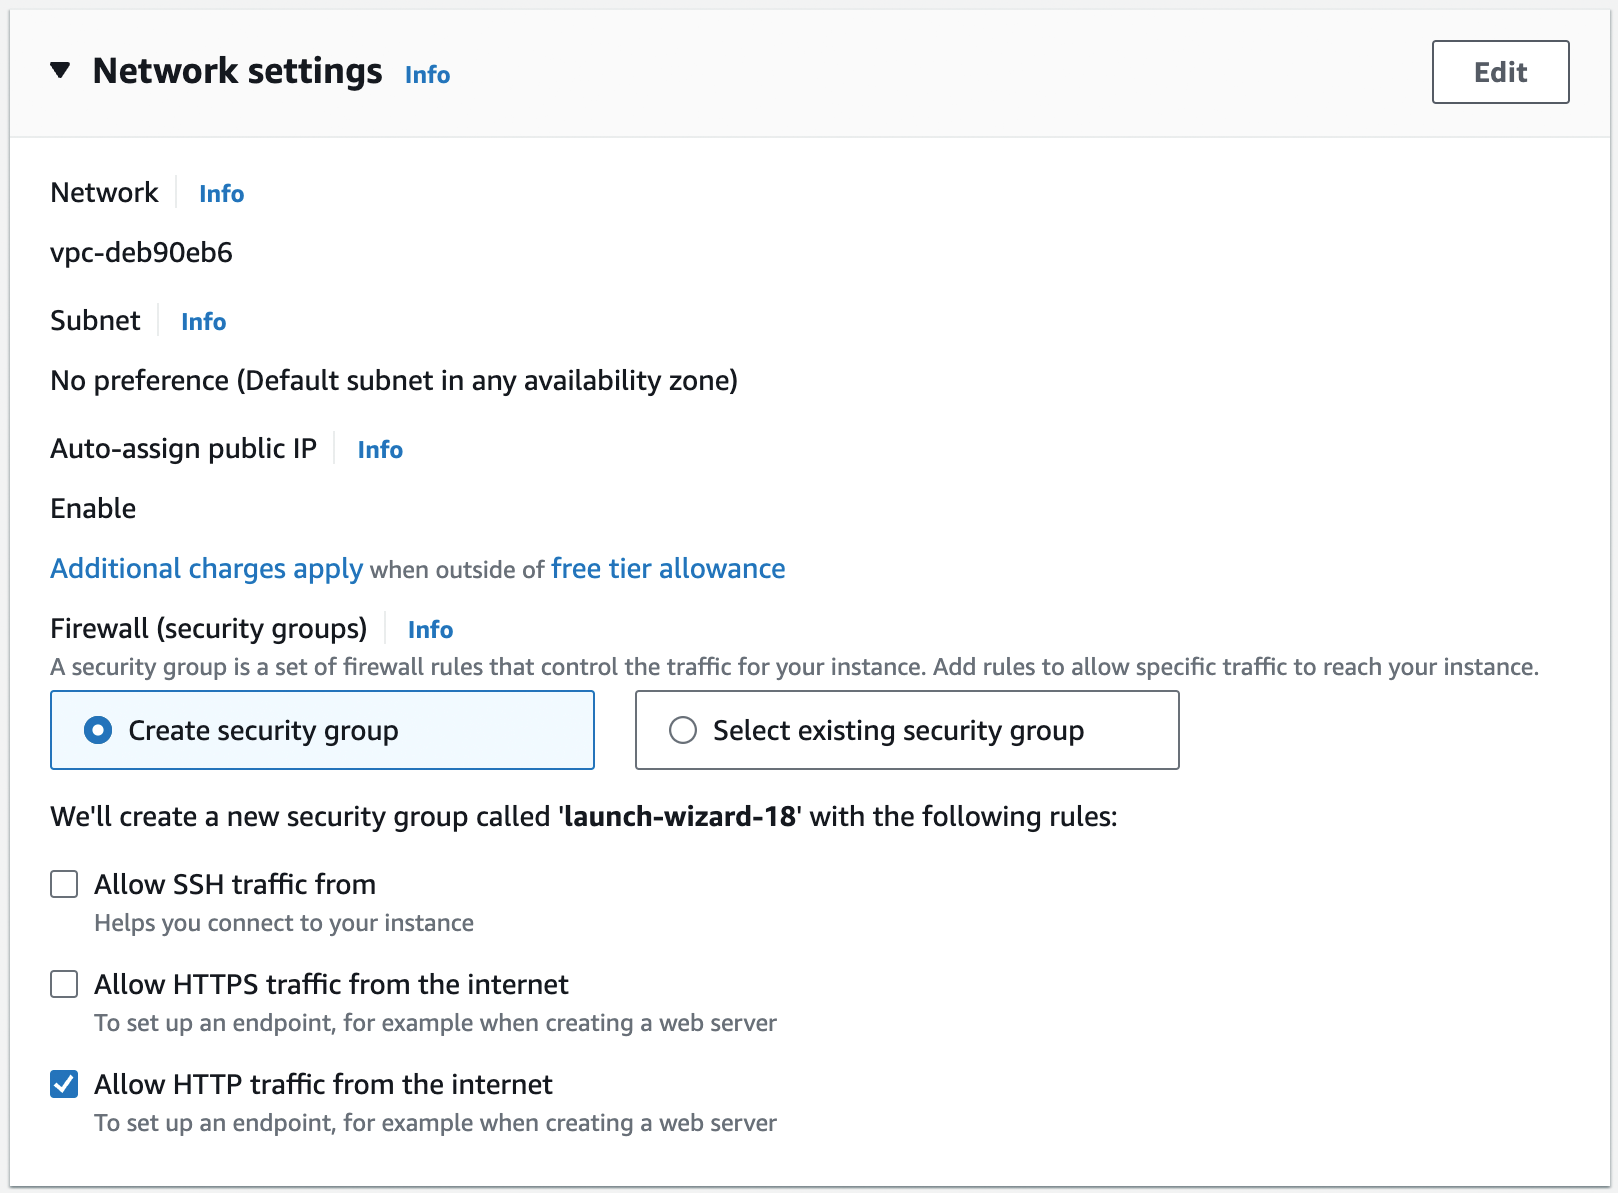
Figure 6. Configure the network settings for your EC2 instance.
Step 5: Configure advanced details. Open up the "Advanced details" section, and scroll down to "User data," as shown in Figure 7.
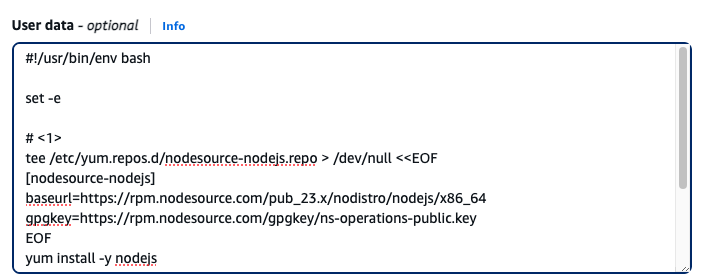
Figure 7. Configure user data for your EC2 instance.
User data is a script the EC2 instance will execute the first time it boots up. Copy and paste the script shown in Example 2 into user data. You should also save a copy of this script in ch1/ec2-user-data-script/user-data.sh, so you can reuse it later.
Example 2. User data script (ch1/ec2-user-data-script/user-data.sh)
#!/usr/bin/env bash
set -e
(1)
tee /etc/yum.repos.d/nodesource-nodejs.repo > /dev/null <<EOF
[nodesource-nodejs]
baseurl=https://rpm.nodesource.com/pub_23.x/nodistro/nodejs/x86_64
gpgkey=https://rpm.nodesource.com/gpgkey/ns-operations-public.key
EOF
yum install -y nodejs
(2)
tee app.js > /dev/null << "EOF"
const http = require('http');
const server = http.createServer((req, res) => {
res.writeHead(200, { 'Content-Type': 'text/plain' });
res.end('Hello, World!\n');
});
(3)
const port = process.env.PORT || 80;
server.listen(port,() => {
console.log(`Listening on port ${port}`);
});
EOF
(4)
nohup node app.js &This user data script will do the following when the EC2 instance boots:
| 1 | Add the NodeSource repos to yum and use those repos to install Node.js. |
| 2 | Write the sample app code to a file called app.js. This is the same Node.js code you saw earlier in the blog post, with one difference, as described in (3). |
| 3 | The only difference from the sample app code you saw earlier is that this code defaults to listening on port 80 instead of 8080, as that’s the port you opened up in the security group. |
| 4 | Run the app using node app.js, just like you did on your own computer. Note the use of
ampersand (&), which runs the app in the background, so it doesn’t block the user data script from exiting, and
nohup ("no hangup"), which ensures the app keeps running even after the user data script exits and the terminal
session ends. |
|
Watch out for snakes: these examples have several problems
The approach shown here with user data has a number of drawbacks, as explained in Table 4:
It’s OK to use this simple, insecure approach as a first step for learning, but make sure not to use this approach in production. You’ll see how to address all of these limitations in Part 3. |
Step 6: Launch the EC2 instance. Leave all the other settings at their defaults and click "Launch
instance." Once the EC2 instance has launched, you should see its ID on the page (something like
i-05565e469650271b6). Click on the ID to go to the EC2 instances page, where you should see your EC2 instance booting
up. Once it has finished booting (you’ll see the instance state go from "Pending" to "Running"), which typically takes
1-2 minutes, click on the row with your instance, and in a drawer that pops up at the bottom of the page, you should
see more details about your EC2 instance, including its public IP address, as shown in Figure 8.
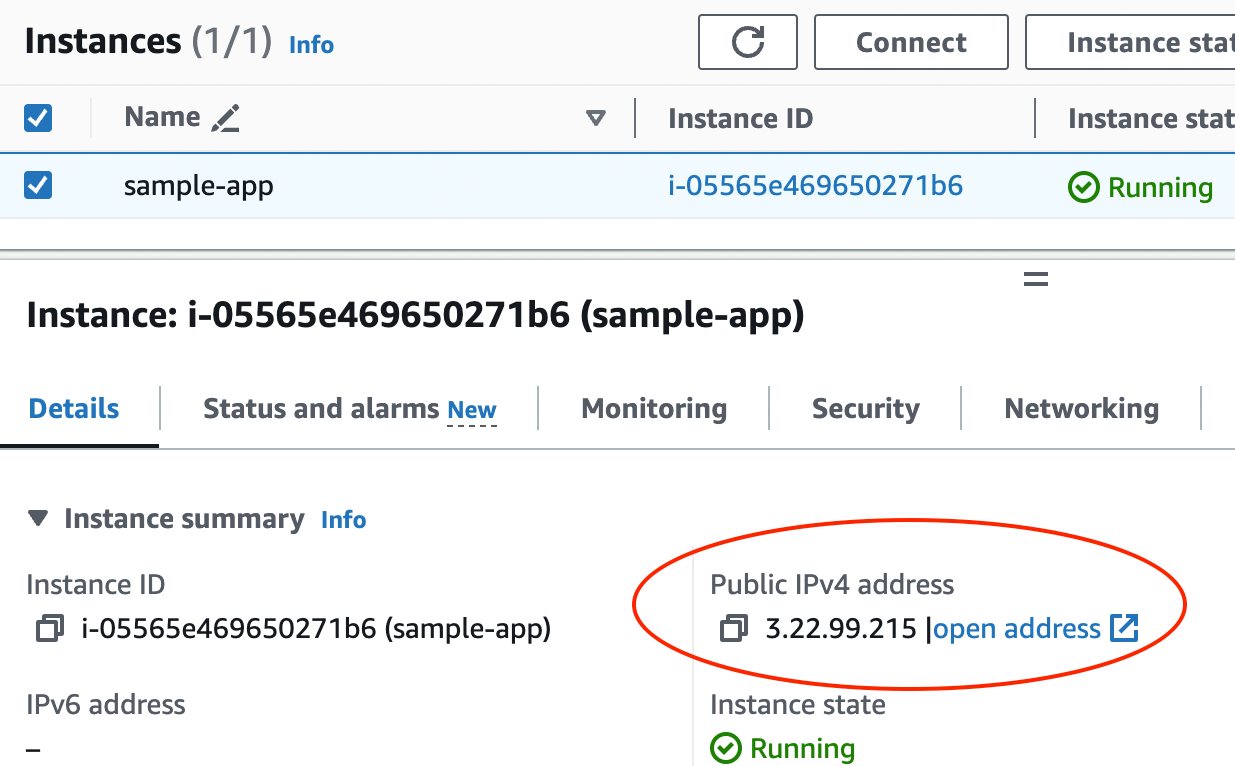
Figure 8. Find the public IP address for your EC2 instance.
Copy and paste that IP address, open http://<IP>; in your browser (note: you have to actually type the http://
portion in your browser, or the browser may try to use https:// by default, which will not work), and you should
see:
Hello, World!
Congrats, you now have your app running on a server in AWS!
|
Get your hands dirty
Here are a few exercises you can try at home to go deeper:
|
When you’re done experimenting with AWS, you should undeploy your app by selecting your EC2 instance, clicking "Instance state," and choosing "Terminate instance" in the drop down, as shown in Figure 9. This ensures that your account doesn’t start accumulating any unwanted charges.
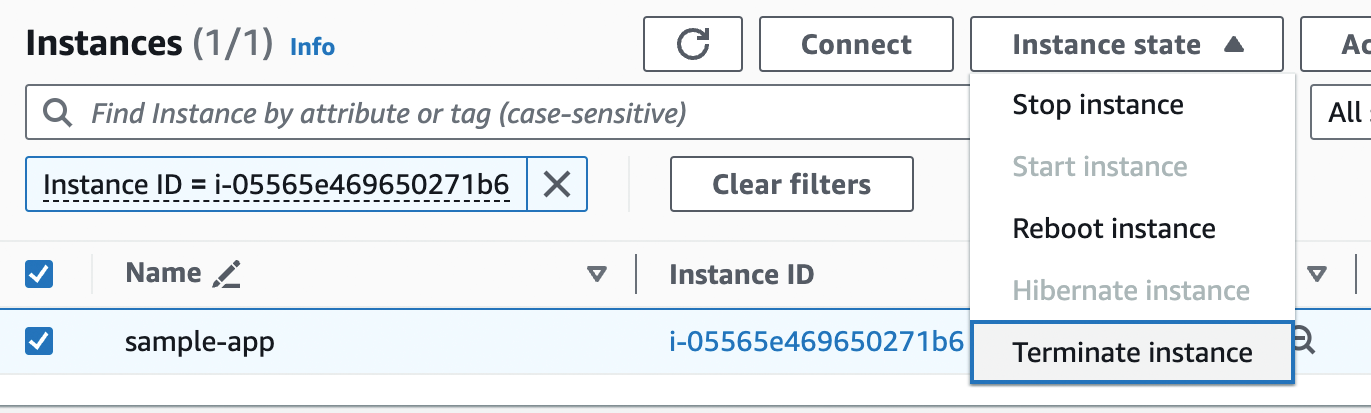
Figure 9. Make sure to terminate your EC2 instance when you’re done testing.
With IaaS, what you see really is what you get: it’s just a single server. Unlike PaaS, you don’t get multiple servers, domain names, encrypted connections, and so on out of the box. What you do get is access to all the low-level primitives, so you can build all those parts of the software delivery process yourself, as described in the rest of this blog post series. And that’s both the greatest strength and weakness of IaaS: you have more control and visibility, so you have fewer limits, can customize things more, and meet a wider set of requirements; but for those same reasons, it’s much more work than using a PaaS.
Now that you’ve seen several deployment options, how do they compare? This is the focus of the next section.
Comparing Deployment Options
You’ve now seen several options for how to host your application: you could go with on-prem or the cloud, and if you go with the cloud, you could go with IaaS or PaaS. The following sections will compare these options, starting with on-prem versus cloud, followed by IaaS versus PaaS.
On-Prem Versus Cloud
When should you go with on-prem and when should you use the cloud? To start answering this question, let’s look at the key reasons to go with the cloud.
When to go with the cloud
If you’re starting something new, in the majority of cases, you should go with the cloud. Here are just a few of the advantages:
- Elasticity and pay-as-you-go
-
On-prem, you pay up-front for capacity that may go unused: e.g., if you need 10 servers most of the time, but anticipate traffic spikes, you may have to buy 50 servers. The cloud offers pay-as-you-go pricing, which starts out cheap or free, only increases with usage, and allows you to scale elastically: e.g., pay for 10 servers most of the time, and pay for 50 servers only while there’s a traffic spike.
- Speed
-
Getting new hardware takes weeks on-prem, but just minutes in the cloud.
- Maintenance and expertise
-
Data centers require a lot of expertise (e.g., in hardware, cooling, power) and maintenance (e.g., replacing broken or obsolete equipment), all of which the cloud handles for you.
- Managed services
-
With the cloud, you get not only servers, but also services such as managed databases, load balancers, file stores, networking, analytics, and machine learning.
- Security
-
Despite the myth that on-prem is more secure, the world’s most secure data centers belong to the cloud providers: e.g., AWS complies with 143 security standards (e.g., PCI-DSS, HIPAA, NIST 800-171) and has dozens of third-party audits and attestations (e.g., SOC, ISO, FedRAMP).
- Global reach
-
The cloud gives you instant access to dozens of data centers around the world.
- Scale
-
Major cloud providers can invest more in data centers than almost anyone else. For example, AWS made $107 billion in 2024—and they’re still growing.
For all these reasons, the cloud is the de facto option for most new startups, as well as new projects in many established companies.
|
Key takeaway #2
Using the cloud should be your default choice for most new deployments these days. |
With all these advantages of using the cloud, does it ever make sense to use on-prem?
When to go with on-prem
The following are use cases where running servers yourself is the better option:
- You already have an on-prem presence
-
If your company already has its own data centers, and they are working well for you, then stick with it! If it ain’t broke, don’t fix it.
- You have usage patterns that are a better fit for on-prem
-
Certain usage patterns may be a better fit for on-prem: e.g., steady, predictable usage that doesn’t benefit from elasticity (see Basecamp for an example) or usage that requires lots of bandwidth (bandwidth can be expensive in the cloud).
- You need more control over pricing
-
Although the competition between the major cloud vendors has historically driven prices down, there have also been cases of sudden price increases.[2] One way to minimize this risk is to pick a cloud vendor with a good track record related to pricing and to negotiate a long-term contract with them. Another option is to avoid the cloud entirely, and go on-prem. The only option I wouldn’t recommend is using the cloud, but trying to avoid "lock-in," as described in the "cloud vendor lock-in myth" sidebar.
- You have compliance requirements that are a better fit for on-prem
-
You may find that some compliance standards, regulations, laws, auditors, and customers have not yet adapted to the cloud, so depending on your industry and product, you may find that on-prem is a better fit.
It’s worth mentioning that it doesn’t have to be cloud vs on-prem; it can also be cloud and on-prem, as discussed next.
When to go with hybrid
A hybrid deployment is when you use a mixture of cloud and on-prem. The most common use cases for this are the following:
- Partial cloud migration
-
Some companies migrate a subset of their apps (including all new apps) to the cloud, but they keep some apps on-prem, either temporarily (as a full migration can take years) or permanently (some apps are not worth the cost to migrate).
- Right tool for the job
-
You may choose to use the cloud for use cases where it’s a good fit (e.g., an app that needs elasticity) and to use on-prem for use cases where it’s a good fit (e.g., an app with steady traffic patterns). Use the right tool for the job!
My goal with this blog post series is to allow readers to try out the examples as quickly and cheaply as possible, so the cloud is the right tool for this job. Therefore, while the underlying concepts will apply to both the cloud and on-prem, most of the examples in this series will use the cloud. And if you’re going to use the cloud, you need to know when to use IaaS versus PaaS, which is the focus of the next section.
IaaS Versus PaaS
If you’re using the cloud, when should you go with IaaS and when should you go with PaaS? To start answering this question, let’s look at the key reasons to go with PaaS.
When to go with PaaS
This may seem like a strange thing to say in a blog post series about DevOps and software delivery, but if you can create a great product without having to invest much in DevOps and software delivery, that’s a good thing. Your customers don’t care what kind of deployment pipeline you have, or if you are running a fancy Kubernetes cluster, or if you’re on the newest type of database. All that matters is that you can create a product that meets your customers' needs.
|
Key takeaway #3
You should spend as little time on software delivery as you possibly can, while still meeting your company’s requirements. |
If you can find someone else who can take care of software delivery for you, and still meet your requirements, you should take advantage of that as much as possible. And that’s precisely what a good PaaS offers: out-of-the-box software delivery. If you can find a PaaS that meets your requirements, then you should use it, stick with it for as long as you can, and avoid having to recreate all those software delivery pieces until you absolutely have to. Here are a few use cases where a PaaS is a good choice:
- Side projects
-
If you’re working on a side project, the last thing you want to do is kill your passion for that project by spending all your time fighting with builds or pipelines or networking. Instead, let a PaaS do the heavy lifting.
- Startups and small companies
-
If you’re building a new company, you should almost always start with a PaaS. Startups are a race against time: can you build something the market wants before you run out of money? As you saw earlier in this blog post, you can get live on a PaaS in minutes, and for most startups, the scalability, availability, security, and compliance needs are minimal, so you can keep running on a PaaS for years before you run into the limitations. It’s only when you find product/market fit, and start hitting the problem of having to scale your company—which is a good problem to have—that you may need move off PaaS.
- New and experimental projects
-
If you’re at an established company that has a slow software delivery process, using a PaaS can be a great way to quickly try out new and experimental projects, especially if those projects don’t have the same scalability, availability, security, and compliance needs as your company’s more mature products.
As a general rule, you want to use a PaaS whenever you can, and only move on to IaaS when a PaaS can no longer meet your requirements, as per the next section.
When to go with IaaS
The following are use cases where an IaaS is usually a better fit:
- Load
-
If you’re dealing with a lot of traffic, PaaS pricing may become prohibitively expensive. Moreover, PaaS usually limits the types of apps and architectures you can use, so you may have to migrate to IaaS to scale your systems.
- Company size
-
As you shift from a handful of developers to dozens of teams with hundreds of developers, not only can PaaS pricing become untenable, but you may also hit limits with governance and access controls (e.g., allowing some teams to make some types of changes, but not others).
- Availability
-
Your business may need to provide uptime guarantees that are higher than what your PaaS can provide. Moreover, when there is an outage or a bug, PaaS offerings are often limited in the type of visibility and connectivity options they provide (e.g., Heroku doesn’t let you connect to servers over SSH), so you may have to migrate to IaaS to improve your ability to debug and introspect your systems.
- Security & compliance
-
One of the most common reasons to move off PaaS is because most of them (with the notable exception of Aptible) do not provide sufficient visibility, access, or control to meet security and compliance requirements (e.g., SOC 2, ISO 27001, PCI-DSS).
You go with IaaS whenever you need more control, more performance, and/or more security. If your company gets big enough, one or more of these needs will likely push you from PaaS to IaaS—that’s just the price of success.
|
Key takeaway #4
Go with PaaS whenever you can; go with IaaS when you have to. |
Now that you’ve had a chance to do a basic app deployment, and compare hosting options, the question is, what happens next? How will your architecture and processes change as your company grows? This is the topic of the next section.
The Evolution of DevOps
While writing my first book, Hello, Startup, I interviewed early employees from some of the most successful companies of the last 20 years, including Google, Facebook, LinkedIn, Twitter, GitHub, Stripe, Instagram, Pinterest, and many others. One thing that struck me is that the architecture and software delivery processes at just about every software company evolve along similar lines. There are of course individual differences here and there, but there are far more similarities than differences, and the broad shape of the evolution tends to repeat again and again. In this section, I’m going to share this evolutionary process, broken down into nine high-level steps.
If you’re new to DevOps and software delivery, you may be unfamiliar with some of the terms used here. Don’t panic. The idea is to start with a top-down overview—a bit like a high level map—to help you understand what the various ingredients are and how they fit together. You can think of it as a high-level preview of the topics you’ll cover in the following blog posts. As you go through each blog post, you’ll zoom in on each of these topics, study each one in detail, and try most of them out with real examples. You can then zoom back out and revisit this high-level map at any time to see the big picture, and get your bearings again.
Let’s begin with step 1, as shown Figure 10, which is where most projects start, including new startups, new initiatives at established companies, and side projects:

Figure 10. Step 1
- Single server
-
All of your application code runs on a single server.
- ClickOps
-
You manage all of your infrastructure and deployments manually.
Does this sound familiar? It’s what you just did earlier in this blog post using Render and AWS. So congrats, you’ve completed step 1! But this is only the beginning. As traffic and team size grows, you move on to step 2, shown in Figure 11:
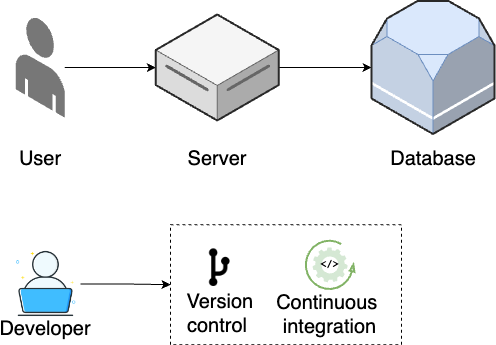
Figure 11. Step 2
- Standalone database
-
As your database increasingly becomes the bottleneck, you break it out onto a separate server (Part 9).
- Version control
-
As your team grows, you use a version control system to collaborate on your code and track all changes (Part 4).
- Continuous integration
-
To reduce bugs and outages, you set up automated tests (Part 4) and continuous integration (Part 5).
As traffic continues to grow, you move on to step 3, shown in Figure 12:
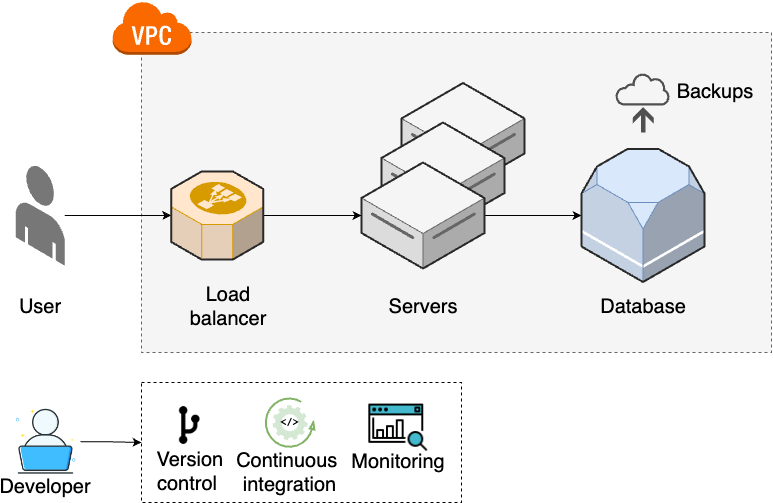
Figure 12. Step 3
- Multiple servers
-
As traffic increases further, a single server is no longer enough, so you run your app across multiple servers (Part 3).
- Load balancing
-
You distribute traffic across the servers using a load balancer (Part 3).
- Networking
-
To protect your servers, you put them into a private network (Part 7).
- Data management
-
You set up schema migrations and backups for your data stores (Part 9).
- Monitoring
-
To get better visibility into your systems, you set up monitoring (Part 10).
Most software projects never need to make it past these first three steps. If you’re one of them, don’t fret: this is actually a good thing. The first three steps are relatively simple. The technologies involved are fast to learn, easy to set up, and fun to work with. If you’re forced into the subsequent steps, it’s because you’re facing new problems that require more complex architectures and processes to solve, and this additional complexity has a considerable cost. If you aren’t facing those problems, then you can, and should, avoid that cost.
That said, larger, more established companies, with more users, may have to move on to step 4, shown in Figure 13:

Figure 13. Step 4
At this point, your team size is often the biggest problem, so you have to move onto step 5, shown in Figure 14:

Figure 14. Step 5
- Multiple environments
-
To help teams do better testing, you set up multiple environments (e.g., dev, stage, prod), each of which has a full copy of your infrastructure (Part 6).
- Continuous delivery
-
To make deployments faster and more reliable, you set up continuous delivery (Part 5).
- Secure communication and storage
-
To keep all the new environments secure, you work on secrets management and encrypting all data at rest and in transit (Part 8).
As your teams keep growing, to be able to keep moving quickly, you will need to update your architecture and processes to step 6, as shown in Figure 15:
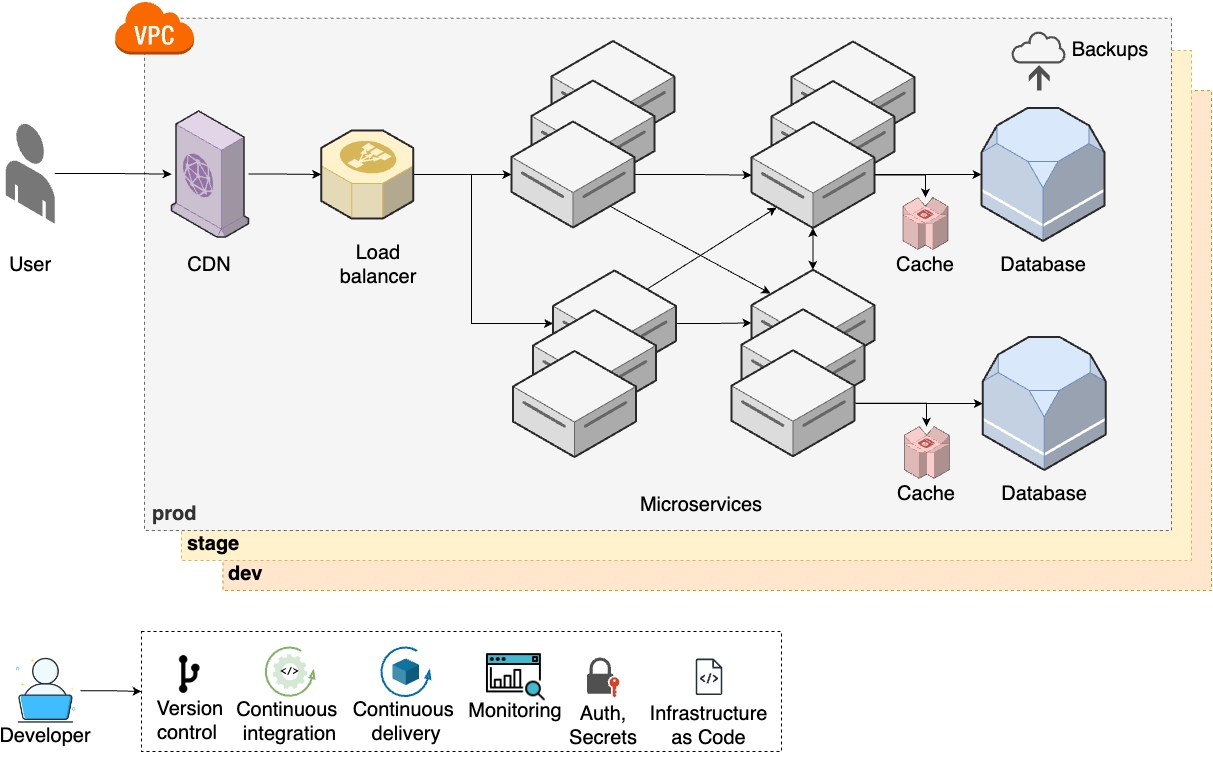
Figure 15. Step 6
These steps represent a significant increase in complexity: your architecture has more moving parts, your processes are more complicated, and you most likely need a dedicated infrastructure team to manage all of this. For a small percentage of companies—typically large enterprises with massive user bases—even this isn’t enough, and you are forced to move on to step 7, shown in Figure 16:
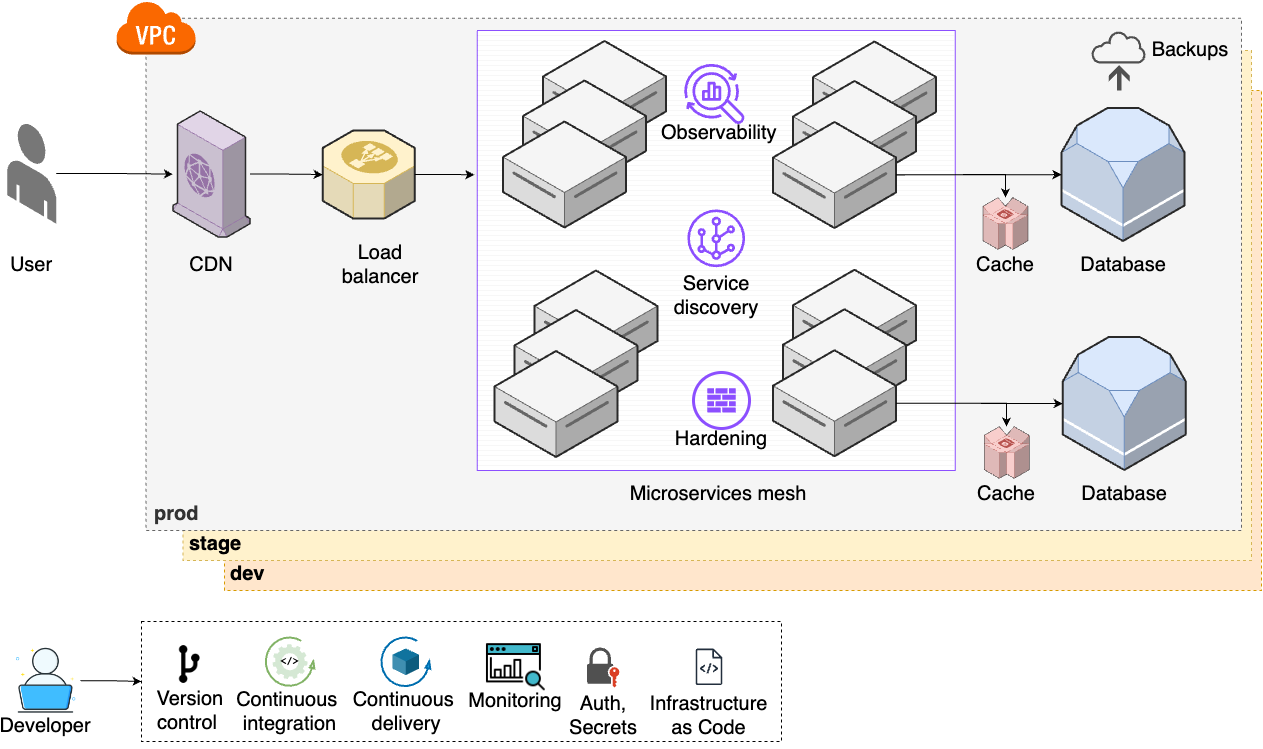
Figure 16. Step 7
- Service discovery
-
As the number of microservices increases, you set up a service discovery system to help them communicate with each other (Part 7).
- Observability
-
To get even more visibility into your microservices, you start using structured events, tracing, and observability tools (Part 10).
- Hardening
-
To meet various compliance standards (e.g., NIST, CIS, PCI), you work on server and network hardening (Part 7, Part 8).
- Microservice mesh
-
With even more microservices, you start using service mesh tools as a unified solution for the items above (observability, service discovery, hardening), as well as for traffic control and error handling (Part 7).
Large companies produce a lot of data, and the need to analyze and leverage this data leads to step 8, shown in Figure 17:
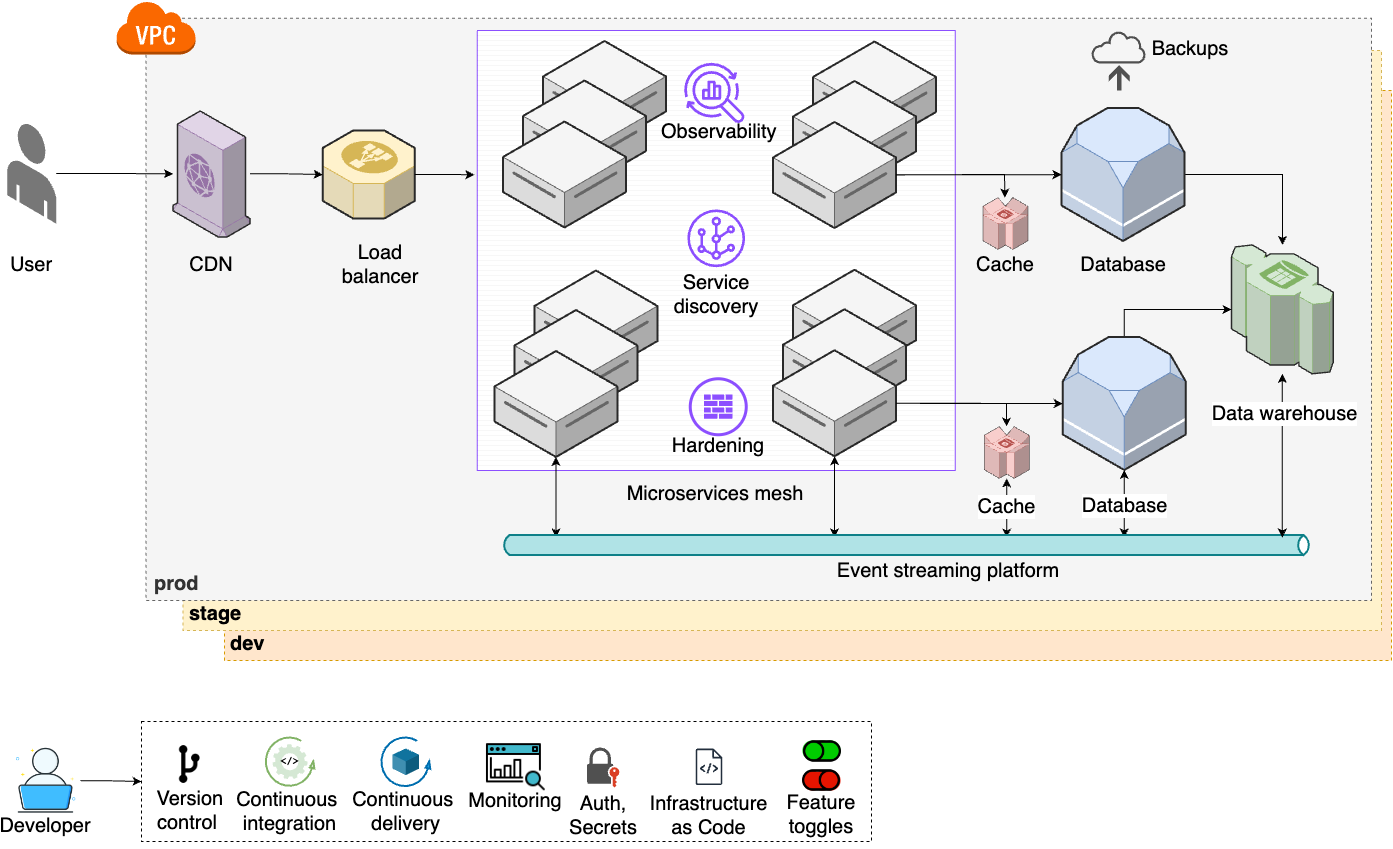
Figure 17. Step 8
- Analytics tools
-
To be able to process and analyze your company’s data, you set up data warehouses, big data systems, fast data systems, etc. (Part 9).
- Event streams
-
With even more microservice communication and more data to move around, you set up an event streaming platform and move to an event-driven architecture (Part 9).
- Feature toggles
-
You start using feature toggles in your code to A/B test new features and to make deployments more reliable (Part 5).
Finally, as your user base and employee base keeps growing, you move on to step 9, shown in Figure 18:
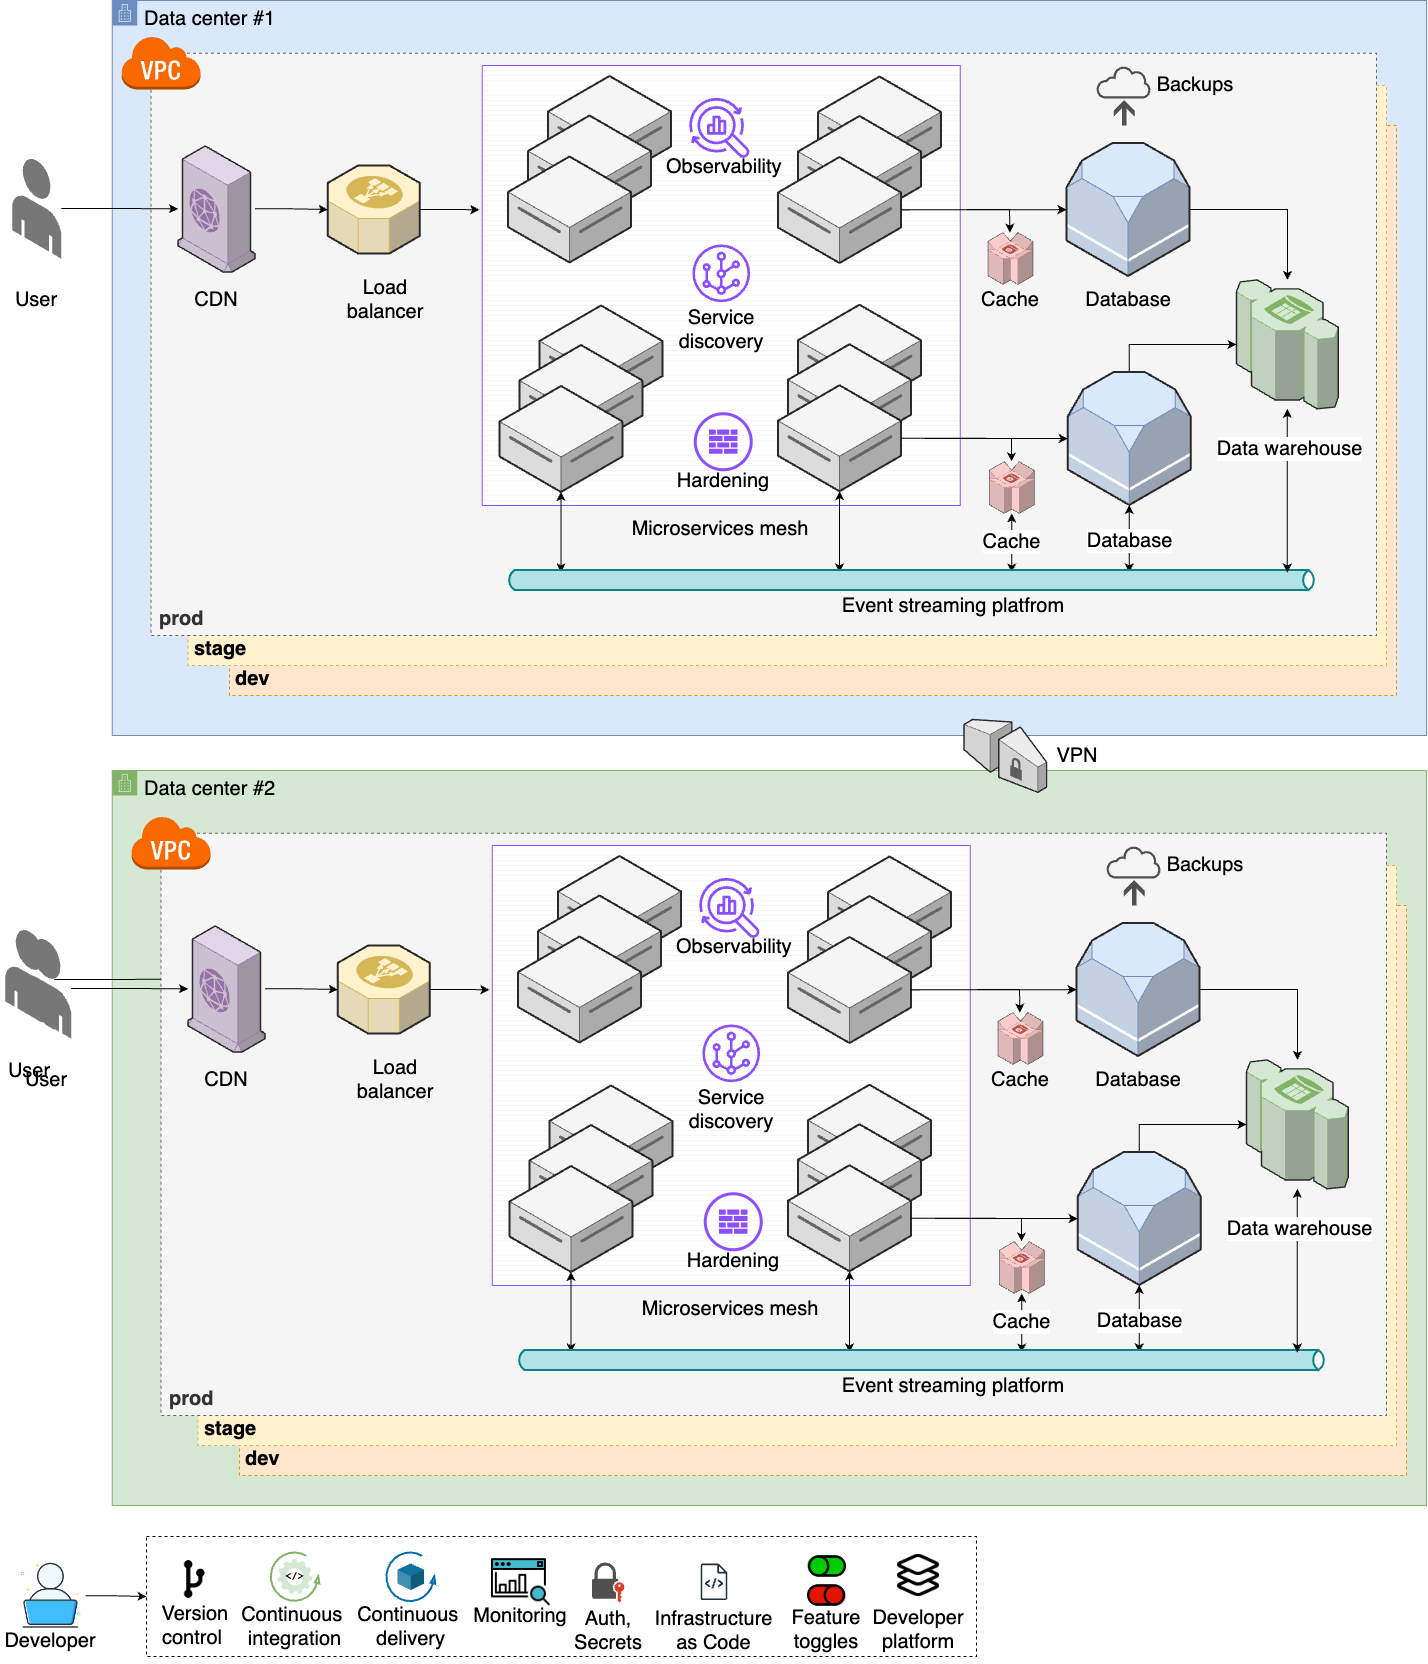
Figure 18. Step 9
- Multiple data centers
-
To handle a global user base, you set up multiple data centers around the world (Part 6).
- Advanced networking
-
You connect all your data centers together over the network (Part 7).
- Internal developer platform
-
To help boost developer productivity, and to standardize coding practices, you set up an internal developer platform (Part 11).
These last three steps are for companies that face the toughest problems and have to deal with the most complexity: global deployments, thousands of developers, millions of customers. Even the architecture you see in step 9 is still a simplification compared to what the top 0.1% of companies face, but if that’s where you’re at, you’ll need more than this introductory blog post series!
Now that you’ve seen all the steps, there are two things to keep in mind. The first thing to keep in mind is that these steps are a simplification. I’ve presented them as discrete, self-contained, one-time actions to make it easier to learn, but in the real world, you may find that it’s more of a continuum than discrete steps, the steps may happen in a different order, and a single step may be broken down into many parts and developed over a long period of time. For example, instead of trying to introduce infrastructure as code all at once in step 6, it’s sometimes more effective to introduce a minimal amount of infrastructure as code in step 2, a bit more in step 3, even more in step 4, and so on, incrementally building up to managing everything as code by step 6. I hope this is a helpful mental model of how DevOps typically evolves within a company, but never forget it’s just a model.
All models are wrong, but some are useful.
— George E. P. Box
The second thing to keep in mind is this: you should expect change. There’s no one "best practice" or one right way to "do DevOps." Your architecture and processes need to be adapted to your company’s needs, and those needs will change. Be aware of it, plan for it, embrace it. In fact, one of the hallmarks of great software is that it is adaptable. Great code, great architectures, and great processes are, above all else, easy to change. And the very first change may be adopting DevOps practices in the first place, which is the focus of the next section.
Adopting DevOps Practices
As you read through the nine steps, the idea is to match your company to one of the steps, and to pursue the architecture and processes in that step. What you don’t want to do is to immediately jump to the end, and use the architecture and processes of the largest companies. Let’s be honest here: your company probably isn’t Google or Netflix; you don’t have the same scale, you don’t have the same problems to solve, and therefore, the same solutions won’t be a good fit. In fact, adopting, the solutions for a different stage of company may be actively harmful. Every time I see a 3-person startup running an architecture with 12 microservices, Kubernetes, a service mesh, and an event streaming platform, I just shake my head: you’re paying a massive cost to solve problems you don’t have.
|
Key takeaway #5
Adopt the architecture and software delivery processes that are appropriate for your stage of company. |
Even if you are a massive company, you still shouldn’t try to adopt every DevOps practice all at once. One of the most important lessons I’ve learned in my career is that most large software projects fail. Whereas roughly 3 out of 4 small IT projects (less than $1 million) are completed successfully, only 1 out of 10 large projects (greater than $10 million) are completed on time and on budget, and more than one-third of large projects are never completed at all.[3]
This is why I get worried when I see the CEO or CTO of a large company give marching orders that everything must be migrated to the cloud, the old datacenters must be shut down, and that everyone will "do DevOps" (whatever that means), all within six months. I’m not exaggerating when I say that I’ve seen this pattern several dozen times, and without exception, every single one of these initiatives has failed. Inevitably, two to three years later, every one of these companies is still working on the migration, the old datacenter is still running, and no one can tell whether they are really "doing DevOps" or not.
A more effective way to do any large migration project is to do it incrementally. The key to incrementalism is not just splitting up the work into a series of small steps but splitting up the work in such a way that every step brings its own value—even if the later steps never happen. To understand why this is so important, consider the opposite, false incrementalism.[4] Suppose that you do a huge migration project, broken up into the following steps:
-
Redesign the user interface.
-
Rewrite the backend.
-
Migrate the data.
You complete the first step, but you can’t launch it, because it relies on the new backend in the second step. So, next, you rewrite the backend, but you can’t launch that either, until you migrate the data in the third step. It’s only when you complete all three steps that you get any value from this work. This is false incrementalism: you’ve split the work into smaller steps, but you only get value when all the steps are completed. This is a huge risk, as conditions change all the time, and the project may be paused or cancelled or modified part way through, before you’ve completed all the steps, and if that happens, you get the worst possible outcome: you’ve invested a bunch of time and money, but got nothing in return.
What you want instead is for each part of the project to deliver value, so that even if the entire project doesn’t finish, no matter what step you got to, it was still worth doing. You can accomplish this by focusing on solving one, small, concrete problem at a time. For example, instead of trying to do a "big bang" migration to the cloud, try to identify one team that is struggling, and work to migrate just them. If you can get a quick win by fixing one real, concrete problem right away, and making one team successful, you’ll begin to build momentum. This will allow you to go for another quick win, and another one after that, incrementally working through all the parts of the larger migration. But even if the larger migration is cancelled, at least one team is more successful now, so it was still worth the investment.
|
Key takeaway #6
Adopt DevOps incrementally, as a series of small steps, where each step is valuable by itself. |
Conclusion
You now know the basics of deploying apps. Here are the 6 key takeaways from this blog post:
- You should never expose apps running on a personal computer to the outside world
-
Instead, deploy those apps on a server.
- Using the cloud should be your default choice for most new deployments these days
-
Run your server(s) in the cloud whenever you can. Use on-prem only if you already have an on-prem presence or you have load patterns or compliance requirements that work best on-prem.
- You should spend as little time on software delivery as you possibly can, while still meeting your company’s requirements
-
If you can offload your software delivery to someone else, while still responsibly meeting your company’s requirements, you should.
- Go with PaaS whenever you can; go with IaaS when you have to
-
A PaaS lets you offload most of your software delivery needs, so if you can find a PaaS that meets your company’s requirements, you should use it. Only go with an IaaS if your company’s requirements exceed what a PaaS can offer.
- Adopt the architecture and software delivery processes that are appropriate for your stage of company
-
Always pick the right tools for the job.
- Adopt DevOps incrementally, as a series of small steps, where each step is valuable by itself
-
Avoid big bang migrations and false incrementalism, where you only get value after all steps have been completed.
One way to summarize these ideas is the concept of minimum effective dose. This is a term from pharmacology, where you use the smallest dose of medicine that will give you the biological response you’re looking for. That’s because just about every drug, supplement, and intervention becomes toxic at a high enough dose, so you want to use just enough to get the benefits, and no more. The same is true with DevOps: every architecture, process, and tool has a cost, so you want to use the most simple and minimal solution that gives you the benefits you’re looking for, and no more. Don’t use a fancy architecture or software delivery process if a simpler one will do; instead, always aim for the minimum effective dose of DevOps.
Knowing how to deploy your apps is an important step, but it’s just the first step in understanding DevOps and software delivery. There are quite a few steps left to go. One problem you may have noticed, for example, is that you had to deploy everything in this blog post by manually clicking around a web UI. Doing things manually is tedious, slow, and error-prone. Imagine if instead of one app, you had to deploy ten, and you had to do it many times per day. Not fun.
The solution is automation, and managing your infrastructure as code, which is the topic of Part 2.
Update, June 25, 2024: This blog post series is now also available as a book called Fundamentals of DevOps and Software Delivery: A hands-on guide to deploying and managing software in production, published by O’Reilly Media!
Last updated 2025-02-17 01:44:24 UTC


