$ cd fundamentals-of-devops
$ git init
Initialized empty Git repository in /fundamentals-of-devops/.git/Part 4. How to Version, Build, and Test Your Code

Update, June 25, 2024: This blog post series is now also available as a book called Fundamentals of DevOps and Software Delivery: A hands-on guide to deploying and managing software in production, published by O’Reilly Media!
This is Part 4 of the Fundamentals of DevOps and Software Delivery series. In Part 2, you learned how to manage your infrastructure, and in Part 3, you learned how to manage your apps. Along the way, you wrote code using a variety of tools, including Node.js, Kubernetes, and OpenTofu. What did you do with all of that code? Is it just sitting on your computer? If so, that’s fine for learning, where you’re the only one touching that code, but most software development is a team sport, and that means you need to figure out how to solve the following problems:
- Code access
-
All the developers on your team need a way to access the same code, and as they make changes to it, you need some way to merge their changes together.
- Automation
-
To save time and ensure consistency across your team, you need a way to automate common operations such as downloading dependencies, building the code, and packaging the code.
- Correctness
-
It’s hard enough to make your own code work, but when multiple people are modifying it, you need to find a way to prevent a stream of bugs.
To solve these problems, modern companies use the following tools:
-
Version control
-
Build system
-
Automated testing
This blog post will dive into each of these tools, and along the way, you’ll go through examples of storing code in Git and GitHub, using NPM to manage your build and dependencies, and writing automated tests for your Node.js and OpenTofu code. Let’s get started with version control.
Version Control
A version control system (VCS) is a tool that allows you to store source code, share it with your team, integrate your work together, and track changes over time. It’s a central part of every modern software delivery process. And there’s nothing modern about it: 25 years ago, using version control was item #1 on the Joel Test (a quick test you can use to rate the quality of a software team), and the first version control system was developed roughly 50 years ago.
There are a number of options for version control, including Subversion, Perforce, Mercurial, and the one that’s the most popular these days, Git (full list). There are also several options for Git hosting, including GitHub, GitLab, and BitBucket (full list). Of these, GitHub is the most popular. In the next several sections, you will take the code you’ve been working on throughout this blog post series, turn it into a Git repo, push that repo to GitHub, and then learn patterns for using version control effectively.
|
Git and GitHub knowledge is required to proceed!
Many of the examples in the rest of this blog post series require Git and GitHub. If you don’t know how to use these tools, go through the Learn Git and GitHub in 15 Minutes tutorial on this blog post series’s website to learn everything you need to know for this blog post series, including the basics of commits, branches, merges, pull requests, and more. |
Let’s start by turning your code into a Git repo.
Example: Turn your Code into a Git Repo
Go into the folder you’ve been using to work on the code samples for this blog post series, and turn it into a Git repo
by running git init:
Next, add a .gitignore file with the contents shown in Example 61:
Example 61. The gitignore file (.gitignore)
(1)

*.tfstate*


(2)

.terraform


(3)

*.key


(4)

*.zip


(5)

node_modules
The .gitignore file specifies files you do not want Git to track:
| 1 | OpenTofu state should not be checked into version control. You’ll learn why not, and the proper way to store state files, in Part 5. |
| 2 | The .terraform folder is used by OpenTofu as a scratch directory. |
| 3 | The Ansible examples in earlier blog posts store SSH private keys in .key files. These are secrets, so they should not be stored in version control (as you’ll learn about in Part 8). |
| 4 | The lambda module from Part 3 creates zip files automatically. Build artifacts should not
be stored in version control. |
| 5 | The node_modules folder is where Node.js downloads dependencies, as you’ll see later in this post. |
It’s a good idea to commit the .gitignore file first to ensure you don’t accidentally commit other files that don’t belong in version control:
$ git add .gitignore
$ git commit -m "Add .gitignore"With that done, you can now commit the rest of the code:
$ git add .
$ git commit -m "Example code for first few chapters"The code is now in a Git repo on your local computer. The next step is to push it to GitHub so that you can collaborate on it with your teammates.
Example: Store your Code in GitHub
To store your code in GitHub, go through the following steps:
-
If you don’t have a GitHub account already, sign up for one now (it’s free).
-
Add your new GitHub repo as a remote in your local Git repo:
$ git remote add origin https://github.com/<USERNAME>/<REPO>.git -
Push the
mainbranch of your local Git repo to GitHub:$ git push origin main
In subsequent parts of this blog post series, you will use GitHub as a central part of your software delivery process, including using it to collaborate with other team members, run automated tests, perform automated deployments, and more. But first, let’s discuss some patterns for using version control effectively.
Version Control Recommendations
Now that your code is in version control, the next several sections will go through the following tips on how to use version control effectively:
-
Always use version control
-
Write good commit messages
-
Commit early and often
-
Use a code review process
-
Protect your code
Always use version control
The single most important recommendation with version control is: use it.
|
Key takeaway #1
Always manage your code with a version control system. |
It’s easy, it’s cheap or free, and the benefits for software engineering are massive. If you’re writing code, always store that code in version control. No exceptions.
Write good commit messages
Commit messages are important. When you’re trying to figure out what caused a bug or an outage, or staring at a
confusing piece of code, git log and git blame can be your best friends—but only if the commit messages are well
written. Good commit messages consist of two ingredients:
- Summary
-
The first line of the message should be a short summary of the change (less than 50 characters).
- Context
-
If it’s a trivial change, a summary line can be enough, but for anything larger, add a new line[19], and then provide more information to help future coders (including a future you!) understand the context. In particular, focus on the what and why, which is context that you can’t get just by reading the code, rather than how, which should be clear from the code itself.
Here’s an example of such a commit message:
Fix bug with search auto complete


A more detailed explaination of the fix, if necessary. Provide

additional context that isn't obvious from reading the code.


- Use bullet points

- If appropriate


Fixes #123. Jira #456.
Just adding these two simple ingredients, summary and context, will make your commit messages considerably better. If you’re able to follow these two rules consistently, you can level up your commit messages even further by following the instructions in How to Write a Good Commit Message, and for especially large projects and teams, you can also consider adopting Conventional Commits.
Commit early and often
One of the keys to being a more effective programmer is learning how to take a large problem and break it down into small, manageable parts. As it turns out, one of the keys to using version control more effectively is learning to break down large changes into small, frequent commits. In fact, there are two ideals to aim for:
- Atomic commits
-
Each commit should do exactly one small, relatively self-contained thing. You should be able to describe that thing in one short sentence—which, conveniently, you can use as the commit message summary. If you can’t fit everything into one sentence, then the commit is likely doing too many things at once, and should be broken down into multiple commits.
- Atomic pull requests
-
Each pull request (PR) should do exactly one small, relatively self-contained thing. A single PR can contain multiple commits, so it’ll naturally be larger in scope than any one commit, but it should still represent a set of cohesive changes: that is, changes that naturally and logically go together. If you find that your PR contains a list of somewhat unrelated changes, that’s usually a sign you should break it up into multiple PRs. A classic example of this is a PR that contains a new feature, a bug fix, and refactors a bunch of code. Leaving the code cleaner than how you found it (the Boy Scout Rule) is great, but this PR should really be three separate PRs: one for the bug fix, one for the refactor, and one for the new feature.
Atomic commits and PRs are ideals, and sometimes you’ll fall short, but it’s always a good idea to strive towards these ideals, as they give you a number of benefits:
- More useful Git history
-
When you’re scanning your Git history, commits and PRs that do one thing are easier to understand than those that do many things.
- Easier code reviews
-
Reviewing small, self-contained changes is easy. Reviewing massive PRs with thousands of lines of unrelated changes is hard.
- Cleaner mental model
-
To work in atomic units, you typically have to break the work down ahead of time. This often produces a cleaner mental model, and ultimately, better results.
- Stronger safety net
-
At a basic level, committing more frequently reduces your risk of data loss. For example, if you commit (and push) hourly, you’ll never lose more than an hour of work (e.g., due to accidentally deleting a folder or a hard-drive dying). At a higher-level, committing often makes it safer to explore new directions in your code. For example, you might start a major refactor, and realize that part way through, you went the wrong direction. If you made small commits all along the way, it’s easy to revert to any previous point, whereas if you didn’t, you have the harder task of undoing many steps manually.
- More frequent integration
-
As you’ll see in Part 5, one of the keys to working effectively as a team is to integrate your changes together regularly, and this tends to be easier if everyone is doing small, frequent commits.
|
Get your hands dirty
It’s normal for your initial commits and commit messages to be messy. Often, you don’t know how to break something up into smaller, atomic parts until after you’ve done the whole thing. That’s OK! Learn how to go back and tidy up by amending commits, squashing commits, and rebasing (see rewriting history in Git). |
Use a code review process
Every page in this book has been checked over by an editor. Why? Because even if you’re the smartest, most capable, most experienced writer, you can’t proofread your own work. You’re too close to the concepts, and you’ve rolled the words around your head for so long you can’t put yourself in the shoes of someone who is hearing them for the first time. Writing code is no different. In fact, if it’s impossible to write prose without independent scrutiny, surely it’s also impossible to write code in isolation; code has to be correct to the minutest detail, plus it includes prose for humans as well!
— Jason Cohen
Making Software: What Really Works, and Why We Believe It by Andy Oram and Greg Wilson (O’Reilly Media)
Making Software: What Really Works, and Why We Believe It by Andy Oram and Greg Wilson (O’Reilly Media)
Having your code reviewed by someone else is a highly effective way to catch bugs, reducing defect rates by as much as 50-80%.[20] Code reviews are also an efficient mechanism to spread knowledge, culture, training, and a sense of ownership throughout the team. There are several different ways of doing code reviews:
- Enforce a pull request workflow
-
You can enforce that all changes are done through pull requests (you’ll see a way to do that in the next section), so that the maintainers of each repo can asynchronously review each change before it gets merged.
- Use pair programming
-
Pair programming is a technique where two programmers work at one computer, with one person as the driver, responsible for writing the code, and the other as the observer, responsible for reviewing the code and thinking about the program at a higher level. The result is a bit like a constant code review process. Some companies use pair programming for all their coding, while others use it on an as-needed basis (e.g., for complex tasks or ramping up new hires).
- Use formal inspections
-
A formal inspection is a live code review meeting where the author presents their code to their team, and everyone goes through the code together, line-by-line. You can’t do this degree of scrutiny for every line of code, but for the mission-critical parts, this can be an effective way to catch bugs and get everyone on the same page.
Whatever process you pick for code reviews, you should define your code review guidelines up front, so you have a process that is consistent and repeatable across the entire team. That is, everyone knows what sorts of things to look for (e.g., automated tests), what sorts of things not to look for (e.g., code formatting, which should be automated), and how to communicate feedback effectively. For an example, have a look at Google’s Code Review Guidelines.
Protect your code
For many companies these days, the code you write is your most important asset—your secret sauce. Moreover, it’s also a highly sensitive asset. If someone can slip some malicious code into your codebase, it can be devastating, as that will bypass most security protections you put in place. Therefore, you should consider enabling the following security measures to protect your code:
- Signed commits
-
Git allows you to use the
git configcommand to set your username and email to any values you want, so you could make commits pretending to be someone else! Fortunately, most VCS hosts allow you to enforce signed commits, where they use cryptographic signatures (a topic you’ll learn about in Part 8) to validate user identities. To use this feature, you create a GPG or SSH key, which consist of a public and private key pair, and you (a) configure your local Git client to use the private key to sign your commits and (b) upload your public key to your VCS host, so it can use it to validate your signature (example instructions for GitHub). You can then enable commit signature verification in your repos (example instructions for GitHub), and the VCS host will reject commits that don’t have valid signatures. - Branch protection
-
Most VCS hosts allow you to enable branch protection, where you can enforce certain requirements before code can be pushed to certain branches. For example, you could use GitHub’s protected branches to require that all code changes to the
mainbranch are (a) submitted via pull requests, (b) those pull requests are reviewed by at least N other developers, and (c) certain checks, such as security scans, pass before those pull requests can be merged. This way, even if an attacker compromises one of your developer accounts, they still won’t be able to get code merged intomainwithout some degree of scrutiny.
Now that you know how to use a version control system to help everyone on your team work on the same code, the next step is ensure that you’re all working on that code in the same way: that is, building the code the same way, running the code the same way, using the same dependencies, and so on. This is where build system can come in handy, which is the focus of the next section.
Build System
Most software projects use a build system to automate important operations, such as compiling the code, downloading dependencies, packaging the app, running automated tests, and so on. The build system serves two audiences: the developers on your team, who run the build steps as part of local development, and various scripts, which run the build steps as part of automating your software delivery process.
|
Key takeaway #2
Use a build system to capture, as code, important operations and knowledge for your project, in a way that can be used both by developers and automated tools. |
The reality is that for most software projects, you can’t not have a build system. Either you use an off-the-shelf build system, or you end up creating your own out of ad hoc scripts, duct tape, and glue. I would recommend the former.
There are many off-the-shelf build tools out there (full list). Some were originally designed for use with a specific programming language or framework: for example, Rake for Ruby, Gradle for Java, and NPM for JavaScript (Node.js). There are also some build tools that are largely language agnostic, such as Bazel, Just, and the grandaddy of all build systems, Make.
Usually, the language-specific tools will give you the best experience with that language; I’d only go with the language-agnostic ones like Bazel in specific circumstances, such as massive teams that use dozens of different languages in a single repo. For the purposes of the blog post series, since the sample app you’ve used in previous parts is JavaScript (Node.js), let’s give NPM a shot, as per the next section.
Example: Configure your Build Using NPM
|
Example Code
As a reminder, you can find all the code examples in the blog post series’s sample code repo in GitHub. |
Let’s set up NPM as the build system for the Node.js sample app you’ve been using throughout the blog post series. Head into the folder you created for running examples in this series, and create a new subfolder for this blog post and the sample app:
$ cd fundamentals-of-devops
$ mkdir -p ch4/sample-app
$ cd ch4/sample-appCopy the app.js file you first saw in Part 1 into the sample-app folder:
$ cp ../../ch1/sample-app/app.js .Next, make sure you have Node.js installed, which should also install NPM for you. To use
NPM as a build system, you must first configure the build in a package.json file. You can create this file by hand,
or you can let NPM scaffold out an initial version of this file for you by running npm init:
$ npm initNPM will prompt you for the package name, version, description, and so on. You can enter whatever data you want here, or hit ENTER to accept the defaults. When you’re done, you should have a package.json file that looks similar to Example 62:
Example 62. The generated NPM build file (ch4/sample-app/package.json)
{
"name": "sample-app",
"version": "0.0.1",
"description": "Sample app for 'Fundamentals of DevOps and Software Delivery'",
"scripts": {
"test": "echo \"Error: no test specified\" && exit 1"
}
}Most of this build file is metadata about the project. The part to focus on is the scripts object. NPM has a number
of built-in commands, such as npm install, npm start, npm test,
and so on. All of these have default behaviors, but you can override these commands, and add custom commands, by
updating the scripts block. You’ll see how to override the test command in the scripts block later in this
blog post, but for now, update the scripts block with a start command, which will define how to
start your app, as shown in Example 63:
Example 63. Add a start command to the scripts block (ch4/sample-app/package.json)
"scripts": {
"start": "node app.js",
},Now you can use the npm start command to run your app:
$ npm start
> sample-app@0.0.1 start
> node app.js
Listening on port 8080Being able to use npm start instead of node app.js may not seem like much of a win, but the difference is that
npm start is a well-known convention. Most developers (humans) and tooling (automation) that are familiar with
Node.js and NPM know to try npm start. On the other hand, running node app.js is known only to you, and while it
may seem obvious when the entire app consists of a single app.js file, it won’t be obvious if the app grows to
thousands of source files. You could document the start command in a README, but documentation is more likely to
become outdated than code in your build system, which your team runs regularly.
Of course, start isn’t the only command you would add. The idea would be to add all the common operations on your
project to the build. For example, in Part 3, you created a Dockerfile to package the app as
a Docker image, and in order to build that Docker image for multiple CPU architectures (e.g., arm64, amd64), you
had to use a relatively complicated docker buildx command. This is a great thing to capture in your build.
First, create a Dockerfile with the contents shown in Example 64:
Example 64. Dockerfile for the app (ch4/sample-app/Dockerfile)
FROM node:21.7
WORKDIR /home/node/app
(1)
COPY *.json .
(2)
COPY *.js .
EXPOSE 8080
USER node
(3)
CMD ["npm", "start"]This is identical to the Dockerfile you created in Part 3, except for three changes:
| 1 | Copy all .json files, including package.json, into the Docker image. |
| 2 | Copy all .js files, including app.js, into the Docker image. |
| 3 | Use npm start to start the app, rather than hard-code node app.js. This way, if you ever change how you run the
app—which you will later in this blog post—the only thing you’ll need to update is package.json. |
Second, create a script called build-docker-image.sh with the contents shown in Example 65:
Example 65. A script to build a Docker image (ch4/sample-app/build-docker-image.sh)
#!/usr/bin/env bash
set -e
(1)
name=$(npm pkg get name | tr -d '"')
version=$(npm pkg get version | tr -d '"')
(2)
docker buildx build \
--platform=linux/amd64,linux/arm64 \
--load \
-t "$name:$version" \
.This script does the following:
| 1 | Use npm pkg get to read the values of name and version from package.json. This ensures
package.json is the single location where you manage the name and version of your app. |
| 2 | Run the same docker buildx command as before, setting the Docker image name and version to
the values from (1). |
Next, make the script executable:
$ chmod u+x build-docker-image.shFinally, add a dockerize command to the scripts block in package.json that executes build-docker-image.sh, as
shown in Example 66:
Example 66. Add a
dockerize command (ch4/sample-app/package.json) "scripts": {
"start": "node app.js",
"dockerize": "./build-docker-image.sh",
},Now, instead of trying to figure out a long, esoteric docker buildx command, members of your team can execute
npm run dockerize (note that you need npm run dockerize and not just npm dockerize as dockerize is custom
command, and not one of the ones built-into NPM):
$ npm run dockerizeNow that you know how to use a build system to automate your workflow, let’s talk about another key responsibility of most build systems: managing dependencies.
Dependency Management
Most software projects these days rely on a large number of dependencies: that is, other software packages and libraries that your code uses. There are many kinds of dependencies:
- Code in the same repo
-
You could break up the code in a single repo into multiple modules, and have these modules depend on each other. This lets you develop parts of your codebase in isolation, possibly with separate teams working on each part.
- Code in different repos
-
Your company may store code across multiple repos. This gives you even more isolation between the different parts of your software and makes it even easier for separate teams to take ownership of each part. Typically, when repo A depends on code in repo B, you depend on a specific version of B. This version may correspond to a specific Git tag, or it could depend on a versioned artifact published from that repo: e.g., a Jar file for Java or a Gem for Ruby.
- Open source code
-
Perhaps the most common type of dependency these days is open source code. The 2024 Open Source Security and Risk Analysis Report found that 96% of codebases rely on open source and that 70% of all the code in those codebases originates from open source! The open source code almost always lives in separate repos, so again, you’ll typically depend on a specific version of that code.
Whatever type of dependency you have, the common theme is that you use a dependency so that you can leverage other people’s work. If you want to maximize that leverage, make sure to never copy & paste dependencies into your codebase. If you copy & paste a dependency, you run into a variety of problems:
- Transitive dependencies
-
Copy/pasting a single dependency is easy, but if that dependency has its own dependencies, and those dependencies have their dependencies, and so on (collectively known as transitive dependencies), then copy/pasting becomes difficult.
- Staying up to date
-
If you copy/paste the code, to get any future updates, you’ll have to copy/paste new code, and new transitive dependencies, and make sure you don’t lose any changes your team members made along the way.
- Private APIs
-
You may end up using private APIs (since you can access those files locally) instead of the public ones that were actually designed to be used, which can lead to unexpected behavior, and make staying up to date even harder.
- Bloating your repo
-
Every dependency you copy into your VCS makes it larger and slower.
The better way to use dependencies is with a dependency management tool. Most build systems have dependency management tools built in, and the way they typically work is you define your dependencies as code, in the build configuration, including the version of the dependency you’re using, and the dependency management tool is then responsible for downloading that dependency, plus any transitive dependencies, and making it available to your code.
|
Key takeaway #3
Use a dependency management tool to pull in dependencies—not copy & paste. |
Let’s try out an example with the Node.js sample app and NPM.
Example: Add Dependencies in NPM
So far, the Node.js sample app you’ve been using has not had any dependencies other than the http standard library
built into Node.js itself. Although you can build web apps this way, the more common approach is to use some sort of
web framework. For example, Express is a popular web framework for Node.js. To use it,
you can run:
$ npm install express --saveIf you look into package.json, you will now have a new dependencies section, as shown in
Example 67:
Example 67. NPM managed dependencies (ch4/sample-app/package.json)
"dependencies": {
"express": "^4.19.2"
}You should also see two other changes in the folder with the package.json file:
- node_modules
-
This is a scratch directory where NPM downloads dependencies. This folder should be in your .gitignore file so you do not check it into version control. Instead, whenever anyone checks out the repo the first time, they can run
npm install, and NPM will install all the dependencies they need automatically. - package-lock.json
-
This is a dependency lock file, which captures the exact dependencies that were installed. This is useful because in package.json, you can specify a version range instead of a specific version to install. For example, you may have noticed that
npm installset the version of Express to^4.19.2. Note the caret (^) at the front: this is called a caret version range, and it allows NPM to install any version of Express at or above 4.19.2 (so 4.20.0 would be OK, but not 5.0.0). If you didn’t have a dependency lock file, then every time you rannpm install, you might get a different version of Express. With a lock file, you get the exact version of Express that is defined in that lock file, which helps ensure that your builds are reproducible in all environments.
Now that Express is installed, you can rewrite the code in app.js to use the Express framework, as shown in Example 68:
Example 68. The sample app rewritten using Express.js (ch4/sample-app/app.js)
const express = require('express');
const app = express();
const port = process.env.PORT || 8080;
app.get('/', (req, res) => {
res.send('Hello, World!');
});
app.listen(port, () => {
console.log(`Example app listening on port ${port}`);
});This app listens on port 8080 and responds with "Hello, World!" just as before, but because you’re using a framework, it’ll be a lot easier to evolve this code into a real app by leveraging all the features built into Express: e.g., routing, templating, error-handling, middleware, security, and so on. You’ll see examples of this shortly.
There’s one more thing you need to do now that the app has dependencies: update the Dockerfile to install dependencies, as shown in Example 69.
Example 69. Install dependencies (ch4/sample-app/Dockerfile)
COPY *.json .
(1)
RUN npm ci --only=production
COPY *.js .There’s just one change to the Dockerfile:
| 1 | Run npm ci, which is similar to npm install, except it’s designed to do a clean install, where it
deletes any previously installed dependencies, installs them from scratch based on package-lock.json, and throws
an error if any dependencies defined in package.json don’t match what’s in package-lock.json. This is meant to
be used in automated environments, where you want reproducible builds. Note also the use of the --only=production
flag to tell NPM to only install the production dependencies. You can have a devDependencies block on
package.json where you define dependencies only used in the dev environment (e.g., tooling for automated testing,
as you’ll see shortly), and there’s no need to bloat the Docker image with these dependencies. |
Check everything works by building a Docker image and running it:
$ npm run dockerize
$ docker run -p 8080:8080 -it --init sample-app:0.0.1
Example app listening on port 8080If you open http://localhost:8080, you should see "Hello, World!" Congrats, you’re now managing dependencies with
NPM!
|
Get your hands dirty
To avoid introducing too many new tools, I used NPM as a build system in this blog post, as it comes with Node.js. However, for production, you may want to try out a more modern and robust build system, such as Yarn, Turborepo, or Lerna (full list). |
Now that you’ve seen how a version control system allows your team members to work on the same code, and a build system allows your team members to work the same way, let’s turn our attention to one of the most important tools for allowing your team members to get work done quickly: automated tests.
Automated Testing
Programming can be scary. One of the underappreciated costs of technical debt is the psychological impact it has on developers. There are thousands of programmers out there who are scared of doing their jobs. Perhaps you’re one of them.
You get a bug report at three in the morning and after digging around, you isolate it to a tangled mess of spaghetti code. There is no documentation. The developer who originally wrote the code no longer works at the company. You don’t understand what the code is doing. You don’t know all the places it gets used. What you have here is legacy code.
Legacy code. The phrase strikes disgust in the hearts of programmers. It conjures images of slogging through a murky swamp of tangled undergrowth with leaches beneath and stinging flies above. It conjures odors of murk, slime, stagnancy, and offal. Although our first joy of programming may have been intense, the misery of dealing with legacy code is often sufficient to extinguish that flame.
— Michael Feathers
Working Effectively with Legacy Code (Pearson)
Working Effectively with Legacy Code (Pearson)
Legacy code is scary. You’re afraid because you still have scars from the time you tried to fix one bug only to reveal three more; the "trivial" change that took two months; the tiny performance tweak that brought the whole system down and pissed off all of your coworkers. So now you’re afraid of your own codebase.
Fortunately, there is a solution: automated testing. The idea is to write test code to validate that your production code works the way you expect it to. The main reason to write automated tests is not that tests prove the correctness of your code (they don’t) or that you’ll catch all bugs with tests (you won’t), but that a good suite of automated tests gives you the confidence to make changes quickly.
The key word is confidence: tests provide a psychological benefit as much as a technical one. If you have a good test suite, you don’t have to keep the state of the whole program in your head. You don’t have to worry about breaking other people’s code. You don’t have to repeat the same boring, error-prone manual testing over and over again. You just run a single test command and get rapid feedback on whether things are working.
|
Key takeaway #4
Use automated tests to give your team the confidence to make changes quickly. |
In 2008, I had just started a job as a Software Engineer at TripAdvisor, and as my first task, my manager asked me to
add a new sort option to the web page that listed all the hotels in a city. It seemed like an easy task, and I was able
to get it done and pushed to production in my first week. The same day my new code went live, I was in my manager’s
office for our first one-on-one meeting, and I told him about getting the task done. He was excited and wanted to see
it, so I watched as he went to the hotel listings page for Paris, selected the new sort option, and waited. And waited.
And waited. It took nearly two hours for the page to load. Or maybe it was two minutes. It’s hard to tell when you’re
sweating profusely, and wondering if you’re going to be fired in your first week on the job. Later that
night—much later—I figured out that my sorting code called a function that, under the hood, made two
database calls. I was calling this function during sort comparisons, and as it takes roughly n log n comparisons to
sort n items, where n = 2,000 for a city like Paris, that works out to roughly 40,000 database calls for a single
page load.
I didn’t get fired that day. Good companies recognize that incidents like this aren’t caused by a single person, but by systemic failures, and use these incidents to improve their tools and processes. For example, what tooling could have caught this issue before it made it to production? Or what processes could we have put in place to mitigate the damage from such issues if they do make it to production? In Part 5, you’ll learn how continuous integration, canary deployments, and feature toggles can help answer these questions. This was also a chance for me to improve as a developer. I had tested my sorting feature manually, but I hadn’t written any automated tests, and as a result, nearly melted our database. From that experience, I learned about all the different types of automated tests:
- Compiler
-
If you’re using a statically-typed language (e.g., Java, Scala, Go, TypeScript), you can compile the code to identify (a) syntactic issues and (b) type errors. If you’re using a dynamically-typed language (e.g., Ruby, Python, JavaScript), you can pass the code through the interpreter to identify syntactic issues.
- Static analysis / linting
-
These are tools that read and check your code "statically"—that is, without executing it—to automatically identify potential issues. Examples: ShellCheck for Bash, ESLint for JavaScript, and Terrascan for OpenTofu (full list).
- Policy tests
-
In the last few years, policy as code tools have become more popular as a way to define and enforce company policies and legal regulations in code. Examples: Open Policy Agent (OPA) and Sentinel (full list). Many of these tools are based on static analysis, except they give you flexible languages to define what sorts of rules you want to check. Some rely on plan testing, as described next.
- Plan tests
-
Whereas static analysis is a way to test your code without executing it at all, plan testing is a way to partially execute your code. This typically only applies to tools that can generate an execution plan, such as OpenTofu, which has a
plancommand that shows you what changes the code would make to your infrastructure without actually making those changes, effectively running all the read operations of your code, but none of the write operations. You can write automated tests against this sort of plan output using tools such as OPA and Terratest (full list). - Unit tests
-
This is the first of the test types that fully execute your code. The idea with unit tests is to execute only a single "unit" of your code. What a unit is depends on the programming language, but it’s typically a small part of the code, such as one function or one class. You typically mock any dependencies outside of that unit (e.g., databases, other services, the file system), so that the test solely executes the unit in question. Had I written some unit tests for my sorting code at TripAdvisor, I would’ve had to mock out the database, and might’ve realized how many database calls my code was making, catching the bug before it made it to production. Some programming languages have unit testing tools built in, such as the testing package for Go and unittest framework for Python, whereas other languages rely on 3rd party tools for unit testing, such as JUnit for Java and Jest for JavaScript (full list).
- Integration tests
-
Just because you’ve tested a unit in isolation and it works, doesn’t mean that multiple units will work when you put them together. That’s where integration testing comes in. Here, you test multiple units of your code (e.g., multiple functions or classes), often with a mix of real dependencies (e.g., a database) and mocked dependencies (e.g., a mock remote service).
- End-to-end (E2E) tests
-
End-to-end tests verify that your entire product works as a whole. You run your app, all the other services you rely on, all your databases and caches, and so on, and test them all together. These often overlap with the idea of acceptance tests, which verify your product works from the perspective of the user or customer. If I had created an E2E test for my sorting code at TripAdvisor, I might have noticed that the test took ages to run on larger cities, and caught the bug then.
- Performance tests
-
Most unit, integration, and E2E tests verify the correctness of a system under ideal conditions: one user, low system load, and no failures. Performance tests verify the stability and responsiveness of a system in the face of heavy load and failures. If I had created performance tests for my sorting code at TripAdvisor, it would’ve been obvious that my change had severely degraded performance.
Automated tests are how you fight your fear. They are how you fight legacy code. In fact, in the same book I quoted earlier, Michael Feathers writes, "to me, legacy code is simply code without tests." I don’t know about you, but I don’t want to add more legacy code to this world, so that means it’s time to write some tests!
Example: Add Automated Tests for the Node.js App
Look again at the Node.js sample app code in Example 68, and ask yourself, how do you
know this code actually works? So far, the way you’ve answered that question is through manual testing, where you
manually ran the app with npm start and checked URLs in your browser. This works fine for a tiny, simple app, but
once the app grows larger (hundreds of URLs to check) and your team grows larger (hundreds of developers making
changes), manual testing will become too time-consuming and error-prone.
The idea with automated testing is to write code that performs the testing steps for you, taking advantage of the fact that computers can perform these checks faster and more reliably than a person. Let’s add an end-to-end test for the sample app: that is, a test that makes an HTTP request to the app, and checks the response. To do that, you first need to split app.js into two parts: one part that configures the app, and one that has the app listen on a port. That will allow you to more easily write automated tests for the part that configures the app, and to run those tests concurrently, without having to worry about getting errors due to trying to listen on the same port.
Example 70 shows how to update app.js to only configure the Express app:
Example 70. Update app.js to only configure the app (ch4/sample-app/app.js)
const express = require('express');
const app = express();
app.get('/', (req, res) => {
res.send('Hello, World!');
});
module.exports = app;Next, create a new file called server.js that imports the code from app.js and has it listen on a port, as shown in Example 71:
Example 71. Create server.js to listen on a port (ch4/sample-app/server.js)
const app = require('./app');
const port = process.env.PORT || 8080;
app.listen(port, () => {
console.log(`Example app listening on port ${port}`);
});Make sure to update the start command in package.json to now use server.js instead of app.js, as shown in
Example 72:
Example 72. Update the start command (ch4/sample-app/package.json)
"start": "node server.js",Next, you need to install some testing libraries, including Jest as a testing framework and
SuperTest as a library for testing HTTP apps. Use npm install to add these
dependencies, but this time, use the --save-dev flag to save them as dev dependencies. This way, they’ll be available
during development (where you run tests), but won’t be packaged into your app for production (where you don’t run
tests).
$ npm install --save-dev jest supertestThis will update package.json with a new devDependencies section, as shown in Example 73:
Example 73. Dev dependencies (ch4/sample-app/package.json)
{
"devDependencies": {
"jest": "^29.7.0",
"supertest": "^7.0.0"
}
}Next, update the test command in package.json to run Jest, as shown in Example 74:
Example 74. Update the test command to run Jest (ch4/sample-app/package.json)
"scripts": {
"test": "jest --verbose"
}Finally, you can add a test in a new file called app.test.js, as shown in Example 75:
Example 75. Add an automated test for the app (ch4/sample-app/app.test.js)
const request = require('supertest');
const app = require('./app'); (1)
describe('Test the app', () => { (2)
test('Get / should return Hello, World!', async () => { (3)
const response = await request(app).get('/'); (4)
expect(response.statusCode).toBe(200); (5)
expect(response.text).toBe('Hello, World!'); (6)
});
});Here’s how this test works:
| 1 | Import the app code from app.js. |
| 2 | Use the describe function to group several tests together. |
| 3 | Use the test function to define individual tests. |
| 4 | Use the SuperTest library (imported under the name request) to fire up the app and make an HTTP GET request to
it at the "/" URL. |
| 5 | Use the expect matcher to check that the response status code is a 200 OK. |
| 6 | Use expect to check that the response body is the text "Hello, World!" |
Use npm test to run this test:
$ npm test
PASS ./app.test.js
Test the app
✓ Get / should return Hello, World! (12 ms)
Tests: 1 passed, 1 total
Time: 0.308 s, estimated 1 sThe test passed! And it took all of 0.308 seconds, which is a whole lot faster than any manual testing you can do. And that’s just for one test; the difference in testing speed only increases as you add more tests. For example, add a second endpoint to app.js as shown in Example 76:
Example 76. Add a second endpoint to app.js (ch4/sample-app/app.js)
app.get('/name/:name', (req, res) => {
res.send(`Hello, ${req.params.name}!`);
});When you go to /name/xxx, this endpoint will return the text "Hello, xxx!" Under the hood, this works because the
/name/:name syntax tells Express.js to extract the :name part of the path and make it available under
req.params.name. Test this out by running npm start, opening up http://localhost:8080/name/Bob, and you
will see:
Hello, Bob!
Update app.test.js to add a test for this new endpoint, as shown in Example 77:
Example 77. Add an automated test for the new endpoint (ch4/sample-app/app.test.js)
test('Get /name/Bob should return Hello, Bob!', async () => {
const response = await request(app).get('/name/Bob');
expect(response.statusCode).toBe(200);
expect(response.text).toBe('Hello, Bob!');
});This test automates the /name/Bob check you just did manually. Re-run the tests:
$ npm test
PASS ./app.test.js
Test the app
✓ Get / should return Hello, World! (13 ms)
✓ Get /name/Bob should return Hello, Bob! (5 ms)
Tests: 2 passed, 2 total
Time: 0.339 s, estimated 1 sExcellent, you now have tests for both endpoints, and these tests run in just 0.339 seconds. However, there’s a
serious bug—a security vulnerability—hidden in that second endpoint. To see it, run npm start once more, and try
opening the following URL:
You should see something that looks like Figure 28:
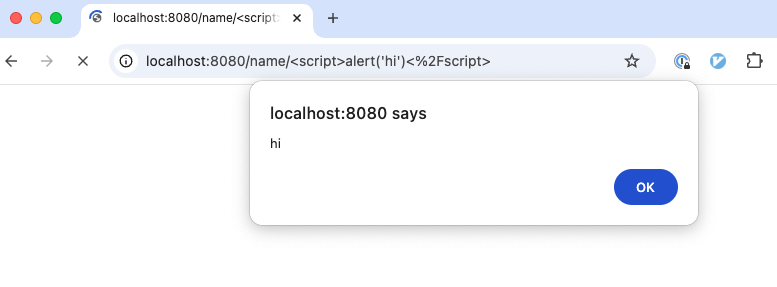
Figure 28. An example of an injection attack
What you just saw is an example of an injection attack (one of the most common types of attacks, as per the
OWASP Top Ten), where a user includes malicious code in their input, and your
application ends up executing that code. In particular, this was a cross-site scripting (XSS) injection attack, where
the malicious code that’s injected is a <script> tag (URL encoded, which is why you see funky characters like %3C
and %2F) that executes JavaScript code. The code it executed was alert("hi"), which is harmless, but it could’ve been
something far worse, such as the 2014 XSS vulnerability in eBay that
allowed hackers to gain access to seller accounts and steal payment details.
The way to prevent injection attacks is to sanitize all user-provided data by stripping out "unsafe" characters.
Which characters are "unsafe" depends on how you plan to use that data. For example, if you are using that data in a
query to a database, you need to strip out characters specific to the Structured Query Language (SQL), a topic
you’ll learn about in Part 9. If you are using that data in HTML, as in the Node.js sample app, you
need to escape characters specific to HTML: e.g., brackets (< and >).
A good way to fix this bug is to write an automated test for it first, specifying the expected (escaped) output, and then working on the implementation code until that test passes. This is known as test-driven development, a topic you’ll learn more about later in this blog post. Update app.test.js with a new test, as shown in Example 78:
Example 78. Add a test for sanitization (ch4/sample-app/app.test.js)
const maliciousUrl = '/name/%3Cscript%3Ealert("hi")%3C%2Fscript%3E';
const sanitizedHtml = 'Hello, <script>alert("hi")</script>!'
test('Get /name should sanitize its input', async () => {
const response = await request(app).get(maliciousUrl);
expect(response.statusCode).toBe(200);
expect(response.text).toBe(sanitizedHtml);
});You can see that this test runs the malicious URL from before, and that it is expecting the resulting HTML to be fully sanitized. Re-run the tests:
$ npm test
FAIL ./app.test.js
Test the app
✓ Get / should return Hello, World! (13 ms)
✓ Get /name/Bob should return Hello, Bob! (3 ms)
✕ Get /name should sanitize its input (3 ms)
● Test the app › Get /name should sanitize its input
expect(received).toBe(expected) // Object.is equality
Expected: "Hello, <script>alert("hi")</script>!"
Received: "Hello, <script>alert(\"hi\")</script>!"
32 | const response = await request(app).get(maliciousUrl);
33 | expect(response.statusCode).toBe(200);
> 34 | expect(response.text).toBe(sanitizedHtml);
| ^
at Object.toBe (app.test.js:34:27)
Tests: 1 failed, 2 passed, 3 total
Time: 0.254 s, estimated 1 sAs expected, the test fails, as the current code does not sanitize user input. Now you can work on the implementation
code until the test passes. The best way to sanitize input is to use battle-tested libraries to do it for you. For
sanitizing HTML, most HTML templating libraries will sanitize input automatically. Express.js works with a number of
HTML templating libraries, including Pug,
Mustache, and Embedded JavaScript (EJS). Let’s give EJS a shot. First,
use npm install to install EJS:
$ npm install --save ejsSecond, update app.js to use EJS as a template engine, as shown in Example 79:
Example 79. Configure the Express app to use EJS (ch4/sample-app/app.js)
const app = express();
app.set('view engine', 'ejs');Third, update the new endpoint in app.js as shown in Example 80:
Example 80. Render an EJS template (ch4/sample-app/app.js)
app.get('/name/:name', (req, res) => {
res.render('hello', {name: req.params.name});
});This code renders an EJS template called hello, passing it the :name parameter. Create this EJS template under
views/hello.ejs, with the contents shown in Example 81:
Example 81. The
hello EJS template (ch4/sample-app/views/hello.ejs)Hello, <%= name %>!In EJS, the <%= xxx %> syntax renders the value of xxx, while automatically sanitizing HTML characters. Note that
you also need to update the Dockerfile to copy the views folder into the Docker image, as shown in
Example 82:
Example 82. Copy the views folder (ch4/sample-app/Dockerfile)
COPY *.js .
COPY views viewsTo check that the EJS template is working, run the tests one more time:
$ npm test
PASS ./app.test.js
Test the app
✓ Get / should return Hello, World! (15 ms)
✓ Get /name/Bob should return Hello, Bob! (7 ms)
✓ Get /name should sanitize its input (2 ms)
Tests: 3 passed, 3 total
Time: 0.32 s, estimated 1 sCongrats, all your tests are now passing! And these tests take just 0.32 seconds, which is far faster than you could test those three endpoints manually.
|
Get your hands dirty
Here are a few exercises you can try at home to go deeper:
|
The process you just went through is a good example of the typical way you write code when you have a good suite of automated test to lean on. You make a change, you re-run the tests, you make another change, you rerun the tests again, and so on, adding new tests as necessary. With each iteration, your test suite gradually improves, you build more and more confidence in your code, and you can go faster and faster.
|
Key takeaway #5
Automated testing makes you more productive while coding by providing a rapid feedback loop: make a change, run the tests, make another change, re-run the tests, and so on. |
Rapid feedback loops are a big part of the DevOps methodology, and a big part of being more productive as a programmer. Note that this not only makes you more productive in fixing the HTML sanitization bug, but now you also have a regression test in place that will prevent that bug from coming back. This is a massive boost to productivity that often gets overlooked.
|
Key takeaway #6
Automated testing makes you more productive in the future, too: you save a huge amount of time not having to fix bugs because the tests prevented those bugs from slipping through in the first place. |
All the benefits of automated testing apply not only to application code, but infrastructure code, too. Let’s try it out in the next section.
Example: Add Automated Tests for the OpenTofu Code
As an example of infrastructure testing, let’s add an E2E test using
OpenTofu’s built-in test command for the lambda-sample OpenTofu
module you created in Part 3. Copy that module, unchanged, into a new folder for this
blog post:
$ cd fundamentals-of-devops
$ mkdir -p ch4/tofu/live
$ cp -r ch3/tofu/live/lambda-sample ch4/tofu/live
$ cd ch4/tofu/live/lambda-sampleThe blog post series’s sample code repo includes a module called test-endpoint in the
ch4/tofu/modules/test-endpoint folder that can make an HTTP request to an endpoint you specify. You can use this
module to test lambda-sample, sending HTTP requests to the function URL, and checking you get the expected response.
Create a file called deploy.tftest.hcl with the contents shown in Example 83:
Example 83. OpenTofu test (ch4/tofu/live/lambda-sample/deploy.tftest.hcl)
run "deploy" { (1)
command = apply
}
run "validate" { (2)
command = apply
module { (3)
source = "brikis98/devops/book//modules/test-endpoint"
version = "1.0.0"
}
variables { (4)
endpoint = run.deploy.function_url
}
assert { (5)
condition = data.http.test_endpoint.status_code == 200
error_message = "Unexpected status: ${data.http.test_endpoint.status_code}"
}
assert { (6)
condition = data.http.test_endpoint.response_body == "Hello, World!"
error_message = "Unexpected body: ${data.http.test_endpoint.response_body}"
}
}These tests go into files with the .tftest.hcl extension, use the same language (HCL) as your OpenTofu code, and
they consist of run blocks that are executed sequentially:
| 1 | The first run block will run apply on the lambda-sample module itself. |
| 2 | The second run block will run apply as well, but this time on the test-endpoint module in (3), followed by
the assertions in (5) and (6). |
| 3 | The module block tells the run block to run apply on the test-endpoint module from the
blog post series’s sample code repo. |
| 4 | Read the Lambda function URL output from the lambda-sample module and pass it in as the endpoint input
variable for the test-endpoint module. |
| 5 | assert blocks are used to check if the code actually works as you expect. This first assert block checks that
the test-endpoint module’s HTTP request got a response status code of 200 OK. |
| 6 | The second assert block checks that the test-endpoint module’s HTTP request got a response body with the text
"Hello, World!" |
To run this test, authenticate to AWS, and run tofu init and tofu test (these tests take several minutes to run, so
be patient):
$ tofu init
$ tofu test
deploy.tftest.hcl... fail
run "deploy"... pass
run "validate"... fail
╷
│ Error: Test assertion failed
│
│ on deploy.tftest.hcl line 23, in run "validate":
│ 23: condition = data.http.test_endpoint.response_body == "Hello, World!"
│ ├────────────────
│ │ data.http.test_endpoint.response_body is "Fundamentals of DevOps!"
│
│ Unexpected body: Fundamentals of DevOps!Whoops, the test failed. That’s because at the end of Part 3, you updated the Lambda function to respond with "Fundamentals of DevOps!" instead of "Hello, World!" The good news is that the test caught this issue. Update tofu/live/lambda-sample-app/src/index.js to respond with "Hello, World!" and re-run the test:
$ tofu init
$ tofu test
deploy.tftest.hcl... pass
run "deploy"... pass
run "validate"... pass
Success! 2 passed, 0 failed.Congrats, you now have automated tests for your infrastructure! Under the hood, OpenTofu ran apply, deployed your
real resources, validated they worked as expected, and then, at the end of the test, ran destroy to clean everything
up again. With this sort of testing, you can have a reasonable degree of confidence that your module creates
infrastructure that really works.
|
Get your hands dirty
Here are a few exercises you can try at home to go deeper:
|
Now that you’ve tried a few examples of automated tests, let’s go through some recommendations for how to make your testing more effective.
Testing Recommendations
Almost any kind of automated testing is better than none, but there are some automated testing patterns that tend to be more effective than others. The following are my recommendations:
-
The test pyramid
-
What to test
-
Test-Driven Development (TDD)
Let’s go through these one at a time, starting with the test pyramid.
The test pyramid
One question that comes up often is, which testing approach should you use? Unit tests? Integration tests? E2E tests? The answer is: a mix of all of them! Each type of test has different types of errors they can catch, plus different strengths and weaknesses, as summarized in Table 8:
| Compiler | Static analysis | Policy tests | Plan tests | Unit tests | Integration tests | E2E tests | Perf tests | |
|---|---|---|---|---|---|---|---|---|
Syntax errors |
|
|
|
|
|
|
|
|
Type errors |
|
|
|
|
|
|
|
|
Compliance errors |
|
|
|
|
|
|
|
|
Unit functionality |
|
|
|
|
|
|
|
|
Interaction of units |
|
|
|
|
|
|
|
|
System functionality |
|
|
|
|
|
|
|
|
Functionality under load |
|
|
|
|
|
|
|
|
Speed |
|
|
|
|
|
|
|
|
Stability |
|
|
|
|
|
|
|
|
Ease of use |
|
|
|
|
|
|
|
|


The only way to be confident your code works as expected is to combine multiple types of tests. That doesn’t mean that you use all the different types of tests in equal proportion. In most cases, you want the proportion of tests to follow the test pyramid shown in Figure 29:
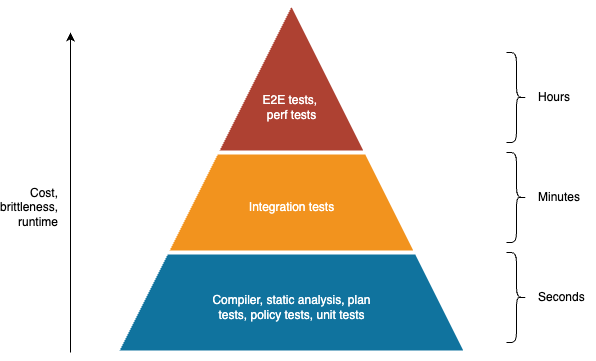
Figure 29. The test pyramid
The idea of the test pyramid is that, as you go up the pyramid, the cost and complexity of writing the tests, the brittleness of the tests, and the runtime of the tests all increase. Therefore, you typically want to do as much testing as you can with the types of tests that are fast to write, fast to run, and stable, which means the majority of your testing (the base of the pyramid), should leverage the compiler, static analysis, plan tests, policy tests, and unit tests. You then have a smaller number of integration tests (the middle of the pyramid), and an even smaller number of high-value end-to-end and performance tests (the top of the pyramid).
Moreover, you don’t have to add all the different types of tests at once. Instead, pick the ones that give you the best bang for your buck and add those first. Almost any testing is better than none. If all you can add for now is static analysis or unit tests, then that’s still better than no tests. Or maybe the highest value in your use case is a single end-to-end test that verifies your system really works: that’s a perfectly fine starting point, too. Start with something, anything that gives you value, and then add more and more tests incrementally.
What to test
Another question that comes up often is, what should you test? There are some testing purists out there who believe that every line of code must be tested and that your tests must achieve 100% code coverage. I am not one of them.
There is no doubt that tests offer a huge amount of value. But they also have a cost. Writing tests, maintaining them, and ensuring they run quickly and reliably can take a lot of time. In many cases, this overhead is worth it. In some cases, it’s not. In practice, I’ve found that deciding if you should invest in adding automated tests for a certain part of your code comes down to continuously evaluating your testing strategy and making trade-offs between the following factors:
- The cost of bugs
-
The higher the cost of bugs, the more you should invest in automated testing. If you’re building a prototype that you’ll most likely throw away in a week, the cost of bugs is low, and tests aren’t as important. If you’re working on code that processes payments, manages user data, or is related to security, the cost of bugs is high, and automated tests are more important.
- The likelihood of bugs
-
The higher the likelihood of bugs, the more you should invest in automated testing. As a general rule, the larger the codebase, and the more people that work on it, the higher the likelihood of bugs. To scale, you’ll have to invest more in testing.
- The cost of testing
-
The lower the cost of testing, the more you should invest in automated testing. With most languages and tools, setting up unit tests is so easy, the tests run so fast, and the improvement to code quality and correctness is so high that it is almost always worth investing in unit tests. On the other hand, integration tests, end-to-end tests, and performance tests are each progressively more expensive to set up, so you need to be more thoughtful how much to invest in those.
- The cost of not having tests
-
It’s possible to get lost in a cost/benefit analysis and conclude that tests aren’t worth it. Many companies do just that. But you have to remember that this has a cost, too: fear. When you work in a codebase without tests, you end up with a bunch of developers who are afraid to make changes. So if every time you go to add a new feature or deploy something to production, you find your team hesitating and stalling, then you are paying a high cost for not having tests. In those cases, the cost of automated tests is may be lower than the cost of having a paralyzed dev team.
One thing that impacts both the cost of writing tests and the benefits you get from those tests is when you write those tests. Trying to add tests several years after you write the code tends to be more expensive and not as beneficial; adding tests a day after you write the code tends to be cheaper and have more benefits; and as it turns out, adding tests before you write the code may be the lowest cost and most beneficial option of all, as discussed in the next section.
Test-Driven Development (TDD)
The mere act of trying to write tests for your code will force you to take a step back and ask some important questions: How do I structure the code so I can test it? What dependencies do I have? What are the common use cases? What are the corner cases?
If you find that your code is hard to test, it’s almost always a sign that it needs to be refactored for other reasons, too. For example, if the code is hard to test because it uses lots of mutable state and side effects, then it’s likely that code is also hard to understand, maintain, and reuse. Or if the code is difficult to test because it has many complex interactions with its dependencies, then it’s likely that the code is too tightly coupled and will be difficult to change.
In other words, tests not only help you write correct code, they also provide feedback that leads to a better design. You get the most benefit from this feedback if you write the test code before you write the implementation code. This is known as test-driven development (TDD). The TDD cycle is:
-
Add placeholders for the new functionality (e.g., function signatures), just enough for the code to compile, but not the full implementation.
-
Add tests for the new functionality.
-
Run all the tests. The new tests should fail (it’s always a good idea to check your tests can fail, and that when they do, you get a clear error message), but all other tests should pass.
-
Implement the new functionality.
-
Rerun the tests. Everything should now pass.
-
Refactor the code until you have a clean design, re-running the tests regularly to check everything is still working.
One of the unexpected consequences of using TDD is that the design of your code emerges as a result of a repeated test-code-test cycle. Without TDD, you often end up shipping the first design you can think of; with TDD, the very act of trying to figure out how to write tests forces you to iterate on your design, and you often ship something more effective.
In fact, TDD affects not only the design of small parts of your code, but also the design of your entire system. Some TDD practitioners use TDD only for writing unit tests up front, but you can also use TDD with integration tests, end-to-end tests, and performance tests. Thinking about integration tests up front forces you to consider how the different parts of your system will communicate with one another. Thinking about end-to-end tests up front forces you to think through how to deploy everything. Thinking about performance tests up front forces you to think about where your bottlenecks are and what metrics you need to gather to identify them.
Being forced to think through all of this up front, simply because you try to write tests first, can have a profoundly positive impact on the final design. If I had used TDD to write my sorting code at TripAdvisor, I would’ve written the tests first, realized that my code depended on the database, and that would’ve led to a different design that prevented the bug before I had written even a single line of implementation code. If you want to see more examples of how TDD leads to better code, see the Chapter 4 recommended reading.
It’s also worth mentioning that writing tests up front increases the chances that you’ll have thorough test coverage, because it forces you to write code incrementally. Tests can be tedious to write, so it’s easier if you only have to do a few at a time: write a few tests and then a little bit of implementation, then a few more tests, then a little more implementation, and so on. It’s less effective to spend weeks writing thousands of lines of implementation code and then try to go back and do a marathon session of writing test cases for all of it. You’ll get bored and end up with far less code coverage. You’ll also miss many corner cases because you’ll forget the nuances of implementation code you wrote weeks ago.
Note that not all types of coding are a good fit for TDD. For example, if you’re doing exploratory coding, where you don’t yet know exactly what you’re building, and you’re just exploring the problem space by coding and messing with data, TDD might not be a good fit. If you don’t know what result you’re looking for, you can’t write a test for it. In that case, writing tests shortly after you write the code is still valuable.
Also, if you’re working on an existing codebase that doesn’t have any tests (a legacy codebase), then you might feel like TDD doesn’t apply, as the development is already done. However, you can still use TDD for any changes you make to the codebase. It’s similar to the standard TDD process, but with a couple steps at the front:
-
Write a test for the functionality you’re about to modify.
-
Run all the tests. They should all pass.
-
Use standard TDD for any new functionality or changes you’re about to make.
This way, you incrementally build out the test coverage for the codebase, specifically in those parts of the code that you’re modifying. Each test you add for the existing functionality gives you a way to prove to yourself that you truly understand how that code works, which can make it less scary to start making changes; and each test you add for new functionality gives you all the standard benefits of TDD. And when you’re done, you leave the codebase with at least a few tests in place, which will make it less scary—make it feel less like legacy code—for the next developer.
TDD is also useful for bug fixing. If you found a bug in production, that means there was no test that caught the problem, so a good way to start on the fix is, as a first step, to write a failing test that reproduces the bug (test-driven bug fixing), just as you did when fixing the HTML sanitization bug in the sample app earlier in this blog post. The failing test proves you understand the cause of the bug and, after you fix it, leaves you with a regression test that will prevent the bug from coming back.
|
Reminder: commit your code!
While working through this blog post, you’ve probably made a lot of code changes in the ch4 folder: e.g., updating package.json with build steps and dependencies, switching to an Express app, adding automated tests for the app and infrastructure code, and so on. If you haven’t already, make sure to commit all this code—especially changes in the sample-app and tofu folders—so you don’t lose it and can iterate on it in future posts. |
Conclusion
You’ve now taken a big step forward in allowing your team members to collaborate on your code by following the 6 key takeaways from this Part:
-
Always manage your code with a version control system.
-
Use a build system to capture, as code, important operations and knowledge for your project, in a way that can be used both by developers and automated tools.
-
Use a dependency management tool to pull in dependencies—not copy & paste.
-
Use automated tests to give your team the confidence to make changes quickly.
-
Automated testing makes you more productive while coding by providing a rapid feedback loop: make a change, run the tests, make another change, re-run the tests, and so on.
-
Automated testing makes you more productive in the future, too: you save a huge amount of time not having to fix bugs because the tests prevented those bugs from slipping through in the first place.
This is terrific progress, but it doesn’t solve the collaboration problem fully. You have a version control system, but if teams go off and work in branches for months, it becomes difficult to merge their work back together; you have automated tests, but developers don’t always remember to run them, so broken code still slips by; and you have a build system that automates some operations, but deployments are still largely manual. To collaborate efficiently as a team, you not only need to use version control, build systems, and automated tests, but you also need to combine them in a specific way, using two software delivery practices. These practices are called continuous integration and continuous delivery, and they are the focus of Part 5.
Update, June 25, 2024: This blog post series is now also available as a book called Fundamentals of DevOps and Software Delivery: A hands-on guide to deploying and managing software in production, published by O’Reilly Media!
Last updated 2025-02-17 01:44:24 UTC


